80MM Portable MINI Thermal Printer Instruction Manual
Version Feb, 2016 Notice • All rights reserved. Reproduction of any part of this manual in any form whatsoever, without manufacturer’s express permission is forbidden. • The contents of this manual are subject to change without notice. • All efforts have been made to ensure the accuracy of the contents of this manual at the time of going to press. However, should any errors be detected, manufacturer would greatly appreciate being informed of them.
Notes on safety This section presents important information intended to ensure safety and effective use of the printer. Please read carefully. Be sure to use the specified battery and power source provided by our company. Connection to an improper power source may cause fire , explosion or damage to the printer. Don’t put the battery into the fire or water, don’t disassemble or modify the battery, don’t be short circuit, otherwise may result in injury or fire even explosion.
1.Features & Application area 一.Features It can print 80mm width thermal paper Paper dimensions 40mm High-speed,Clear printing Super power lithium electricity, standby time can reach 5-6 days Auto sleep, auto awake, save electricity small size、light weight、reliable performance、simple to connect、 easy to use 二.Application area Compared to the traditional thermal receipt printer, Mini printer has smaller body, more reliable capability, more steady printing and portable advantages.
2.Specification Printing Method: Direct Line Thermal Speed: 70mm/sec Reliability TPH Life: 100000000 pulse / dot or 100km Resolution: 203DPI (8dot/mm) Printing Width: 72mm (576dot) Paper Width: 79.5± 0.5mm Paper thickness: 0.06-0.08 mm Roll Diameter: φ≤40mm Power: rechargeable lithium battery/NI-MH battery Battery: 7.4VDC/2000mAh Charging method: external charger Print parameters: support to download the Logo trademark Character:Chinese character library (one-level,two-level);24*24 dots;support GB18030(e.
Humidity: 10~90% Weight: 260g Barcode Types: 1DBarcode: UPC-A/UPC-E/JAN13(EAN13)/JAN8(EAN8)/CODE39/ITF/CODABAR/CODE93/CODE128 2D Barcode:QR CODE 3.
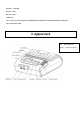
4.Communication Interface 1. RS232(COM):standard RS232 Communications Protocol 2. USB:standard USB Communications Protocol 3. Bluetooth 2.0 / 4.0 Communication Protocol 5.The installation of the paper roll The printer use 80MM thermal paper, and adopt to easy paper loading. So the paper is very convenient install. Paper diameter Max 40mm.
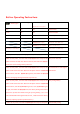
Button Operating Instructions (Green Light) ERROR(Red Light ) CHARGE(Red Printer Status Light/Green Light) OFF OFF OFF Printer Close Flash OFF OFF Printer dormant ON(Always) OFF OFF Printer open and have paper ON(Always) Flash OFF Printer Open , without paper CHARGE(Red Light) Charged with Battery CHARGE(Green Light) Full of Battery Display 1 or 2 shelf Low power of Battery Hold down power for 3 seconds Printer OPEN/OFF Under power on, the paper feeding begins when press 【FEED】 bu
button at the same time. Wait until the power indicator &【ERROR】led are both on, and then 【ERROR】led goes out, then loosen the【MODE】button. The printer turns into the hexadecimal printing mode and print the presentation.Way to quit hexadecimal printing : The way to quit hexadecimal printing mode is switch off the printer . 6.
- Find the File Named “ SDK” from the CD driver, Then follow the path : “ BLUETOOTHDEMO ----bin----PrintDemo.APK “ , install it in your Android phone. (Default pairing password for Bluetooth connection is “ 1234” ) Step 3: - Connect your cell phone with our printer once installation done . Step 4: - Find this icon and open it. click on the "Connect Printer" after the connection successfully, click on the "Print Test Page", the printer will work.
7.Operating Manual for IOS OS Download the Test Tools “Printer-X” from App Store,as below: (Image 1) 2.
3. In“Printer-X”will search “BlueTooth Printer” (Image 3) 4. Connect successful, put content into Edit Box to test printing.
(Image 4) (Image 5) 8.The Bluetooth configuration Step1: Make sure your device (like PC, Note Book) has Bluetooth function, then once the Bluetooth for your device is activated, you will see the Bluetooth sign right bottom side of your device(like PC) screen.
Step2:Power on the Bluetooth printer. Step3:To add the Bluetooth printer, please left-click the click “Add a Bluetooth Device” ,then you will enter wizard screen , please choose “My device is set up according and ready to be found”click “Next”(showed as below).
Step4:if you can see screen as below,then the device is searching the bluetooth printer,please wait.
Step5:Once the Bluetooth printer is found. You can see it listed on the screen, click “Next” Step6:Choose “Let me choose my own passkey”, then enter “1234”(this is factory default passkey, if you want to change it, you have to inform us to set the new passkey for you in our factory before shipping),then click “Next”.
Step7:if you can see the screen as below, that means the Bluetooth printer is already connected. Please notice the assigned COM ports ,then Click”Finish”. (Note: The Bluetooth device will automatically assign a COM port.) Step8: Now if you want to test if the printer is OK to print, you could use a com tool , and send printed data to Outgoing COM port( just as above image shown: COM5). (Com tool setting is 9600,N,8,1.
9.How to use the ports of USB/Serial(RS232) Note: Ensure the printer is working before using,and paper is put on the warehouse. 1、Enter the DC driver,click the related files(printer driver software of 58mm/80mm series)and install.
3 、please read the related terms carefully,and install it as agreement as below 4、Click”next step” ans show as below(customer is available for modifying channel of driver installation or default one)
5 、Click the button”next step”again and show as below and install it: 6、After installation,the related interface will be shown as below,select operation system of your computer and printer model,click”USB port for testing”, if you communication with USB port, USB port of computer will be identified automatically .
7、Click the button”Start Installation” and shown as below.
8.
9.2 Serial port to be used (if you choose a serial print) 1.
2.
You can see the setting parameters of serial port from self-test page, Click "Apply", then click "OK" (Note: This setting must consistent with the setting parameters of serial port from the printer self-test page, otherwise it will be garbled case) appears as shown below:
Click "Apply" again. 3.
If the printer prints a normal page, then it shows that the work was successful.
10.Cleaning of printer head Cleaning of printer When the printer has the following conditions, you should clean the printer head: ① The printer does not print clearly and the thermal paper is Ok. ② The printer Print pages lengthways is not clear ③ It’s getting too noisy while feeding paper or printing. Printer head cleaning steps are as follows: 1. Power off the printer and open the paper room cover. Remove the thermal paper roll. 2.
11.General Troubleshooting 1: Why serial port printer printing messy code? A: Ensure the baud rate setting in the PC is same as the printer baud rate. ( we can see printer baud rate from self test page) 2: Self printing test is ok,but printer does not work after driver installation. A: Recheck the installation according to above installation wizard and see if we selected the right port or ask service center for advice if needed.
7. Printing speed is very slow for serial printer A: follow this path and change the set accordingly : Driver -- Properties -- Device Settings -- Print Mode -- Print as soft font. 8. Water or other liquid spills into the printer A: Cut off the power,we can dry the main board or printer head with a hair dryer, careful of the temperature ( average 50 degree is ok ) 9. The printer can't open A:The battery maybe without electricity,please use power adapter to charge.
This device complies with Part 15 of the FCC Rules. Operation is subject to the following two conditions: (1) this device may not cause harmful interference, and (2) this device must accept any interference received, including interference that may cause undesired operation. Changes or modifications not expressly approved by the party responsible for compliance could void the user's authority to operate the equipment.