
User's Manual


-10-
3. Basic Operation
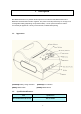
3-1. indicator light & printer status
There are Three indicators, they are red and blue【CHARGE】light, red【ERROR】light, and blue
【BATTERY】indicator. The meanings of each indicators are as
below:
【CHARGE】indicator
Blue light constant on: charging is completed;
Red light constant on: in charging;
Blue and red lights on: mistakes occur, please check whether the battery is
good contact or not, and the temperature is normal or not.
【ERROR】indicator
Constant on slow flashing: printer out of paper
Constant on quick flashing: printer has mistakes.
【BATTERY】indicator
The battery indicators are composed by three parts in order to show the battery status.
Three parts light on: battery is high.
Two parts light on: battery is medium.
One part light on: battery is low.
Minimum part light flashing: battery is extremely low, it must be charged at once.
Three parts light flashing at the same time: power supply should be over voltage (external power
supply without battery) .
3-2. Operation
3-2-1. Switch On
Press【POWER】button for about 2 seconds, the battery indicator is on.
When the printer is powered by battery, battery indicator shows power of the battery. When the
printer is powered by external power supply without battery, the battery indicators are all flashing at
the same time.
3-2-2. Switch Off
Under status of switch on, pressed the 【POWER】button for 2 seconds, the battery indicator goes
out, then loosen the 【POWER】button, the printer is off.
3-2-3. Paper Feeding
Under the normal working status, the paper feeding begins when press 【FEED】 button, and stop
when loosen【FEED】 button.
3-2-4. Selftest
User can check the printer’s current setting at anytime by printing Selftest page.