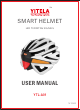
TM SMART HELMET LED TURNITNG SIGNALS USER MANUAL YTL-A01 V.1.5.
PRODUCT INTRODUCTION............................... 1 HELMET CHARACTERISTICS............................ 1 PACKING DETAILS..............................................1 HELMET & REMOTE CONTROLLER..................2 HELMET FUNCTIONS...........................................3 HOW TO WEAR YOUR HELMET..........................4 REMOTE CONTROLLER INSTALLATION...........7 TECHNOLOGY PARAMETERS...........................
Thanks for buying this smart helmet. It will give you new feeling of safety by cycling on the road. It can not only protect users’ life safety, but also provides versatile functions of LED turning signals for you. Meanwhile, the fashion design of smart helmet gives riders wonderful experience and excellent feelings as a beautiful landscape on the road. This smart helmet is suitable for bicycle riders.
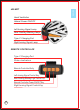
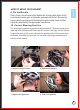
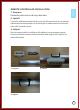
Head Ventilation Helmet Power ON/OFF Left-turning Signal Lamp Rear Flashing Warning Lamp Type-C Charging Port Right-turning Signal Lamp REMOTE CONTROLLER Type-C Charging Port Status Indicators Remote Controller Body Left-turning Signal Control Key Rear Flashing Warning Light Control Key Remote Controller Power ON/OFF Key Right-turning Signal Control Key 2 ENGLISH HELMET
ENGLISH HELMET FUNCTIONS Helmet Power ON/OFF Long press the helmet power button to turn on the helmet. Long press again to turn off the helmet. In addition, the helmet will automatically shut down after 4 hours without any operation. Helmet Indicator When the helmet power indicator flashes slowly, which means it’s time to charge. Helmet Warning Lights The warning light has four working modes, which can be switched through the remote control.
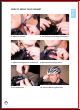
2. Tighten the Buckle The buckle is the main way to fix the helmet. Before wearing, be sure to ghten the buckle and fix it at one end of the helmet. The reserved length of the buckle is recommended to be determined by yourself according to your needs. 3. Adjust the Tightness A er wearing the helmet, you will touch a knob at the back of the helmet. Turn the knob to adjust the ghtness of the helmet. The comfortable handle of the knob will make you more focused on the ghtness experience. 4.
ENGLISH HOW TO WEAR YOUR HELMET 9. Fix the Buckle Finally, there is the extra part of the fixed buckle. A rubber band used to fix the excess buckle can be seen on the buckle connected with the bolt. Remove the helmet, pass the excess part of the buckle through the rubber band, and then adjust the rubber band to the appropriate fixed position. 10. Correct Wearing Position The correct wearing posi on can generally be determined easily.
6 5. Adjust Y-buckle 6. The Pulling & Inserting of Fasteners 7. Adjust the Tightness of the Chin 8. Recommended Tightness 9. Fix the Buckle 10.
1. Prepare ENGLISH REMOTE CONTROLLER INSTALLATION 1. Prepare Prepare the remote control and fixing rubber band 2. Install First put the rubber band around the hook on one side of the remote control, then wrap the rubber band around the handlebar rod, and finally put the rubber band on the hook on the other side of the remote control. 3.
Model Material Size Weight Suitable for Waterproof Cer fica on Ba ery Capacity Max. Power Consump on Working Dura on Charging Power Charging Time Turning Signal Light Warning Lights Wireless Transmission 8 YTL-A01 EPS PC ABS Silicone 27*21*17CM Helmet 360g/ Controller 30g 59cm-62cm IPX4 CE EN1078/CPSC/RoHs/FCC 420mAh Lithium Polymer 42mAh/4.2V 24Hours/3-4Weeks 5V 210mAh About 2 Hours Max. 3.14lm Max:9.
This device complies with part 15 of the FCC Rules. Operation is subject to the following two conditions: (1) this device may not cause harmful interference, and (2) this device must accept any interference received, including interference that may cause undesired operation. Any changes or modifications not expressly approved by the party responsible for compliance could void the user's authority to operate the equipment.