
Installation Manual


4
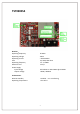
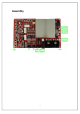
Sensitivity debugging:
Sensitivity Control VR1 adjusts the signal level of the detected RF that is received by the
antenna. VR1 is normally in the full CW position. This is the maximum gain setting. If there is
a high noise environment, VR1 could be adjusted CCW to lower the system gain, thus
reducing the overall noise level. Be aware that reducing the gain using VR1 will also reduce
the detection range.
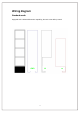
Sensitivity Tuning:
Turn VR1 clockwise to increase sensitivity
Turn VR1 anti-clockwise to decrease sensitivity
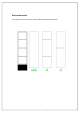
If DS1 DS2 DS3 do not lit up, this means perfect condition (no noise).
If only DS1 lit up, the condition is good.
When DS2 and DS3 lit up, there is high interference, must resolve and reduce
sensitivity until
Keep only DS1 blink to ensure normal operation.
Auto Resonance Control and frequency selection:
jumper A is Auto Resonance Control, Plug in 2—3 the work in the Auto Resonance
Control, which can automatically lock lever interference frequency, to prevent false
positives. F is the frequency selection jumper, Plug in 2—3 the work in narrowband,
Plug in 1—2 the work in broadband.
The alarm sound frequency and time selection:
DIP switch SW1 RATE frequency selection for the alarm sound, the device has two
different alarm sound frequency, the user can choose according to their preferences
alarm sound, TIME Select the length of the alarm sound, 3 and 5 second
Alarm sound intensity debugging:
The Volume Control VR2 is used to adjust the volume level of the alarm sounder. VR2 is
normally in the full CW position. This is the maximum volume setting. If the volume has to
be reduced in a particular store environment, VR2 can be adjusted CCW until the desired
volume is reached.
No Synchronizing
No interconnecting cable required.
Improves overall appearance.
Reduces installation time.