Safety Precautions z Do not subject the device to severe impact or drop it from heights. z Do not use the device in extreme hot or cold, dusty or damp conditions. Do not expose it to direct sunlight. z Avoid using the device near strong magnetic fields. z Normal functioning of the product may be disturbed by ESD. If so, simply reset z z z z z z z z z z z z z z z z and restart the device following the instruction manual.
with the same or equivalent type. z The battery (battery or batteries or battery pack) should not be exposed to excessive heat such as sunlight, fire or the like. z Please follow responsible procedures for battery disposal. z If the power adaptor disconnected from the device, the device will remain operable as long as the battery has sufficient charge. z The power adaptor is a CLASS II apparatus with double insulation, and no external ground is provided.
Listening Cautions z This product respects the current regulations for limiting the output volume of z z z z z consumer audio devices to a safe level. By listening to your device with headphones or earbuds at high volumes, you run the risk of permanent damage to your ears. Even if you get used to listening at high volumes and it seems normal to you, you still risk the possibility of damaging your hearing. Reduce the volume of your device to a reasonable level to avoid permanent hearing damage.
Table of Content Safety Precautions...................................................................................................... 1 Listening Cautions ...................................................................................................... 3 Feature Summary ....................................................................................................... 5 Accessories ................................................................................................................
Feature Summary Wi-Fi Connectivity With the latest Wi-Fi technology, this device can connect you to the Internet wherever you are. 8.4” Touch Screen Touch or slide your finger on the screen, the screen responds instantly. Third-party Application Support With the built-in Android TM OS, you can install a large number of third-party applications in this device. Built-in Camera Lens Equipped with the built-in camera lens, this unit can function as a webcam or video recorder.
n n. Memory card slot Charging Battery The device has a built-in rechargeable battery. No extra battery installation is required. Just charge the device when it indicates low battery. To charge the battery, connect the device to any standard wall outlet via the DC-IN port using the power adaptor. It takes about 5 hours to fully charge the battery. When the battery is fully charged, the charge indicator should light up in green. During charging, the indicator lights up in red. Note: a.
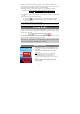
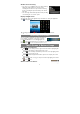
Instantly, two removable disk drives will show on your computer standing for the internal memory of the device, and the memory card inside it. Now you can copy files from or to the memory card just as you do on your hard drive. (4) When the device is connected to computer, you can drag from the top bar downwards any time to display the USB notification message as shown. Drag downwards (5) To disconnect the device to computer, select and tap on the button “Turn off USB storage”.
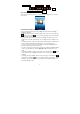
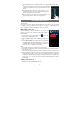
Go to Home Screen Battery level Time Return Menu USB connection WiFi connection Volume down/up The extended Home Screen Slide your finger horizontally on the screen to go to the left or right panel of the extended Home Screen. Customize the Home Screen You can customize the Home Screen by adding/removing shortcuts and widgets, changing the wallpaper. y To add a Home Screen item (shortcuts, widgets, folders etc.), tap on the Menu icon and then select “Add” .
Weather Forecast Setting y You can choose a worldwide city you are interested in by tapping the weather indicator. Locate the city by selecting the state where the city is and then selecting the city, or inputing the city name directly in the “Search City” filed. y You can change the default temperature unit by checking or unchecking the “Use Celsius” option. Display all Applications The device has many useful applications pre-installed. You can tap the Application Tab to display them.
y When watching a video or listening to music, you can tap on the progress bar to playback any designated section of the file. You can drag the cursor of the progress bar to any other elapsed time point of the file. y In different browsers (File, Music, Video, Photo, etc.), you can hold your finger on the screen and then drag up and down to scroll the file list up and down. y In some browsers (File, Music, Video, Photo, Web etc.), you may hold your finger on an item to display options.
(1) In the “Wi-Fi settings” screen, tap the Menu icon , and then tap “Scan.” (2) If the Wi-Fi network you want to connect to does not appear in the list, scroll down the screen, then tap “Add a Wi-Fi network.” Enter the required information, and then tap “Save.” To set up IP address manually, tap the Menu icon , tap “Advanced” and then input all required network parameters (“Regulatory domain,” “IP address,” etc). You can obtain these parameters from the network administrator.
keyboard and then slide your finger to a character on the keyboard. Release your finger if you see two lines appear on the character. Using the Web Browser y y You can scroll the screen up and down by tapping on the page and dragging it up or down (be careful not to tap a link until you are ready!). To open a link, simply tap it. You can open several web pages at a time, view them all at once on the screen, and then tap one of them to view it in full screen. .
Refresh Forward More windows to view it in full screen, or tap the Close icon in the small window to close the window. “Refresh” will refresh the current web page, if it has stopped loading. Will go to the next page that you browsed. Will give you access to other options (“Add Bookmark”, “Find on page,” “Select text,” “Page info,” “Downloads,” “Settings” etc.). Reading E-Books Transfer E-books from Computer Before reading, you need to transfer or download e-books to the device.
Search for E-book (1) Tap on the Search button. (2) Enter the e-book name with case sensitive and then tap “OK” to start searching. (3) The search result is displayed and you can view them by category (title, author, size) Page Up/Down When you are reading the e-book, you can slide your finger on the screen left and right to page up or down.
section to read. (1) When you are reading, tap on the Menu icon to display e-book settings. (2) Tap on “TOC” to display the outline of the e-book, and then tap the chapter that you want to read. View Book Information During reading Ebook, you can view the book information anytime by tapping on the Menu icon and selecting BookInfo item in sequence. Auto Flip During reading, you can use the Auto Flip (turning the pages automatically) function for your convenience. to bring up the overlay menu.
Library– return to music library menu. Party Shuffle – select Party Shuffle mode Add to playlist – add a song to the playlist. Delete – delete a song. Sound Effects – Set the sound effects for the music playback. Shuffle songs to display options – Play all, Party shuffle and In the library, tap the Menu icon Shuffle all. Play all – play tracks in normal order. Party shuffle – shuffle 7-8 songs as a group each time. Shuffle all – shuffle all songs stored in the device. Playback Screen g e f a. b. c. d.
The playlist is a list of songs that you have added manually. To add the current track to a playlist, tap , selelect “Add to playlist” and then choose a playlist or tap “new” to create a new playlist. To play the playlist, (1) In the Music menu, tap the Playlist icon that you have added are listed. (2) Tap a song to start playing. to display all the playlist. All songs Playing Video In the Home Screen, tap the Video Player icon to enter the video player mode.
enter the Video Player, and tap on the bookmarked video. You should be prompted to “Play from beginning” and “Play from bookmark”. Select “Play from bookmark”. In default, the video plays from beginning. To remove the bookmark, ” to display the menu, and then choose “Delete Bookmark”. tap on “ y Tap on to adjust the brightness of screen. y Tap on / to play the previous or next video. y Tap on to change the aspect ratio of screen. y Tap on to stop playing and return the video list.
thumbnails or group photos by date. (4) Tap a photo thumbnail to view the photo in full screen. (5) To display the previous/next picture, slide your finger on the screen horizontally. (6) To zoom in or out the picture, pinch your finger on the picture. Display Toolbar When you are viewing the picture, you can tap on the screen or the Menu icon show a floating menu.
Zoom in/Out Start slideshow Display menu options Tapping “Menu” can display other menu options. Information about the picture Set the picture as desktop background Crop a part from the picture Rotate the picture left Rotate the picture right Send picture to friend by e-mail (email account login required) Delete picture Slide Show To start an automatic slideshow, tap on the screen to show a floating menu, and then tap the Slideshow menu on the toolbar. To stop the slideshow, tap the screen.
z The video clip / photo can be previewed in the Preview Window. play the video clip that you have made, enter the Video Player, and then tap the video. z To view the photo that you have taken, enter the Photo Viewer mode, and then tap the photo. z To HDMI Output The device features a HDMI interface with which you can connect the device to digital audio devices, computer monitors or digital televisions. HDMI connection can deliver high-definition audio and video quality.
Using the Explorer Navigate through Files and Folders y You can drag your finger up and down to scroll the file list up and down. y To open a file or folder, tap the file/folder. y Tap the menu icon , you can manage the applications (see details in the “Managing 3rd party Applications” section). y You can go back or forward one level in the interface by tapping on the Back icon or Next icon . y y You can go back one level in the directory by tapping on the LevelUp button .
(2) (3) (4) (5) the file/folder that you want to copy or move. Hold the selected file/folder until a pop-up menu appears. Select “Copy” or “Move” from the pop-up menu. Navigate to the location where you wish to copy or move the file/folder to. from the toolbar and then choose “Paste.” Select the Editor icon Delete Files and Folders (1) In the file list, scroll up and down the list by sliding finger to select the file/folder that you want to delete.
y Tap the Home icon to go to the root directory. Using the Toolbar You can use the toolbar to navigate through your device’s internal memory/ memory card and delete or copy files. Tapping on the grey area can hide/display the toolbar. Sliding your finger on the toolbar can scroll through all tools. Home Up Multi Edit Search Back Next View Sort Prefs Network Go to the Home Screen. Go back one level in the directory. Select more than one file. Copy, delete, move, paste or rename the file or folder.
(3) (4) Select “Zip” from the pop-up menu. Enter a name for the zip file and then tap “Create”. File Options You can hold your finger on an item to display the following options: Details – file information Open As – open the file with another application. Edit – copy, delete, move, zip the file Send – send the file by e-mail (email account login required.) Set As – set the file as desktop Sending/Receiving E-mails This device has an E-mail application pre-installed.
Add another Account Following these steps to add another account if you want. to display the (1) Launch the email application and then tap on the Menu icon menu item. Choose “Accounts” to display accounts. to display the menu item, and then choose “Add (2) Tap on the Menu icon account”. (3) Follow the steps of setting up a Email Account to add an account. Delete an Email Account to display the menu (1) When you are in the email box, tap on the Menu icon items.
(2) Launch the OfficeSuite application. (3) Locate an Office document by navigation. (The following illustrations show how to select a document from the internal memory.) (4) Tap the document to open it. On the opening page, you can slide your finger up and down to turn over the page. (5) You can tap the Menu icon to display menu options. With these options, you can search for specific texts or count words in the document.
Voice Recording z Record (1) In the Home Screen, tap on the Application Tap to reveal all applications. (2) Tap on the “Sound Recorder” icon to enter the recorder mode. (3) Tap on the “ ” icon to start recording. ”icon to stop recording. (4) Tap on the “ to preview the recording if you want to. (5) Tap (6) Tap on “Use this recording” and then use the Audio Player to play the recording. To discard the recording, tap on “Discard”. (7) Tap on to go back to the Home Screen.
browser, alarm clock, calculator etc. Install Applications You can install applications manually following these steps: (1) Download the installation file directly from the built-in application library (e.g. SLIDEME) or Internet. Make sure the file is in format of .apk which is supported by your Internet Tablet system. (2) Copy the installation file to your Internet Tablet by USB connection. (3) Turn on your Internet Tablet and locate the installation file with the Explorer.
(3) Tap “KILL selected apps” to end the task. System Settings In the Home screen, tap “Settings” and choose a category: “Wireless & Networks,” “Sound & Display,” “Date & Time,” etc. y When a down arrow appears on the right of a parameter, this means that this setting includes sub-parameters. Tap it to display the list of sub-parameters. y When a check box appears on the right of a parameter, tap it to enable or disable this option.
keyboard Date & Time Update Media Library Erase activation record About Device and more accurate text input. This setting allows you set up the date, time, time zone and formats. Update the media library of your Device manually. Used to erase record of DRM activations. Display information about your Device system. Troubleshooting Reset this device y In the event that the device freezes, you can force the device to shut down by holding the Power button for 15 seconds.
AAC(ADIF, ATDS Header AAC-LC and AAC-HE): 8~48KHZ File Format Video Coding Format AVI, 3GP, MP4, RM, RMVB, FLV, MOV, AVI(MPEG4,XVID,DIV 1920*1088pixels/30FPS (Max) X3/4/5/6, MS MPEG4 Audio Codec:MP2/MP3/AC3/AAC/PCM V3) MPEG4,XVID,DIVX3/4/5/6: 3GP/MP4(H.264,H.263 1920*1088pixels/30FPS (Max.) ,MPEG4,XVID,DIVX3/4 H.264: 1920*1088pixels/30FPS (Max) /5/6, MS MPEG4 V3) Audio Codec: MP2/MP3/AC3/AAC/PCM RM/RMVB(Real video 8/9): FLV(Sorenson Spark) MOV(H.264, H.
equipment off and on, the user is encouraged to try to correct the interference by one or more of the following measures: -- Reorient or relocate the receiving antenna. -- Increase the separation between the equipment and receiver. -- Connect the equipment into an outlet on a circuit different from that to which the receiver is connected. -- Consult the dealer or an experienced radio/TV technician for help.