Safety Precautions z Do not subject the device to severe impact or drop it from heights. z Do not use the device in extreme hot or cold, dusty or damp conditions. Do not expose it to direct sunlight. z Avoid using the device near strong magnetic fields. z Normal functioning of the product may be disturbed by ESD. If so, simply reset z z z z z z z z z z z z z z and restart the device following the instruction manual.
z To reduce the risk of fire or electric shock, do not expose this device to rain or z z z z z z moisture. The device should not be exposed to dripping or splashing. Never place objects filled with liquids, such as vases, on the device. There is danger of explosion if the battery is replaced incorrectly. Replace only with the same or equivalent type. The battery (battery or batteries or battery pack) should not be exposed to excessive heat such as sunlight, fire or the like.
, Spain, Belgium, Netherlands, Portugal, Greece, Ireland, Denmark, Luxembour g, Austria, Finland, Sweden, Norway and Iceland. In France, except the channel 10 through 13, law prohibits the use of other channels. Listening Cautions z This product respects the current regulations for limiting the output volume of z z z z z consumer audio devices to a safe level. By listening to your device with headphones or earbuds at high volumes, you run the risk of permanent damage to your ears.
Table of Content Safety Precautions............................................................................................ 1 Listening Cautions ............................................................................................ 3 Feature Summary ............................................................................................. 5 Accessories ...................................................................................................... 5 Buttons & Ports........................
Feature Summary Wi-Fi Connectivity With the latest Wi-Fi technology, this device can connect you to the Internet wherever you are. 7.0” Touch Screen Touch or slide your finger on the screen, the screen responds instantly. Third-party Application Support With the built-in Android TM OS, you can install a large number of third-party applications in this device. Built-in G-sensor The screen changes to landscape or portrait automatically when the device rotates.
Bottom View g i j k h g. Power-IN port – connects to any standard electric source through the provided AC adaptor. SD Card Slot – accommodates any standard SD memory card. Earphone Port – connects to stereo earphones (not provided with the unit.) USB Port – connects to a computer through the USB cable. Power Button/Charge Indicator – press and hold to turn on or off the device; briefly press to turn the screen on or off. h. i. j. k. Rear View l.
the “SD Card” directory. Transferring Files Before reading or playing files, you need to transfer media files from a computer to the device. (1) Connect the device to a computer with the supplied USB cable. (2) Drag from the top bar downwards to display the USB notification message as shown. Drag downwards (3) Choose “USB Connected” and then tap “Turn on USB storage” to connect the device to computer. (4) Once connected, two removable disk drives will show on your computer.
Home Screen Weather forecast – worldwide cities (required Wi-Fi connection) y You can change the city by tapping the city name. y You can change the temperature unit by tapping the temperature. Current Time Default shortcuts Tap on an icon to open the corresponding application. You can add or remove shortcuts, see “Customizing the Home Screen items” on the next page.
and then select “Add” . You can also hold your finger on the screen and then choose an item from the list. y You can add a folder onto the Home Screen by holding your finger on the screen and then choose Folders Æ New Folder. You can drag shortcuts or widgets to the folder. To rename the folder, a) tap to open the folder, b) hold your finger on the title bar of the opened folder until the Rename window pops up, c) input folder name.
Unlocking the Screen The screen will lock itself after standing by for a few seconds. You need to unlock the screen by dragging the lock icon to the arrow direction before you continue to use the device. Note: Dragging the icon to the arrow direction will mute the sound. Touch Screen & Buttons Usage Main Touch Screen Actions y In different applications, you can go back one level in the interface by tapping on the Back icon (in the top right corner of the screen).
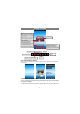
Making WIFI Connection (1) In the Home screen, tap on the WiFi icon. (2) Tap on the “Wi-Fi” setting to turn on the Wi-Fi. (3) Tap the “Wi-Fi settings”, your NextBook will scan automatically for available WiFi networks and display them. The list of available networks shows all the wireless networks in range of your device. Note: a) The available network list is constantly refreshed automatically.
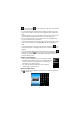
Using the Virtual Keyboard Tapping on any text input field can open the virtual board. With the virtual keyboard, you can enter a website address or any text required. Indications a c a. Caps Lock b. Backspace. c. Number and Characters /Letter Keyboard Switch. d. Space e.
y y Depending on where you are in the web browser, holding down on an item will give you access to more options. To fill in a text field, tap in the field, then use the virtual keyboard to type in the required text. Web Browser Menu Items When you are viewing a page, you can tap the menu icon items. to display the menu New window Allows you to open new windows. Bookmarks Will open the “Bookmarks” manager. You will see three tabs: “Bookmarks,” “Most visited,” and “History.
install the Adobe Digital Editions software following the instructions. (2) Authorize your computer with your Adobe ID and Password. (3) Activate your NextBook. Connect your NextBook to computer with the USB cable and start up the Adobe Digital Editions. Click “Authorize Device” to authorize your NextBook. y The Adobe ID can be used only for six times. It should expire after 6 tries of authorizing device.
(6) Connect your NextBook to the computer with the USB cable, and the Adobe Digital Editions should recognize your NextBook. (7) Click “Purchase” to see your downloaded e-book and then drag it to your NextBook. Start Reading (1) (2) In the Home Screen, tap the E-book Reader shortcut to enter the e-book reader mode. Tap an e-book to start reading immediately. History and My Library You can tap “History” to view your reading history or tap “My Library” to enter the e-book library.
Page Up/Down When you are reading the e-book, you can slide your finger on the screen left and right to page up or down. You can let the ebook page up and down automatically by: a) tapping the Men Menu to display e-book settings; b) Tap “Auto Flip”; c) Selecting a flip interval time. icon Increase Font Size (1) When you are reading, tap the Menu icon to display e-book settings. (2) Tap “Font Size” to adjust the font size. (3) Tap a size that you want, and then tap “OK” to confirm.
(1) When you are reading, tap the Menu icon to display e-book settings. (2) Tap “Bookmarks” to display a bookmark menu. Use the menu to add, delete or display bookmarks. Show Outline of the e-book You can view the outline of the e-book and then choose your desired chapter or section to read. (1) When you are reading, tap on the Menu icon to display e-book settings. (2) Tap on “TOC” to display the outline of the e-book, and then tap the chapter that you want to read.
(7) (8) Check your credit card information and the price. Tap Buy Now to download the e-book. Note: The ebook won’t to be downloaded to your NextBook. They are accessible only if you sign in with your Kobo Account. Read e-books in Kobo Library E-books from Kobo are saved in Kobo library. They are unable be synchronized to the internal memory of the device. To read e-books that you have purchased from Kobo, (2) Tap an e-book and tap “Start (1) Tap to enter the Kobo library Reading” to read the e-book.
(3) During reading, you can: y Turn over pages by sliding your finger left and right. y Tap on the screen to display the control bar. By sliding the control bar, you can go to any page in the e-book. y Tap the Menu icon to display menu options. With these options, you can view outline of the e-book, change the view mode (day or night mode), change the font size or style. (previous/next page) (control bar) (options) Playing Music In the Home Screen, tap the Music icon to enter the music player mode.
Album List music files by album. Playlist List your favorite songs. Now Playing Go to the Now Playing screen. Music Library Menu In the library, holding your finger on a track can display the following menu options. Play – start playing the song Add to playlist – add the song to the playlist. Delete – delete the song. Search – search for information about the song. Shuffle Tracks In the library, tap the Menu icon to display options – Party shuffle and Shuffle all.
y y y To display menu options, tap . Tapping continuously on the track title can search for the information about the track from the Internet. To go back directly to the Home screen, tap on the Home icon or Return icon . Playing Menu When the track is playing, you can tap the Menu icon to display the following menu options. Library – go back to the music library. Party shuffle – shuffle all tracks in the current directory. Add to playlist – add the track to the playlist. Delete – delete the song.
Playback Screen a d c b e f g h i j k a. b. c. d. e. f. g. h. i. j. k. VOLProgression bar VOL+ Bookmark Brightness Previous video/Rewind Play/Pause Next video / Fast forward View Mode Exit Video settings y Tap on the / icon to pause/resume the video, y Tap on “ ” to display the menu items. y Tap on the progression bar to go directly to a different location in the video. You can also use your finger to drag the cursor in the progression bar to another location in the video.
after playing. Repeat One – Repeat the current video. Repeat All – Repeat all videos. Help Get instructions on playing video. Return Exit from the menu. Viewing Photos In the Home Screen, tap the Gallery icon to enter the photo viewer mode. Optionally, you can tap the Applications shortcut to display all applications and then tap the Gallery icon to enter the photo Gallery. Viewing Photo (1) Folders containing photos should be listed once you enter the Gallery. Tap a folder to open it.
(4) Tap a photo thumbnail to view the photo in full screen. (5) To display the previous/next picture, slide your finger on the screen horizontally. (6) To zoom in or out the picture, pinch your finger on the picture. Display Toolbar When you are viewing the picture, you can tap on the screen or the Menu icon show a floating menu.
Tapping “Menu” can display other menu options. Send picture to friend by e-mail (email account login required) Delete picture Information about the picture Set the picture as desktop background Crop a part from the picture Rotate the picture left Rotate the picture right Slide Show To start an automatic slideshow, tap on the screen to show a floating menu, and then tap the Slideshow menu on the toolbar. To stop the slideshow, tap the screen.
Using the Explorer Navigate through Files and Folders y You can drag your finger up and down to scroll the file list up and down. y To open a file or folder, tap the file/folder. y Tap the menu icon , you can manage the applications (see details in the “Managing 3rd party Applications” section). y You can go back or forward one level in the interface by tapping on the Back icon or Next icon . y You can go back one level in the directory by tapping on the LevelUp button .
Delete Files and Folders (1) In the file list, scroll up and down the list by sliding finger to select the file/folder that you want to delete. (2) Hold the selected file/folder until a pop-up menu appears. (3) Select “Delete” from the pop-up menu, then select “Delete” to confirm or “Cancel” to quit. Rename Files and Folders In the file list, scroll up and down the list by sliding finger to select the file/folder that you want to rename. (2) Hold the selected file/folder until a pop-up menu appears.
Using the Toolbar You can use the toolbar to navigate through your device’s internal memory/ memory card and delete or copy files. Tapping on the grey area can hide/display the toolbar. Sliding your finger on the toolbar can scroll through all tools. Home Go to the Home Screen. Up Multi Go back one level in the directory. Select more than one file. Edit Copy, delete, move, paste or rename the file or folder. Search Search for a specific file or folder Back Go back one level in the interface.
select multiple items by tapping. To deselect the item(s), tap the Cancel icon (3) (4) Select “Zip” from the pop-up menu. Enter a name for the zip file and then tap “Create”. File Options You can hold your finger on an item to display the following options: Details – file information Open As – open the file with another application. Edit – copy, delete, move, zip the file Send – send the file by e-mail (email account login required.
prompts you that “Your account is set up, and email is on its way”, your account is set up successfully. (8) Input your name and then tap on “Done” to finish. Note: If you have more than one account, every time when you start up the email application, you enter the default email account. Manage Accounts You can setup more than one account and manage these accounts by checking information about the account, adding another account or deleting an account.
Email Menu Items In the email list, tap on the Menu icon to display the menu. Refresh Refresh the emails. Compose Compose a new email. Folders Go back to email box. Accounts View all email accounts. Account Settings Check your account settings. Reading Office Document The device provides support to Microsoft Office document with its built-in OfficeSuite application. You can read documents in Word, Excel or PPT etc. (1) Copy Office documents to the device by USB connection.
Managing 3rd Party Applications Your NextBook provides support to many useful third-party applications. You can purchase the applications to add more functions to your device. They are available online at the Internet or directly on your product. Pre-installed Applications The device has pre-installed applications when it was manufactured. You can see them by tapping the Applications icon browser, alarm clock, calculator etc. .
y Some of the applications developed for Android mobile might not run properly in the NextBook. Please consult the respective software developer for further information. Managing Tasks Your NextBook can handle multiple tasks at the same time. For example, you can view photos while listening to music. Multitasking is helpful but inefficient if too many tasks are running. In order to save system memory and enhance system performance, you can end some tasks that you don’t use at the moment.
the screen. Display Brightness –allows you to adjust the brightness of the screen. Auto-rotate screen – switch the screen orientation automatically when the device rotates. Animation –enables/disables the display of animations when opening and closing applications. Screen timeout –allows you to adjust the delay before the screen automatically turns off and locks itself. To turn the screen back on, press the Power button once, and press it again to unlock the screen.
Frequently Asked Questions Terminate inactive applications Software Version information User Guide Troubleshooting Upgrade the system automatically once a software update is detected online. Troubleshooting Reset this device y In the event that the device freezes, you can force the device to shut down by holding the Power button for 15 seconds. y If the Power button does not reset your device, use the “pinhole reset” button, located on the back the device.
USB2.0 High speed Interface SD (compatible SDHC) Connection Agreement WiFi (802.11 b/g/n) 3.5mm Earphone G-sensor E-Book Support 360 spin˅ File Format Coding Format PDF/EPUB/TXT/FB2/PDB/RTF PDF / EPUB Format: .Open; .Adobe DRM (For License) TXT / FB2/PDB/RTF Format: .Open JPEG(Baseline) : Max. 2Mpels˅ BMP Photo Format GIF Static˅ PNG File Format MP3/WMA/WAV/OGG/FLAC/APE/AAC MP3˄MPEG1/2/2.5 Audio Layer 1/2/3˅˖8̚48KHZ/8̚320Kbps,CBR and VBR Audio Coding Format WMA˄Version 4, 4.
Write speed 4.5-4.8MB/S (MLC flash) Battery Charge Time About 5 Hours Battery Life About 7 hours of music playback; About 6 hours of video playback; About 6 hours of web browsing. Display 7.0-inch TFT LCD, Touchpad (capacitive touch pad), 800X600 pixels. SNR 90dB above Frequency Response Range 20Hz—20KHz Power Supply Rechargeable lithium-ion polymer battery; AC Adapter: AC Input 100-240V̚50/60Hz, DC Output 5V/2A Storage Temp. -20ć ̚ +65ć Ambient Temp.
(2) this device must accept any interference received, including interference that may cause undesired operation. Changes or modifications not expressly approved by the party responsible for compliance could void the user's authority to operate the equipment. Changes or modifications not expressly approved by the party responsible for compliance could void the user's authority to operate the equipment. Canada: - This device complies with Industry Canada licence-exempt RSS standard(s).
Other names of systems and products mentioned in these instructions are usually the registered trademarks or trademarks of the manufacturers who developed the system or product concerned. The TM and marks are not used to identify registered trademarks and trademarks in these instructions. This manual was correct and complete at the time of printing. However, new specifications and updates can occur at any time without prior notice.