
User's Manual


- 5 -
Installing Photo Sketcher
Insert the Note Manager application CD into your PC,
select “Photo Sketcher” and then install it following
the wizard’s instruction.
A desktop icon will be added once installation
complete.
Using Photo Sketcher
Run the Photo Sketcher by clicking the desktop icon.
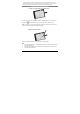
1) Connect the Digital Pen
Before you can use the ‘Photo Sketcher’, your Digital Pen must be connected to your
computer properly. A connection icon will be Green
, indicating the Digital Pen
is properly connected.
(2) Load a picture file by clicking the application ‘File’ icon
. Browse to the file you
would like to edit and select ‘Open’.
(3) Sketch on a picture file
Once a picture is loaded, use your Digital Pen to sketch anywhere you like on the picture.
Use the Pen, while hovering, to get to the point in which you’d like to sketch. Then, simply
use the Pen as you usually use a Pen, and sketch.
(4) Save a file
To save a picture, press the
icon. Now select a path and a name for your file and
select ‘Save’.
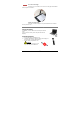
Open a picture
Connection Indicator
Save picture
Send picture
Close
Change pen
preference
Eraser/Pen
Redo Undo