wRZLWHF INSTRUCTIONS FOR USE EC20 WWW.WOWITOYS.
Contents Disclaimer & Warnings Safety Guidelines Use of Battery Packing list 2 3 4 Drone Blades Details Controller Functions Download the APP Flying the Drone APP
Disclaimer & Warnings 1. Please read this Disclaimer & Warning and Safety Guidelines carefully before using our product. This product is not recommended for people under the age of 14. By using this product, you hereby agree to this disclaimer and signify that you have read it fully. You agree that you are responsible for your own conduct and any damages caused while using this product, and its consequences.
Safety Guidelines 1.Check Before Use (1). This product is not a toy, it is a high precision drone that integrates various electronic stability and control mechanisms. Please be sure to setup this drone carefully and correctly to ensure safe, accident-free operation. (2). Please be sure that the batteries of the drone and controller are clean, undamaged and have enough power. (3). Please be sure that all the propellers are undamaged and are installed in the right direction. (4).
3. Use of Battery (1).Ensure batteries are fitted in the correct direction as shown in the instruction manual. (2).Avoid short circuits by fitting the batteries incorrectly, and do not crush or squeeze the batteries as this could carry the risk of explosion. (3).Do not mix new and old batteries as this can lead to a poor performance of the product. (4).Dispose used batteries carefully. (5).Keep dead batteries away from heat and fire. (6).
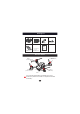
Packing list Drone x 1 Blade x 4 Controller x 1 Battery x 1 Screwdriver x 1 User Manual x 1 USB charger x 1 Drone’s details Blade B (Counter Clockwise) Blade A (Clockwise) Blade B (Counter Clockwise) Blade A (Clockwise) Camera HEAD It is crucial that all the blades are installed in the correct position (Pay attention to the letter A or B printed underneath each blade.
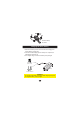
insert the battery into drone Charging the drone battery 1. Remove the battery from the drone & insert the charging wire into the battery charging slot 2. Connect the USB charger (square socket) to a computer, the USB indicator will glow red 3. The red light will go out when the battery is fully charged USB Adapter (5V/0.5-2.0A) Battery Computer USB Port WARNING Do not leave the battery unattended while charging & only use the supplied battery or plug charger.
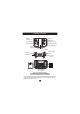
Controller functions throttle left stick right stick calibration/ emergency Stop normal/GPS mode picture/LED power switch one key start/stop video/ headless mode phone holder antenna speed-select button camera up camera down auto return Home 4xAAA batteries (not included) . Always use alkaline batteries . Never mix old and new batteries 1.Unscrew the battery cover,and insert 4xAAA batteries(not included), make sure to insert them following the correct polarity as shown. 2.
Preparation for Flight 1.Boot up Turn on the power of the remote control; turn on the power of the drone (long press for 2 seconds to turn on/off) 2.Pair the Drone to the Remote Control power indicator power switch (1).After the remote control and the drone are properly loaded with batteries, place the drone on a horizontal surface and turn on the remote control power switch. At this time, the remote control power indicator flashes red.
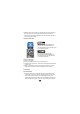
(3).Wait for about 10 seconds, the red light on the rear of the drone flash and turn into a steady light, which means that the drone has received the pairing instruction and completed the self-check. The pairing is successful. 3.Download the APP * +<= > Search and download"WOWI FLY" from Google Play.Or scan the QR code on the left to download. * @<= > Search and download"WOWI FLY" from App store.Or scan the QR code on the left to download.
(2).Wait for about 10 seconds, the indicator light on the rear of the drone is always on, indicating that the calibration is successfully completed. Geomagnetic Calibration (1).Press the calibration compass button on remote control, wait for the remote control to make a beeping sound and release the button. The front green light of the drone will flash quickly, and the rear red light will be steady on, indicating that the compass calibration is started.
(3).Hold the drone in hand with the nose down, and then slowly rotate the drone clockwise (about 3-5 rotations), wait until the red light on the rear of the drone is off and the remote control beeps twice, indicating that the vertical calibration is completed. 30cm (4).Place the drone horizontally and wait for the red light on the rear of the drone to keep on to indicate that the compass calibration is completed.
GPS mode GPS signal Flying the Drone 5.Taking-off and landing methods Taking-off method 1 (1) Press and hold the one key start/stop button for 1 second, the drone will automatically take off at an altitude of about 1.2 meter. Taking-off method 2 (2) Manual take-off: pull the left and right levers at the same time (as shown in the figure), and then push the left throttle lever upwards to take-off.
Landing method 1 Press and hold the one key start/stop button for 1 second, and the drone will land on its own. Landing method 2 Pull the left throttle lever of the remote control to the bottom and the drone will land by itself. Landing Method 2 Landing method 1 6.Drone Operations (1). Ascend / descend / turn left / turn right Use “the left lever” to control the altitude & rotation during flight.
(2) Forward / Backward / Leftward / Rightward Use “the right lever” to control forward, backward,left & right movement during flight. 7.Indoor Flight Normal Mode(Non-GPS) (1).Place the drone on an open horizontal surface to pair the remote control to the drone. (2).Select normal mode on remote control. (as shown in the figure). (3).The drone is ready to take off and can be operated by the remote control. normal mode DO NOT switch between normal mode/GPS mode during flight.
Features 1 power indicator GPS signal 3 5 2 4 1.To take a photo: Press once, take one picture. Long press the camera button to turn on/off the LED light 2.To record a video: Press once to start the video mode, press one time again to stop the video mode. (Remark: because the drone comes with a wifi camera, it can only take pictures or videos after connected with mobile phone.
4.one key start/stop Long press the "one key start/stop" button, hear a short "beep", the drone will take off slowly and hover at an altitude of about 1.2 meters. 5.Normal/GPS mode After the drone is paired sucessfully and started to fly, press the GPS mode button, the drone will fly in the GPS mode. Press the Normal Mode Button, the drone will fly in the normal mode, no GPS function 6 8 7 9 6.Camera up 7.Camera down 8.Speed-select button Two speeds for the drone, fast and slow. 9.
Auto return home: When the drone flies too far in GPS mode, users can't tell the directions of the drone, then users can operate it in below 2 ways to fly back the drone to the takeoff place: 1. Long press the auto return home button for 2-3 seconds, the drone will fly back to the takeoff place automatically; 2. Directly switch off the power of the remote control, the drone will return to the takeoff place.
WOWIFLY APP 1.APP Interface 1.Return home 2.Altitude Mode 3.Flight record 4.GPS signal 5.Controller signal 6.Drone Power 7.Show/Hide set up menu 8.Hide 10.Reverse lens 11.V-Sign 12.Waypoint flight 13.Follow me 14.Surround flight 15.Add music 16.One key start 17.One key stop 9.3D view 18.Automatic return 17 19.Photo/Video 20.Shutter 21.Replay 22.Map 23.Distance 24.Filter 25.
2. Smart Flight Mode Surround Mode: Tap the icon to enter the surround mode (surround flight) Under normal flight conditions (flight altitude more than 5 meters), GPS signal is more than or equal to 8 satellites, the drone will orbit clockwise defaulting to the current position as the center of the orbit, with a radius of 10 meters, and a speed of 3 meters per second. Follow-me Mode: Tap the icon to activate follow-me flight mode.
Auto Return Home 1.One-key Return Home Remote control: Press and hold the auto-return button for 3-5 seconds or tap the return home icon on the APP to start one-key return, the remote control will emit two beeps to indicate that the return home function is activated, and the drone will automatically fly back to the vicinity of the take-off point. To cancel the one-key return home process: Long press the return button and the remote control will beep once or tap the icon X to exit the return to home process.
Optimal communication range of remote control Since the transmitter module of the drone will have different interferences due to different site environmental conditions, the maximum flight distance of the drone under normal condition is 1000m. When the drone is flying in GPS mode, if the drone signal encounters interference (user moves the remote control position, etc.),the drone will automatically turn back when the signal is bad, andwill not turn back automatically until the drone signal is good. 1.
Left/right hand throttle switch This product defaults to the left-hand throttle control. User can switch the left/right-hand throttle according to user’s operating habits. After the left/right-hand throttle is switched, it will always be recorded, and user does not need to repeat the switching operation. 2 1 Left-hand mode to Right-hand mode: Long press the No.
Insert the SD card The drone equipped with a built-in WIFI camera, and the WIFI board has a card slot. User can connect to the drone WIFI with mobile phones and open the WOWI FLY APP to take photos and videos. Also user can insert a SD card to the drone and use the remote control to take photos and videos (which will be stored in the SD card) without connecting to the WIFI. Note: SD cards and card readers are not included in this product.
Specifications Drone 249g Take-off weight 16 x 10x 7cm (folded) 30 x 30x 7cm (unfolded) Drone size Maximum horizontal flight speed 5m/s Maximum ascent speed 3m/s Maximum flight time 20 minutes Working frequency 2402-2480MHz,2412-2462MHz,5180-5240MHz,5475-5825MHz Maximum effective distance of signal 1000m Image transmission range 1000m Battery Li-po, 7.
Trouble shooting Possible Causes Solutions Uncontrollable/ Not work 1. Unsuccessful pairing. Remote control is not synced to the drone. 2. Insufficient battery power. 1. Re-pair according to the instructions. 2. Use fully charged or new batteries and perform pairing again. Vibrates/sways badly 1. The blades are deformed. 2. The hollow shaft bends. 1. Replace with new blades. 2. Replace with new hollow shaft. Always fly sideways and out of balance 1. The blades are deformed. 2.
FCC Warning This device complies with part 15 of the FCC Rules. Operation is subject to the following two conditions: (1) This device may not cause harmful interference, and (2) this device must accept any interference received, including interference that may cause undesired operation. Any Changes or modifications not expressly approved by the party responsible for compliance could void the user's authority to operate the equipment.