
User's Manual


INSTALLING THE DASHCAM
1. Check the orientation of the Dash Cam camera first before installation. When the Dash
Cam lens is facing outwards, the power button faces backward.
2. Use an alcohol wipe to clean the windscreen and enhance adhesion.
3. Fix the Dash Cam on the inside surface of the windscreen by removing backing off 3M tape
and press & hold firmly to windscreen for 60 seconds. The area near the rear-view mirror is
suggested where the vision is not blocked. Do not install the device on the vehicles airbag
or within its working range. Please make sure the wiper won’t block the lens of the Dash
Cam especially when cleaning the windscreen during raining day. The best installation
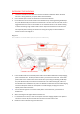
location shown in the diagram 1.
Diagram 1.
Note: As different car model has different layout, this picture is for reference only.
4. Insert the Micro USB end of the GPS power cable into the Micro USB Power socket/charging
point of the Dash Cam. The best position for GPS is just next to the Dash Cam. Fix the GPS
power cable on the inside surface of the windscreen by removing the backing off 3M tape
and press & hold firmly to windscreen for 60 seconds. For a better GPS signal, make sure
the 3M sticker faces toward the sky and in not blocked or obstructed. Connect USB charging
end of the GPS power cable into the 12/24V in-car USB charger, the plug this into the
12/24V power socket of vehicle.
5. Turn the vehicle’s ignition on and then it will power on the Dash Cam, you will hear an
audible tone.
6. When recording the LED light indicator will flash red.
7. For the Dash Cam to work, it must receive power from the charging adapter. Once power is
removed or turned off, the Dash Cam will save the current file and turn off.
8. Rotate the camera direction to get the best view.