NEXGO G3 Wireless POS terminal User Guide 1
Version Information Shenzhen Xinguodu Technology Co., Ltd. Warning: No part of this publication may be reproduced, transmitted, stored in a retrieval system, nor translated into any human or computer language, in any form or by any means, electronic, mechanical, manual, or otherwise, without the prior written permission of Shenzhen Xinguodu Technology Co., Ltd. All trademarks mentioned are proprietary of their respective owners. Version number:V 1.00 Notice 1. Install software well in this terminal; 2.
Contents SPECIFICATION OF POS TERMINAL ..................................................................................... 4 BASIC SETTING............................................................................................................................ 5 Power on/off.................................................................................................................................. 5 Self-checking ......................................................................................
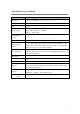
Specification of pos terminal Item Specifications Processor iMX258 CPU/400MHz,working voltage 1.52-3.V Memory Large memory:128MBYTE FLASH,64MBYTE DDR2 SDRAM。 OS LINUX Power Supply External switch power Input: 100V~240V AC,50/60Hz Output: 5VDC, 1.
Basic setting Power on/off power on: Please connection G3 with power by power adapter, press “on/off” for 3 seconds to boot up G3; Power off: Under status of power on, please press “on/off” for 3 seconds, then it will prompt “ press OK to power off, other keys to return”, then press “OK”, then it will prompt “ in powering off, waiting…”, after 2 seconds, it will finally power off. Self-checking 1. Press “on/off”, “F” and “3” at the same time to power on, then it will prompt “please input password”; 2.
② Test LCD backlit: adjust the light of backlit; ③ Test LCD contrast: adjust the current contrast of LCD; ④ Test charging battery: not support; (3) Mag-card: to check if read/write mag-card working well; (4)Comm: to test WIFI; (5) IC card: to test IC cards slot 1,2 3 and initialization key card; (6) Accessories: to test fingerprint, barcode scanner, voice(not support in G3) and USB and serial port; (7) Clock: to set the current time.
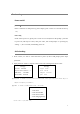
G3 setting of China UnionPay China UnionPay will set system parameter of G3 like bellows: System setting System management 1. POS parameter setting 2. Comm.Parameter setting 3. Transaction function setting 4.
Pre-authorization completion void:set if need brushing card when pre-authorization completion void Sales void password:set if need input password when sales void Pre-authorization void password:set if need input password when pre-authorization void pre-authorization completion void password : set if need input password when pre-authorization completion void pre-authorization completion (online) password:set if need input password when pre-authorization completion (online) 2. comm. setting 1. comm.
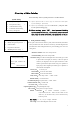
Link method:select link method 0-long link 1-short link Calling times:set calling times 4.TPDU setting:banking cards TPDU, total 10 bits, the first 2 bits are TPDU ID, generally they are 60, and the middle 4 bits are the target address of TPDU, the last 4 bits are source address of ; 3. Transaction functions setting: Transaction functions setting 1. shield transaction 5.print page number 2.chargeback setting 6.maximum transaction 3.tip setting 4.
3、reset dominating password 6、other functions Erase transaction batch:Delete all transaction record TMS download:Remote download Parameter printing:Print key parameter POS introduction:POS brief introduction 7、PC parameter download Use computer and POS terminal for communication and parameter setting. 8、MODEM parameter setting Set MODEM parameter, set whether online checking、test dialing tone, and testing time etc.
General function operation Operator sign-in Function:Sign-in means the operator start to use POS terminal, and to make sure it’s valid.
6、use G3 to withdraw transaction, it shows success at the end, meanwhile print receipt。 Refund Function:Transaction refund is used to withdraw transaction made in previous days or batches. Operator need to verify the transaction receipt from cardholder, and make sure transaction is in valid period (like, within 3 months). Follow instructions, operator need to input data regarding original transaction, then send to POS center and applying for refund.
pre-authorization receipt III pre-authorization completion online: Function:Merchants frozen cards of cardholder and credit fee, but this transaction is revocable. Operation steps:1、under main menu to press“4、pre-authorization”,and select“3、pre-authorization completion online” 2、brushing card according to screen prompt or input card No. by hand; 3、input original transaction date; 4、input original authorization code and press “OK”.
3、input original transaction date; 4、input original authorization code and press “OK”. 5、input amount and press OK; 6、input password, if no password please directly press “OK”; 7、pre-authorization completion void success and print receipt. Note: pre-authorization completion offline is not revocable. Offline I offline settlement: Function:Do offline settlement by POS, currently it’s only allowed for visa and mastercard cards. Operation steps:1、under main menu to select “5.
Query Function:Cardholder inquiry his balance by POS. this transaction don’t attend settlement. Operation steps:1、under main menu to select “8. Other operation” and select “1. Balance inquiry”; 2、swiping card; 3、input password, if no password, please press “OK”; 4、pos will return the balance of banking card. Response Test Under main menu to select “8. Other operation”, then select “2. Response test, then you can test the Ethernet between POS and banking switch, if connecting success, POS will prompt “comm.
General management operation Reprint Under main menu to press “6. reprint” to enter reprint interface. I reprint the last sales receipt:Reprint the last successful sales receipt, if last sales receipt is not completed then need reprint the last one. II Reprint any sales receipt: input receipt No.
setting is ok by important parameter list. System standby Under main menu to select “7. Management”, then “7. Lock POS”, then it will enter system closing interface temporary. If operator need to leave POS temporary, he can use this function to lock G3 POS temporary, and the screen will prompt “system close temporary”, that means the whole system will be closed temporary, if need withdraw close, then press “return” to input current operator password or merchant management password.