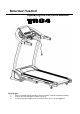
Motorized Treadmill Operating Instructions Manual Special tips: 1. 2. 3. Before installation and operation, please read this operation manual carefully. Please save this manual for future reference. Product may vary slightly from the item pictures due to model upgrades.
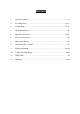
Content 1. Safety Precautions.........................................................................................1-3 2. Assembly Steps...........................................................................................3-13 3. Folding Steps.............................................................................................14-17 4. Grounding Methods........................................................................................18 5. Operation Instruction..................
IMPORTANT SAFETY INSTRUCTIONS WARNING - Read all instructions before using this treadmill. It is important your treadmill receives regular maintenance to prolong its useful life. Failing to regularly maintain your treadmill may void your warranty. Danger–To reduce the risk of electric shock disconnect your treadmill from the electrical outlet prior to cleaning and/or service work.
IMPORTANT ELECTRICAL INFORMATION WARNING! 1) NEVER use a ground fault circuit interrupt (GFCI) wall outlet with this treadmill. Route the power cord away from any moving part of the treadmill including the elevation mechanism and transport wheels. 2) NEVER operate treadmill on Generator or UPS power supply. 3) NEVER remove any cover without first disconnecting AC power. 4) NEVER expose this treadmill to rain or moisture.
Warning: Now here we suggest that you should consult with your physician or health professional before starting your workout, especially for the age up to 35 old or once-health problem people. We take no responsible for any troubles or hurts if you don’t following our specification. Treadmill will be carefully assembled and covered the motor shield, then connect to the power. ASSEMBLY INSTRUCTIONS When you open the carton, you will find the below spare parts: Spare parts list: NO. DES.
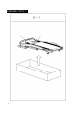
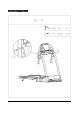
ASSEMBLY STEP 1: EXPLODED DRAWING 4
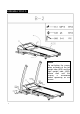
ASSEMBLY STEP 2: Note: : PARTS 5 Do not tighten the screws when assembly of the left upright tube (A05) and the LISTright upright tube (A06), please wait until the Display is assembled before tightening all the screws.
ASSEMBLY STEP 3: Note : When assembling Display (B), please connect the connection wire D03 and D04 first, and then install the Display (B) to the left upright tube (A05) and right upright tube (A06).
ASSEMBLY STEP 4: 7
8
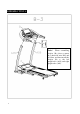
ASSEMBLY STEP 5: Note : After the Display (B) is assembled, tighten all screws on the left upright tube (A05) and right upright tube (A06).
ASSEMBLY STEP 6: 9
ASSEMBLY STEP 7: 10
ASSEMBLY STEP 8: 11
ASSEMBLY STEP 9: 12
ASSEMBLY STEP 10: 13
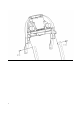
FOLDING INSTRUCTION 1: 14
FOLDING INSTRUCTION 2: 15
FOLDING INSTRUCTION 3: 16
FOLDING INSTRUCTION 4: 17
GROUNDING METHODS This product must be grounded. If it should malfunction or breakdown, grounding provides a path of least resistance for electric current to reduce the risk of electric shock. This product is equipped with a cord having an equipment-grounding conductor and a grounding plug. The plug must be plugged into an appropriate outlet that is properly installed and grounded in accordance with all local codes and ordinances.
OPERATION GUIDE WINDOW DISPLAY: 1、“SPEED” window: The window will display speed under operation mode, show speed range of : 0.610.0MPH. 2、“INCL.” window: Display incline, show range:0-15 section. 3、“TIME” window: Display running time.
button to adjust the speed when the machine is working. 6、“INCLINE+” , “ INCLINE-” button: Press this button to set the value under setting mode. Press this button to adjust the incline when the machine is working. 7、”INCLINE: 2、4、6、8 、10、12、14” incline shortcut button: set incline quickly 8、“SPEED:2、 、3、 、4、 、5 、6、 、7、 、8” speed shortcut button:set speed quickly 9、”CLOCK” setting: Under standby mode, press “SPEED +” and “SPEED –“ buttons 3 seconds synchronously to enter clock setting.
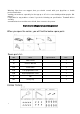
PROGRAM EXERCISE CHART 1 SPEED 1.8 P1 INCLINE 1 SPEED 6.2 P2 INCLINE 1 SPEED 1.8 P3 INCLINE 2 SPEED 1.8 P4 INCLINE 2 SPEED 3.1 P5 INCLINE 3 SPEED 1.8 P6 INCLINE 3 SPEED 1.8 P7 INCLINE 4 SPEED 3.1 P8 INCLINE 4 SPEED 1.2 P9 INCLINE 5 SPEED 1.2 P10 INCLINE 5 SPEED 1.8 P11 INCLINE 3 SPEED 0.6 P12 INCLINE 2 SPEED 0.6 P13 INCLINE 5 SPEED 1.8 P14 INCLINE 2 SPEED 1.2 P15 INCLINE 3 SELF-DEFINE PROGRAM 2 1.8 1 1.8 2 1.8 3 3.1 3 3.1 3 3.1 5 4.3 4 3.1 5 3.1 5 1.8 6 2.4 6 1.2 5 0.6 5 2.4 4 1.
RANGE OF PROGRAM PROGRAM 0:00 0 0.0 0 P 0 TIME(MIN:SECOND) INCLINE(SECTION) SPEED(MPH) DISTANCE(MILE) PULSE(HYPO/MIN) CALORIE(THERM) ORIGION SET UP RANGE DISPLAY RANGE 5:00-99:00 0-15 0.6-10.0 0.5-99.9 N/A 10-999 0:00-99:00 0-15 0.6-10.0 0.00-99.9 50-200 0-999 15:00 0 0.6 1.
EXERCISE INSTRUCTIONS 1. The Warm Up Phase This stage helps get the blood flowing around the body and the muscles working properly. It will also reduce the risk of cramp and muscle injury. It is advisable to do a few stretching exercises as shown below. Each stretch should be held for approximately 30 seconds, do not force or jerk your muscles into a stretch - if it hurts, STOP. 2. The Exercise Phase This is the stage where you put the effort in.
MAINTENANCE & CARE General cleaning will help prolong the life and performance of your treadmill. Keep the unit clean and maintained by dusting the components on a regular basis. Clean both sides of the running belt to prevent dust from accumulating underneath the belt. Keep your running shoes clean so that dirt from your shoes does not wear out the running board and belt. Clean the surface of the running belt with a clean damp cloth.
LUBRICATING THE TREADMILL IMPORTANT NOTE: You will need to lubricate your treadmill before the first use. RUNNING BELTS & TREADMILL LUBRICANT: Lubricating the running board and running belt is essential as the friction between the two affects the life span and function of the treadmill, therefore it is suggested that the running board and belt be inspected regularly. WARNING: Always unplug the treadmill from the electrical outlet before cleaning, lubricating or repairing the unit. HOW TO LUBRICATE: 1.
26
PARTS LIST No. Description Q’ty No.
No. Description Q’ty No. Description Specification Q’ty D25 Incline motor 1 E19 Bolt M5*8 2 D26 Dc motor 1 E20 Screw ST4.2*55 2 E01 Nut M6 2 E21 Screw ST4.2*30 4 E02 Nut M8 6 E22 Screw ST4.2*12 15 E03 Nut M10 6 E23 Screw ST4.2*12 17 E04 Bolt M10*90 1 E24 Screw ST2.9*8 2 E05 Bolt M10*45 1 E25 Screw ST2.9*6 36 E06 Bolt M10*30 2 E26 Screw ST2.
TROUBLE SHOOTING GUIDE 1.There is no display on screen after the machine is connected to the power source: a: Please check the overload button, if the overload protector button bounce, please press this button; b: Please make sure the power source, overload protector ,the driver and the transformer are connected well; c: Please make sure the wire from the driver to the computer board are connected well. d: Check the transformer, if it is wrong, please change a new one; 2.
6.E05 display: Over load current protect a: May be the current is too strong, the system protect itself, please restart the machine. b: May be a part of the machine is locked and result in the motor problem, please add the oil to the machine and restart. c: Please check if there is bad smell from the motor, if there is, please change a new motor; d: Please check if there is bad smell from the driver, if there is, please change a new driver; 7.
ZWIFT APP 31
WARRANTY MANUFACTURER'S LIMITED WARRANTY The supplier warrants to the original purchaser that this product is free from any defect in materials and/or workmanship, provided that the product is properly installed, properly operated and used for the intended purpose (for home use ONLY). This limited warranty is extended ONLY to the original purchaser, and only covers products purchased as new.
Caution: The user is cautioned that changes or modifications not expressly approved by the party responsible for compliance could void the user's authority to operate the equipment. This device complies with Part 15 of the FCC Rules. Operation is subject to the following two conditions: (1) this device may not cause harmful interference, and (2) this device must accept any interference received, including interference that may cause undesired operation.