
Instruction Manual

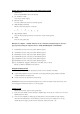

NAME AND FUNCTIONS OF EACH PART AND INSTALLATION
① HDMI PLUG
Insert to HDMI INPUT of TV set directly.
② DC-IN (Micro-USB)
Connect to power supply
③ MicroSD SLOT
To insert a MicroSD memory card with games.
④ DIRECTIONAL JOYSTICK
Move to steer 8 directions as follows:
←、↖、↑、↗、→、↘、↓、↙
⑤ SELECT(ADD COINS)
Press to select playing mode or to add coins under arcade games.
⑥ START
Press to start game play.
NOTE: Press “SELECT + START” buttons on the controller simultaneously to call out a
pop-up menu asking for options such as “SAVE,SETTINGS,EXIT or CONTINUE”.
⑦ Y BUTTON: function may vary under different game.
⑧ X BUTTON: function may vary under different game.
⑨ B BUTTON: function may vary under different game.
⑩ A BUTTON: function may vary under different game.
⑪ L BUTTON: function may vary under different game.
⑫ R BUTTON: function may vary under different game.
⑬ P1 / P2 SWITCH: Toggle to define the controller as P1 or as P2
(NOTE: it’s NOT a ON/OFF power switch)
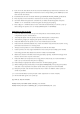
BATTERY INSTALLATION
⚫ Use a screwdriver to open the battery covers of two wireless controllers.
⚫ Insert AAA batteries for each controller correctly by following the polarity indicated
inside the battery compartment.
⚫ Close and screw up the battery cover firmly.
WARNINGS! Please remove the AAA batteries out of the controller if they will not be used
for a long period and store them in a cool dry place.
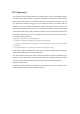
START TO USE
Please follow below steps to start game play.
1) Insert the mini HDMI console directly to HDMI input of TV set. Or connect it to TV via a
HDMI extension cable.
2) Connect one end(Micro-USB plug) of USB cable to the mini HDMI console and the
other end of USB cable to any 5V electric power source such as USB port on TV set,
mobile phone charger, power bank or electrical outlet with USB……etc.