
Use Instruction

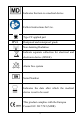
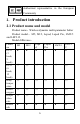
Table Of Contents
- 1.Introduction
- 2.Product introduction
- 3.Preparation before use
- 4.How to use
- 4.1Before use
- 4.2ECG lead wire, temperature probe and blood oxygen
- A.Use of ECG lead wire, body temperature probe and
- B.ECG lead wire placement
- Lead
- Color
- Body surface position (common name)
- 12-lead electrode cable
- RA
- White
- Intersection point between the midline of the righ
- LA
- Black
- The intersection of the left midline of the clavic
- RL
- Green
- Right lower abdomen (right leg)
- LL
- Red
- Left lower abdomen (left leg)
- V1
- Red
- Thoracic lead V1: the fourth intercostal space at
- V2
- Yellow
- Thoracic lead V2: the fourth intercostal space at
- V3
- Green
- Chest lead V3: midway between V2 and V4
- V4
- Blue
- Thoracic lead V4: midclavicular line at the fifth
- V5
- Orange
- Chest lead V5: at the front axillary line, at the
- V6
- Purple
- Chest lead V6: at the mid-axillary line, at the sa
- 6 lead electrode cable
- RA
- White
- Intersection point between the midline of the righ
- LA
- Black
- The intersection of the left midline of the clavic
- RL
- Green
- Right lower abdomen (right leg)
- LL
- Red
- Left lower abdomen (left leg)
- V1
- Red
- Thoracic lead V1: the fourth intercostal space at
- V5
- Orange
- Chest lead V5: at the front axillary line, at the
- 5 lead electrode cable
- RA
- White
- Intersection point between the midline of the righ
- LA
- Black
- The intersection of the left midline of the clavic
- RL
- Green
- Right lower abdomen (right leg)
- LL
- Red
- Left lower abdomen (left leg)
- V1
- Red
- Thoracic lead V1: the fourth intercostal space at
- 3 lead electrode cable
- RA
- White
- Intersection point between the midline of the righ
- LA
- Black
- The intersection of the left midline of the clavic
- LL
- Red
- Left lower abdomen (left leg)
- C.Spo2 probe placement
- D.Temperature probe placement
- 4.3Measurement process
- 4.4Data view
- 4.5 Charging
- 5.Care and maintenance
- 6.Attachment list
- Appendix A Specifications
- Appendix B Electromagnetic compatibility

4
saturation of functional hemoglobin. The following factors may
reduce performance or affect the accuracy of pulse oximetry
measurements:
-The surrounding environment is too light
-The sensor type is incorrect
-Excessive movement
-Moisture in the sensor
-High frequency electrosurgical interference
-Improper use of sensors
-Blood flow restrictor
-Weak pulse or poor signal
Waste (including the scrapped equipment itself) shall be treated in
accordance with relevant laws and regulations.
The validity period of this product is 5 years. For the production
date of the product, please refer to the nameplate of the host.
When several devices are used on the same patient at the same time,
the leakage current may overlap and cause danger. Before
connecting to each other, it is recommended that a qualified
professional perform a leakage current test to ensure that the leakage
current is within the safe allowable range, that is, it will not cause
harm to the patient, the operator and the surrounding environment.
If there is still any doubt, the user should consult the manufacturer
for the correct method of use.
Do not perform high temperature, high pressure, gas fumigation, or
liquid immersion disinfection of the equipment. Please clean and
disinfect the equipment and its accessories according to the
manufacturer's requirements. The power must be cut off before
cleaning or disinfecting the equipment.
It is the operator's responsibility to check the compatibility of the monitor,
probes and cables prior to use and incompatible accessories can result in
reduced performance of the instrument. (including blood oxygen probe and
temperature probe).
1.2 Symbols
Symbols
Meaning