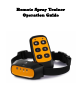
Remote Spray Trainer Operation Guide
Remote Spray Trainer Operation Guide Thank you for choosing SP13 Remote Spray Trainer. Our mission is to offer the best electronic training solutions. We want to ensure your dog’s safety by providing you with the tools and techniques to successfully train your pet. Please feel free to contact us if you have any problems and we will resolve them immediately. Please read the complete operation guide carefully before starting to train your dog including the FAQ.
worn for too long or made too tight on the pet’s neck may cause skin damage. Ranging from redness to pressure ulcers; this condition is commonly known as bed sores. 1. Avoid leaving the collar on the dog for more than 8 hours out of every 24 hours and try to reposition the collar on your dog’s neck every 1 to 2 hours if possible. 2. Check the fit of the collar to prevent excessive pressure.. 3. Examine the contact area daily for signs of a rash or a sore. Brushing the coat daily may help. 4.
temperatures over 113°F or 45°C. 5. Do not burn. Do not dispose of in fire, even when empty. 6. Keep out of direct sunlight. 7.Do not leave the aerosol can in a vehicle where temperature could exceed 113°F or 45°C. 8.Store in a cool location.Keep away from sparks or flame. Do not smoke while refilling. 9. Do not puncture. Contact of liquid propellant with skin may cause frostbite. 10. Do not ingest. In case of accident, seek medical care. If swallowed, call a poison control center immediately.
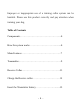
Improper or inappropriate use of a training collar system can be harmful. Please use this product correctly and pay attention when training your dog. Table of Contents Components…………………………………………....6 How the system works…………………………............6 Main Features………………………………………….7 Transmitter……………………………………………..9 Receive Collar………………………………………...11 Charge the Receive collar…………………………….12 Insert the Transmitter battery……………………........
Match a Receive Collar………..………….…………...14 Training Guide……………………………………..…..15 General Training Tips.……………………………........16 How Dogs Learn……………………..……………..….18 Remote control mode & Auto anti bark mode………....19 How to work with Auto anti bark………………......…..19 Adjust the Sensitivity Level………………..…………..20 Frequently Asked Questions…………………………...
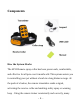
Components How the System Works The SP13 Remote spray collar has been proven safe, comfortable, and effective for all pets over 6 months old. This system assists you in controlling your pet without a leash in a long distance range. At the push of a button, the remote transmitter sends a signal, activating the receive collar and emitting safety spray or warning beep .
misbehavior that your pet exhibits can be corrected or any basic obedience commands can be taught. Also, The SP13 Remote Spray Trainer has anti bark function .When you don’t use remote control in the first 1 minute after turning on the collar , the receive collar will enter anti bark mode automatically. The microphone will be activated by dog’s bark then the receive collar will emit warning beep and safety spray to stop barking.
-Auto anti bark function. -Suitable for all dogs. - Train up to 2 dogs with the same transmitter. - Long and Short spray. - High and Low warning beep. - Select your dog with dog selection button. - Rechargeable 3.7V Li-ion battery for receiver. - 2 PCS of 1.5V AAA battery for remote controller. -Soft Silicon Collar Strap. - LED low power indication. Red light will flash 1 time per second when battery level is low. -LED low spray indication. Red light will flash 1 time per five seconds when low spray.
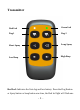
Transmitter Red Led Green Led Dog 1 Dog 2 Short Spray Long Spray Low Beep High Beep Red Led: Indicates the first dog and low battery.
time after choosing the first dog. When low battery , the Red led will flash 1 time per second. Green Led: Indicates the second dog. Press the Dog 2 button or Spray button or beep button one time, the green led light will flash one time after choose the second dog. Dog 1 button: Select the first dog and match the first dog collar; Press this button to control the first dog . Dog 2 button: Select the second dog and match the second collar ;Press this button to control the second dog.
Receive Collar Blue Led Indicates the sensitivity level High, Middle and Low. Spray Nozzle LED Light Indicates the working status, low battery, low spray, charging status. Microphone Dog bark sensor. Pick up the dog’s bark. Mini USB Refill Port On/Off button Press and hold on 2 seconds to turn the collar on. Two confirming tones will sound and the green LED light will flash 1 time per 5 seconds. Press and hold on 2 seconds to turn the collar off.
Function and Response Table Function LED Light Response Unit is on Green light flash 1 time per 5 seconds Low battery Red light flash 1 time per second Low spray Red light flash 1 time per 5 seconds Charging Red light is on Full charge Green light is on Charge the Receive collar The receiver can be charged rapidly in about 2 hours. Though 3-4hours is better for the battery life.
The red LED light is on when charging. The green LED light is on and the red LED light is off when the receive collar is full charged. The receiver’s red LED light will flash one time per second when the battery is low power. Please recharge the battery immediately. Insert the Transmitter battery 1. Hold the Remote Transmitter face down. Gently push on the lower door, slide down and remove the battery cover. 2. Insert 2 pieces of 1.5-Volt alkaline batteries according to the correct “+” and“-“ polarity. 3.
Match a Receive Collar To add a receive collar to your remote dog training system, please follow below steps. Only turn on 1 collar at a time to connect then follow below steps for the 2nd collar if required. Step 1:Take out 1 unmatched receive collar. Press and hold “ON/OFF” button. After two “beep” sounds, release the button, the power of receiver is on. Step 2: Take out the transmitter.
collar ) until hearing 5 “beeps” sound from the receiver then release . If you want to match the second dog collar , press and hold on the Dog 2 button . Note: You should press and hold on Dog 1 button or Dog2 button within 10 seconds after turn on the unmatched receive collar . Otherwise you have to turn off receive collar then turn it on again to match .
middle of the dog’s neck. The receiver should be on the underside of his/her neck, with the Spray Nozzle towards the dog’s nose. The Receive Collar should fit snugly, yet loose enough to allow one finger to fit under the strap. Ensure a Proper Spray Pattern For the Receive Collar to perform properly, the nozzle must be positioned correctly and there must be a clear path from the Spray Nozzle to your dog’s snout. 1.Make sure the Spray Nozzle is angled out and pointing up towards the dog's snout. 2.
10-15 minutes.) 2. Train one dog at a time. 3. During the first initial training session, keep the dog in a familiar outdoor environment. 4. Use a long leash fastened to a non-metallic collar to help the dog's learning. 5. Be consistent. Give your dog a tone and/or spray with each misbehavior. 6. Teach the dog a command first before reinforcing the command with the remote transmitter. 7. Issue one obedience command at a time. Do not use the training system for commands that the dog has not learnt. 8.
the first couple of times), do not be alarmed. Redirect his attention to a simple and appropriate behaviour (i.e. a known command such as “sit”). 12. Please keep in mind, that you should keep training sessions short and end every session on a high note. Stop training and play with the dog as soon as the dog has accomplished a new level of proficiency. 13. Never use the SP13 Remote Spray Trainer to correct or eliminate any form of aggressive behaviour.
Don’t introduce remote training around distractions. Keep things simple for your dog in their first sessions. They can’t learn well when there’s too much going on. Remote control mode & Auto anti bark mode Auto anti bark mode : The receive collar will enter auto anti bark mode automatically 1minute later when you turn on the receive collar and don’t use the transmitter to get any signals within first 1minute.
collar continue to detect the barking in 1 seconds. 3)The collar will return to the original status if it can’t detect the barking in 120 seconds.Then it will start to issue warning beep again. Adjust the Sensitivity Level 1) The receive collar has 3 levels of sensitivity : Low , Middle and High. 2) You can adjust the correct sensitivity level according to the dog type and loudness of dog’s barking. 3) You can press the On/Off to adjust the sensitivity level when the receive collar is power on .
How old should my dog be before I use this device? It is recommended that your dog be 6 months old to use a training collar. Your dog should have learned the basic commands such as “sit” or “stay”. The collar is too long, is it ok to cut off the excess collar? Yes. Can I use this on my aggressive dog? We do not recommend any of our products to be used on aggressive dogs. In this situation please contact your local veterinarian or professional to trainer to determine if your dog might be aggressive.
Does the spray need to hit my dog’s nose ? No. The spray is very fine and simply creates a mist in the region of the snout. Will this work automatically when my dog barks? Yes, you need to confirm the receive collar is Auto anti bark mode. How many dogs can I set up on this system?2.Please purchase extra collars if needed. When will I know to refill the spray? We suggest that full refill the spray before use every time. When the red Led of receive collar flash 1 time per 5 seconds, please refill the spray.
Troubleshooting Guide Problem#1: No spray or beep when a transmitter button is pressed. The receiver has not been activated. The receiver must be turned on otherwise it won’t work at all. The receiver has not been matched to your transmitter. Follow the instructions to match. Problem#2: The beeper of receiver doesn’t make any sound when the receiver is turned on. Press dog selection button to choose correct dog ID before pressing The batteries are dead. Recharge as needed.
You are training in very cold weather. Problem#4: The remote trainer doesn’t have range or the range is significantly reduced. Either you or the dog is shielded by a metal structure. Operate it far away from these structures. The receiver is on backwards. For best range, position the receiver so that the light face toward the dog’s nose. Radio interference. Wait a short while then try again, or move to another area. Problem#6: The receiver can’t receive any signal or cannot work at all.
changes or modifications not expressly approved by the party responsible for compliance could void the user’s authority to operate the equipment. This equipment has been tested and found to comply with the limits for a Class B digital device, pursuant to Part 15 of the FCC Rules. These limits are designed to provide reasonable protection against harmful interference in a residential installation.
to try to correct the interference by one or more of the following measures: -- Reorient or relocate the receiving antenna. -- Increase the separation between the equipment and receiver. -- Connect the equipment into an outlet on a circuit different from that to which the receiver is connected. -- Consult the dealer or an experienced radio/TV technician for help. This equipment complies with FCC radiation exposure limits set forth for an uncontrolled environment.