V Robot vacuum cleaner User Manual Thank you for choosing our smart vacuum cleaner! Please read this manual carefully before use.
Contents 1.Safety Instructions 2.Precautions 3.Product Introduction 3.1 Cleaner Part Diagram 3.2 Specifications 4.Operation Instructions 4.1 Charging method and quick start guide 4.2 Remote controller 4.3 Set reservation 5.Maintenance 5.1 Dust collector and filter screen cleaning 5.2 Clean the side brush and universal caster 5.3 Clean the cliff sensor 5.4 Clean the charging electrode 5.5 Clean the suction port 5.6 Clean the sensor window 5.7 Installation of the water tank(some model with this function) 6.
1.Safety Instructions Please follow the following safety precautions before using the product: Please read this manual carefully before using the product and use the product according to the instructions in this manual. Keep it properly. If you need to transfer the product to a third party, please attach the manual together with the product. Any operation inconsistent with this manual may lead to the damage of the product and personal injury. *Caution 1.
2.Precautions Please read the following guidelines before using the Cleaner. The power cord and other sundries scattered on the ground may entangle or wrap the product. Be sure to remove them before use. Please roll up the fringe of the carpet or make the product work on the short-wool carpet. The gap of less than 8cm at the bottom of the household furniture may stick the product. If cleaning is needed, please raise the furniture.
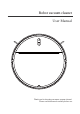
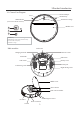
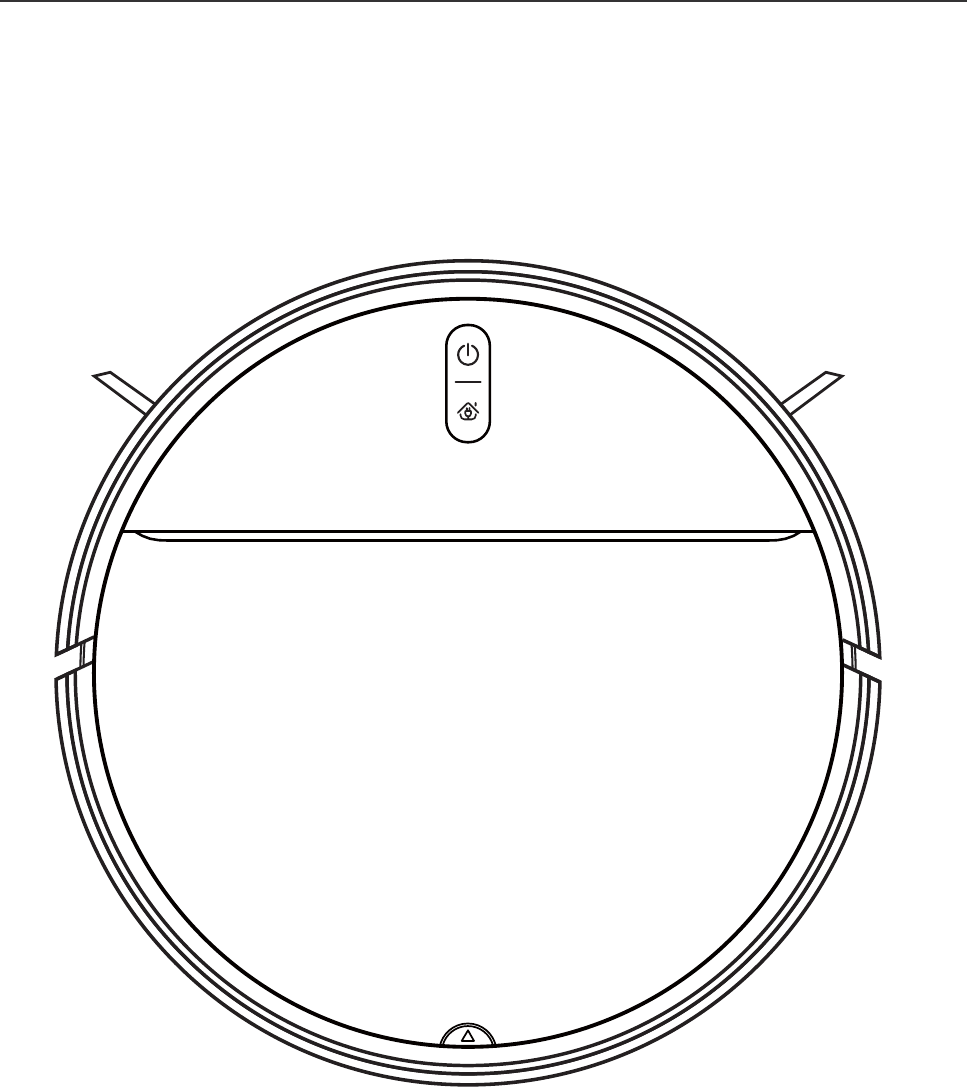
3.Product Introduction 3.1 Cleaner Part Diagram Infrared bumper ON/OFF key Cover WIFI indicator Automatic recharge (some model with this function) Middle cover 1 2 3 1.ON/OFF key 2.WIFI indicator (some model with this function) (to connect APP on the phone) 3.
3.Product Introduction Function keys Indicator status: 1.Power on: Green light constantly on ON/OFF key WIFI indicator (some model with this function) Automatic recharge 2.Abnormal: Red light flashing 3.Changing: Red light breathe 4.
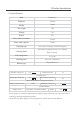
3.Product Introduction 3.2 Specifications Item Parameters Diameter 320mm Height 78mm Net weight 2kg Voltage 7.4V Power 15W Dust collector volume 600ml Water tank capacity 200ml Charging type Automatic charging / manual charging Cleaning mode Automatic cleaning, fixed-point cleaning Edge cleaning Full charge time 4-6 hours Working time About 60-90minutes Button type Physical buttons Operating voltage (V) 7.
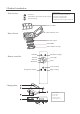
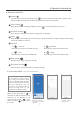
4.Operation Instructions 4.1Charging method and quick start guide 1.How to use the charging base Place the charging base on the flat ground, then connect the power adapter. The power indicator will be constantly on.The indicator light of the charging base will go out during normal charging. . . . *Notes Place the charging base on the flat ground, with the back against the wall, and remove all obstacles around the charging base of about 1.
4.Operation Instructions 4.2Remote controller 1 Standby Press this key to enter the sleep mode; press key for restarting the machine; If the machine is not operated within 3 minutes, the machine will automatically enter the sleep mode. 2 Auto cleaning Press this key to start cleaning automatically; Press to pause the machine if necessary. 3 Automatic recharge Press this key to automatically find the charging base for charging.
5.Maintenance 5.1 Dust collector and filter screen cleaning Take out the dust collector. Open the dust collector lock and pour the dust and garbage. Remove the filter elements. HEPA can be washed with water, and you can tap it to remove dust before washing.
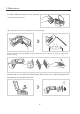
5.Maintenance 5.2 Clean the side brush and universal caster Clean the side brush Remove the side brush and wipe it with a clean cloth. Clean universal caster Clean the universal caster to remove hair entanglement. 5.3 Clean the cliff sensor Clean the cliff sensor to ensure sensor sensitivity. 5.4 Clean the charging electrode Gently wipe the bottom of the machine and the charging electrode of the charging base with a soft cloth. 5.5 Clean the suction port 5.
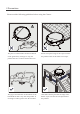
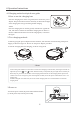
5.Maintenance 5.7 Installation of the water tank(some model with this function) 1. Insert the front end of the water tank into the mop, align as shown in the figure, and paste the mop on the magic tape of the water tank. 2. Open the inlet on the water tank and slowly inject the water into the water tank. 3. Place the bottom of the machine upward, align the positioning column of the water tank with the positioning hole of the carriage at the bottom of the machine, and press the water tank tightly.
6.Trouble Shooting Indicator description Robot will emit a series of beeps when it is in trouble, and the red light will flash or keep on. Beep once and the red light stays on Wheel is stuck please check if there are anything in the wheel gap and clean it up. Beep once and the red light keeps flashing Front bumper is stuck please check bumper Whether stuck and clean foreign matter in it.
7.Packing List Serial number Description Quantity 1 Host(include battery) 1 2 Charging base 1 3 Remote controller 1 4 Power adapter 1 5 User manual 1 6 Side brush 1 pair 7 HEPA filter 1 8 Dishcloth 1 9 (some model include this part) Water tank 1 1 2 3 4 5 6 7 8 6TFS .
Name Tel Address Model Purchase date Warranty period 1. Please keep your product warranty card properly. 2. When you need to maintain the product, please fill in the warranty information completely, make sure the font is neat and easy to identify. 3. When you need the after-sales service, please show the product warranty card and related purchase information. 4. The product shall be provided with relevant after-sales services in accordance with the national guarantees regulations.
NOTE: This equipment has been tested and found to comply with the limits for a Class B digital device, pursuant to part 15 of the FCC Rules. These limits are designed to provide reasonable protection against harmful interference in a residential installation. This equipment generates uses and can radiate radio frequency energy and, if not installed and used in accordance with the instructions, may cause harmful interference to radio communications.