DA ASH CA AM Use er's maanual
Contents Important Notice ....................................................... ....1 Button display. .............................................................. 2 Button function analysis ............................................... 3 Operation/setting and installation ................................. 5 ON/OFF ............................................................... 5 Turn off the screen ............................................... 5 Charging .............................................
Important Notice • Due to the fast power consumption of camera, it should be connected to an external power supply always, otherwise the built‐in Lithium battery will run out quickly.Be sure to power the camera with the original power adapter included. • For safety reasons, this camera has a small built‐in Lithium battery, which is used to save the video file after external power supply cuts off (car turns off). • This camera records video at high resolution.
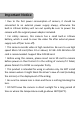
Button display USB Port Mount Socket CAM Memory Card Slot Reset button Power/Screen On or off button Indicator light Lens Mode button OK button Locked/Menu UP button/Rewind Down button/Fast forward 2
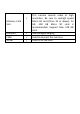
Button function analysis Name Icon UP button Function analysis Long press the power button to start the device, long press to shut down. The screen can be switched on and off by short pressing power button under the power‐on state. When the machine fails, try to insert a pin into the reset hole to reset the machine. Steady red light indicates charging, Flashing blue light indicates that the video is being recorded. Short press to switch: video mode, photo mode, playback mode, return.
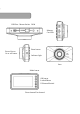
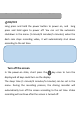
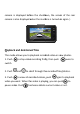
/ Memory Card Slot USB port CAM screw / / / This camera records video at high resolution. Be sure to usehigh speed Micro SD card (Class 10 or above). 32 GB ‐128 GB Micro SD card is recommended. Support Max 128 GB card.
Operation/setting and installation ON/OFF Long press and hold the power button to power on, and long press and hold again to power off. You can set the automatic shutdown in the menu (1 minute/3 minutes/5 minutes); when the dash cam stops recording video, it will automatically shut down according to the set time. Note: When the battery power is low, the driving recorder will automatically shut down after prompting that the power is low.
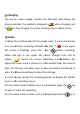
Charging Use the car power supp ply, connect the USB port, an nd charge the driving reccorder. The sym mbol is displayed as as . when charging, and when fully charged, the entire charrging time is abo out 1 hour. Video 1. When the machine de etects the powe er input, it will automatically turn on an nd start recording automaticaally (the "" sign n in the upper left corne er is flashing), press the key k to stop/staart recording.
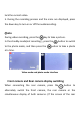
lock the current video. 5. During the recording process and the icons are displayed, press the down key to turn on or off the audiorecording. Photo During video recording, press the key to take a picture . In the standby mode(not recording ), press the to the photo mode, and then press the button to switch button to take a photo at a time.
ore the shutdo own, the scree en of the rear camera is displayed befo w the mach hine is turned on o again. ) camera is also displayed when n of files Playback and deletion This mode e allows you to playback record ded video or vie ew photos. 1. Push to stop video o recording firsttly, then push twice to switch. to sccroll through th he recorded files/photos. 2. Push and 3. Push to view all re ecorded videos,, push again to playback video you want.
Note: Push to return to the playback mode. Setting Menu Menu in video mode In the Video mode(standby,not recording), short press the button to enter the camera menu, and use the up/down buttons to select the sub‐menu to be set for setting.
Loop Record EV License Plate Audio record Date stamp G‐Sensor Parking Guard Auto Power off Screen saver Frequency USB Mode Mirror Image Speaker Boot sound Key Sound Language Date/Time Time Zone Speed Unit GPS test Format Off/1 min/3 min/5 min ±2 On/Off Default: Off On/Off Default: On On/Off Default: On Off/Low/Middle/High Default: Middle On/Off Default: Off Off/1min/3min/5min Default: Off Off/30s/1min/3min/5min Default: Off 50Hz/60Hz USB storage/ charge Default: charge On/Off Default: Off Mute/Low/Middle/
Default Asr Version Whether to restore factory settings On/Off Automatic Speech Recognition Current system version with WIFI come with a QR code Menu in photo mode In the photo mode, short press the button to enter the camera menu, and use the up/down buttons to select the sub‐menu to be set for setting.
Auto Power off Screen saver Frequency Mirror Image Boot sound Language Date/Time Time Zone Speed Unit Format Default Version Off/1min/3min/5min Default: Off Off/30sec/1min/3min/5min Default: Off 50Hz/60Hz On/Off Default: Off On/Off Default: On multilingual Press OK key and Mode key to select time, date, date format and time format respectively for setting Press up/down keys to adjust date, time, date format, time format ±12 KMH/MPH Whether to format the memory card Whether to restore factory settings Curr
2. When the GPS function is turned on, the player will be automatically generated in the Micro SD card, and install the player on the computer. When connected to GPS, the dash cam will record real‐time GPS coordinates in the video file. You can view your driving route and speed on the player while the video is playing on the player on your computer. How to connect to WIFI 1. Before search for“Roadcam”on App Store or Google Play Store ,download the APP. 2.
operation, you need to press any key to display the icons. );Long press the UP button to enter the WiFi mode, as shown in the right figure: The WiFi hotspot name is SBC_ xxxxxx,the password is 12345678.(Tips:After the mobile phone is connected to the dash cam through WIFI, you cannot make any settings on the dash cam. If you need to set it, you can use the APP.) 3. After the mobile phone is connected to the WiFi hotspot name, open app Roadcam, click the device icon in the middle to enter the image screen.
(2) Browse the video in the dash cam card: click the Video / Photo icon.
(3) Download the files in the dash cam card. Click " Select " to select multiple files, download the files to the mobile phone, or delete the files in the memory card.(Note: Videos containing emergency wake‐up recordings cannot be deleted on the mobile phone.
3. Track of browsing video files. After the phone is connected to the dash cam via WIFI, the downloaded video will be saved to the phone memory first. The mobile phone is connected to the data network. Open App Roadcam, click the album and enter the file browsing screen. If the video file has GPS information, the video will be automatically loaded into the GPS track.
ASR ‐ Automatic Speech Recognition Only English instructions are supported. 1. Selectthe Asr option in the Menu,there are 11 instructions. 2. Click "on" to turn on the Asr, Click "off" to turn off the Asr. How to install the suction cup holder Use the suction cup mount to install the dash cam on the windshield. The recommend place is near the rear view mirror facing front, adjust the angle of lens for the best coverage over the hood and the road ahead, so camera can record what happens. 1.
suction cup will be tightly attaached to the windshield. It can be easily removed by e right when remo oving. sliding to the o connect to the t cigarette lighter l sockett How to 1. Before installation, ple ease check the e the function work w well,and be sure to o use high speed Micro SD carrd (speed Class 10 or above), and formaat the card in th he camera menu u before record ding. Note:The Camera will auto o power on/off with w the car engine is on/off. 2.
3. The cab ble of the rear camera c needs to be connecte ed to the dash cam (there e are 2 picturess for reference)). The rear cam mera should be installed above the liicense plate. For more durability, d we recommen nd drilling two screw s holes to install the came era. Note: 1.It iss recommended to install it unde er the guidance of o professionals. Those who have experience in the installatio on of driving recorders can install elves. it by themse 2.
Specification Video codec performance Lens Aperture Lens Display Rear camera Power Interface Battery Operating temperature storage temperature Reversing video GPS WDR Starlight Color Night Vision Parking Guard WIFI ASR ‐ Automatic Speech Recognition G‐Sensor H.264/Resolution 3840*2160@30fps (4K) F/1.
Memory card File format High‐speed micro SD card (Class 10,maximum support 128GB) Video file format is MP4, photo format is JPG Common problems and solutions Q: Even though set the screen saver, but the screen willrandomly come back on. A: The power supply might not be stable, please change another car charger to try. Q: Why dash cam drain car battery? A: Please check whether the cigarette lighter is still on after you turn off car engine.
Q: The camera keeps starting and off? A: That could be the parking monitor function being triggered when detecting a vibration after dash cam is powered off. Q: The dash cam will automatically stop while recording. A: 1.Check whether the Micro SD card is full. If yes, we are afraid there are many locked video which cannot be overwritten automatically by loop recording because of the high sensitivity of G‐sensor. 2.
Q: If the video played on the computer is somehow not fluent or jammed. A: 1.Try to play the video with other video players, such asPotplayer or VLC player. 2.Make sure that the Micro SD card fits the requirement: Write Speed is over 10MB/S. Q: There are stripes interference in the image. A: There should be wrong light frequency According to the local main frequency, make the appropriate settings 50HZ or 60HZ.
the rear camera into the camera again. Q: Suction Cup mount cannot attach on windshield well? A: Removed the protective film of suction cup mount firstly and attach it to the windscreen which is cleaned. If it doesn't work, warming the suction cup or windscreen then try it again. Q: The camera crashes or malfunctions after certainoperations or setting changes. A: The unsuitable settings or operations might cause that the system crashes, please use a pin to press the RESET button to reset the camera.
FCC Warning Statement Changes or modifications not expressly approved by the party responsible for compliance could void the user’s authority to operate the equipment. This equipment has been tested and found to comply with the limits for a Class B digital device, pursuant to Part 15 of the FCC Rules. These limits are designed to provide reasonable protection against harmful interference in a residential installation.