Not for use with aggressive dogs. Do not use this product if your dog is aggressive, or if your dog is prone to aggressive behavior. Aggressive dogs can cause severe injury and even death to their owner and others. if you are unsure whether this product is appropriate for your dog, please consult your veterinarian or a certified trainer. or use with dogs over 6 months of age and over 8 lbs.
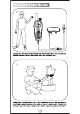
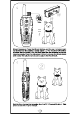
Charge the Receiver and the Remote Transmitter for 3 hours with the double-headed Micro-USB cable from the package box. Make our dog sit down and fit the Receiver to your dog by leaving one finger space between the collar and your dog's neck. Center the contact points underneath your dog's neck, touching the skin.
Turn on the Receiver by pressing and holding the Power Button for 2 seconds with a beeping tone and vibration to indicate that the Receiver turns on. The green LED Indicator light now continues to blink regularly. Turn on the Remote Transmitter by pressing and holding the On/Off {Channel} Button for 2 seconds.
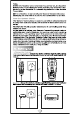
J Warning Tone Command: Press the Warning Tone Button, and the green indicator Light on the Remote Transmitter rapidly lights up. The Receiver will deliver a warning tone, and the green LED indicator light on the Receiver comes up simultaneously. Press the Adjustment Knob to choose the Warning Tone Mode and then rotate the Adjustment Knob to adjust the warning tone level. Press Vibration Command: Press the Vibration Button, and the green indicator Light on the Remote Transmitter rapidly lights up.
iz 5h J Shock Command: Press the Shock Bunion, and the red Indicator Light on the Remote Transmitter rapidly lights up. The Receiver will deliver a shock, and the green LED indicator light on the Receiver comes up simultaneously. Press the Adjustment Knob te choose the Shock Mode and rotate the Adjustment Knob to adjust the shock level. \_ > Switch the channel by pressing the On/Off (Channel) Button. This product can train up to 2 dogs.
\ Steps to pair the Remote Transmitter to an extra Receiver: 1.Change the channel of the Remote Transmitter to Channel 2 by pressing the On/O (Channel)Button; 2.Press the Power Button on the extra Receiver 3 times until you hear a beeping tone while the green LED indicator light on the extra Receiver keeps on; 32.
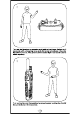
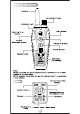
Receiver Nylon Collar J \ ml ali mn Test Bulb Tool Metal Prongs Silicone Caps Charging Cable User Manual Contact Points
Antenna Adjustment Knob indicator Light Warning Tone Light Button Button On/Off {Channel} Button Vibration Button Shock Button Keypad Lock Full-Color LCD Display ie 3§ 7 Note: {1)The icon "88" will be displayed when the Remote Transmitter toggles to the lock state.
Note: {1}With the Receiver and the Remote Transmitter on, the Receiver Battery icon will be displayed when pressing any of the Function Buttons, as the Receiver is successfully paired with the Remote Transmitter. {2}1f the Receiver is turned off, the Receiver Battery will keep displaying its level before shutdown on the Remote Transmitter. The Remote Training Collar is easy to use with an advanced digital display that tells you exactly what level of stimulation you are using.
Please use a charger with a 5V output voltage that can always be seen on the surface of it. If charged with a charger with an output voltage over 5V, the Receiver will deliver a rapid warning tone and stop charging automatically, and the Remote Transmitter will stop charging automatically with the colorful indicator rapidly blinking in red. Turn on the Remote Transmitter by pressing and holding the On/Off (Channel) Button for 2 seconds.
Turn off the Receiver by pressing and holding the Power Button for 3 seconds with a long beeping to indicate that the Receiver turns off, as the green LED Indicator light stops blinking. Press the Warning Tone Button and the Receiver will deliver a warning tone. It will cut off automatically if you press and hold the Warning Tone Button for 10 seconds. There is a total of 8 levels of Warning Tone for training which you can adjust by rotating the Adjustment Knob.
Press a total of two modes for the Light Mode: L1 for the Illuminating Light Mode, and L2 for the Positioning Light Mode, which you can adjust by pressing or holding the Positioning Light Button. Illuminating Light Mode: Press the Light Button, and the Illuminating Light on the Receiver will be on, while the “L1” icon is shown on the Remote Transmitter. Press the Light Button again, and the Illuminating Light Mode will be off.