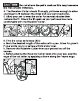
Important Safety Information [WARNING] Not for use with aggressive dogs. Do not use this Product if your dog is aggressive, or if your dog is prone to aggressive behavior. Aggressive dogs can cause severe injury and Sven death to their owner and others. If you are unsure whether this product is appropriate for your dog, please consult your veterinarian or certified trainer. Safety during on-leash training is vitally important that you and your dog remain safe while learning during on-leash training.
«Examine the contact area daily for signs of a rash or a sore. «If a rash or sore is found, discontinue use of the collar until the skin has healed. «If the condition persists beyond 48 hours, see your veterinarian. These steps will help keep your pet safe and comfortable. Millions of pets are comfortable while they wear stainless steal contacts. Some pets are sensitive to contact pressure. You may find after some time that your pet is very tolerant of the collar.
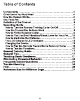
Table of Contents Components Other Items You May Need How the System Works. Key Definition of the Product Operating Guide . How to Turn the Remote Training Collar How the Transmitter Buttons Work . How to Fit the Receiver How to Find the Best Vibration/Shack Level for Your Pe How to Maximize the Distance... The LCD Display & LED Indicator Charging the Device How to Pair the Remote Transmitter & Receiver Collar. How to Test the Functions.
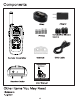
Components Strap Adapter asks eal Conductive Silicone Probes Covers Remote Transmitter Test Bulb USB Cable [E—— sar Manual © o Resolver Collar User Manual Other Items You May Need “Scissors “Lighter
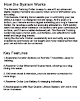
How the System Works The Remote Training Collar is easy to use with an advanced digital display that tells you exactly what level of stimulation you are using. This Remote Training Collar assists you in controlling your pet without a leash in a designed remote range. At the push ofa button, your remote sends a signal activating your dog's Receiver Collar. He receives a safe but annoying stimulation.
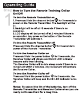
Definition of the Product Remote Transmitter Antenna Wrist Strap Hole LED Light LED Indicator Light Channel ON/ OFF Button) Shock Button Vibration Button Vibration Level UP Shock Level UP Vibration Level DOWN; Shock Level DOWN Receiver Collar lo Ol Contact Point LED Indicator Power On/Off Button Charging Jack ( Pairing Button )
prating Guide How to Turn the Remote Training Collar On/Off To turn the Remote Transmitter on 1.Press and Hold the channel button ® for 3 seconds to power on the Remote Transmitter. The back light will be on. will be off at 10 seconds if thees is no operation. 3.LCD display will be turned off at 2 minutes if there is no operation.Any press on the button of the Remote Transmitter will activate it.
How the Transmitter Buttons Work 1.Press ® / nonattendance beep,shock and vibration command to Receiver Collar. 2.Press and Hold ®/ Receiver Collar will have a consecutive beep,shock and vibration and stop after 10 seconds. Notes: Do not suggest to press and hold @ / @ for long time to avoid physical or psychological hurt to your pet. 3.Adjust the Shock Level UP Button and Shock Level DOWN Button to select the shock level.
Do not shave the pet's neck as this may Increase the risk of skin Irritation. 4. The Receiver Collar should fit snugly, yet loose enough to allow ons finger to fit between the strap and your pat's neck (3C). 5. Allow your pet to wear the collar for several minutes then recheck the fit. Check the fit again as your pet becomes more comfortable with the Receiver Collar. ax 6. Trim the collar as follows (3D): a. Mark the desired length of the collar with a pen.
How to Find the Best Vibration/Shock Level for Your Pet Important: Always start at the lowest level and work your way up.The Remote Training Collar has 100 Stimulation Levels for vibration and static shock, with level 1 being the lowest level and level 100 being the highest. This allows you to choose the Stimulation level that is best for your pet. Once you have placed the Receiver Collar on your pet, iris time to find the Stimulation Level that is best for him. This is called the Recognition Level.
If this still does not yield any results, your pet's hair will need to be trimmed around the Contact completing all of these steps, your dog still does not indicate he is feeling the stimulation, please contact our customer service. How to Maximize the Distance Terrain, weather, vegetation, transmission from other radio devices, and other factors will affect the maximum range. Hold the Remote Transmitter in a horizontal position away from your body to achieve optimum range.
The LCD Display & LED Indicator *LCD Display on Remote Transmitter Ww Indicates LED light Indicates Shock Mode is on ih Indicates Bean Mode Is on Ln} Indicates Vibration Mode is on Indicates battery level B88 | Indicates the 1 to 100 stimulation level of Shock/ Vibration *Remote Transmitter Indicator Light Definitions Remote Transmitter Function Remote Transmitter Indicator Light pones Prass® |, sliver beep command Red LED on when passing the to Receiver Collarbone will stop button after 10 consecutive seco