
User's Manual
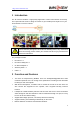
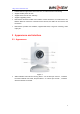
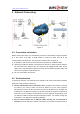

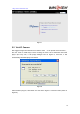
Table Of Contents

http://www.wansview.com
4 Network Connecting
Figure 5
4.1 Connection Instruction
Before visit the IP Camera, you should firstly connect it to the Network, supply the power
to it, and check if the light of RJ45 Socket is normal to make sure all of the
communication links are fluent. The connection method is like as Figure 5.
1) IP Camera-1 and IP Camera-2 are connected separately to 2 different LANs.
2) And these 2 LANs are already connected to the Internet. In order to get the LANs to
be connected to the Internet, they are required to be equipped with router and to
apply for the communication link from the local Internet Service Provider (ISP) and
connect to it by ADSL or optical fiber, etc.
3) PC-3 is connected to the Internet.
4.2 Visit Instruction
To visit the IP Camera, you should do some settings of IP Camera and Internet besides
getting the communication link fluency.
1) The PC and IP Camera are in the same LAN. If you want to use this PC to visit the
IP Camera, you need to make sure their IP address is at the same segment.
Otherwise you need to do the reset of the IP Camera’s IP address. For example, the
IP Camera-1’s IP address in Figure 5 is 192.168.1.139 (at the segment of 192.168.1),
while the PC-1’s IP address is 192.168.0.175 (at the segment of 192.168.0), then
you will be not able to visit the IP Camera through the PC-1. You need to change the
IP Camera-1’s IP address to 192.168.0.139 firstly.
2) The PC and IP Camera are in different LANs, but they are all connected to
Internet. For the IP Camera-1 and PC-2 in Figure 5, if you want to visit IP Camera-1
7