H Series——Mega pixels of Waterproof NCH-532MW User Manual V3.
http://www.wansview.com Index 1 INTRODUCTION ........................................................................................................................... 4 1.1 THE PACKAGE INCLUDES ................................................................................................................. 4 1.2 FUNCTION AND FEATURES ............................................................................................................... 4 1.3 TECHNICAL PARAMETERS .................................
http://www.wansview.com 5.4.6 5.5 6 PTZ Setting ........................................................................................................................ 19 SYSTEM SETTING PAGE .......................................................................................................... 20 5.5.1 Device Information Checking ............................................................................................ 20 5.5.2 Date and Time Setting ..............................................
http://www.wansview.com 1 Introduction The IP Camera combines a high quality digital video camera with network connectivity and a powerful web server to bring clear video to your desktop from anywhere on your local network or over the Internet. 1.1 The package includes IP Camera * 1 12V Power Adapter *1 IP Camera Utility CD *1 Stand of plastic * 1 Cable * 1 NOTE:If you select the device with wifi function, it has built-in wifi module and transmitting antenna in package. 1.
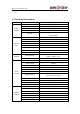
http://www.wansview.com Manufacture provides free software, support Multi-view, Long time recording, video replay etc. 1.3 Technical Parameters Sub Item Description Sensor Mega pixels CMOS Sensor Minimum illumination IR lights on, 0 Lux Image Lens f=8mm, Fixed Iris Capture Lighting 36pcs 850nm Infrared LEDs, 20m distance IR_CUT Support IR and color filter change automatically First Stream Resolution 720P(1280*720)/640*360/320*180 Second Stream Resolution 640*360/320*180 Compression H.
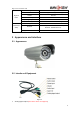
http://www.wansview.com Weight 1130g Dimension 220m(L)*112mm(W)*106mm(H) Physical Power DC 12V Index Power consumption <12W Operating temperature -20℃~ 50℃ Humidity 10% ~ 80% non-condensing OS Supported Microsoft Windows 98/2000/XP/Vista etc. Software(PC Browser Side) Internet Explorer6.0 and Above or Compatible Browser, Safari/Firefox etc. Application Software IPCMonitor.exe 2 Appearance and interface 2.1 Appearance Figure 1 2.
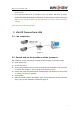
http://www.wansview.com SD Card socket is in the IP Camera, if you want to install SD Card, you must open the rear cover. Press the Reset button for 5 seconds or more, the device will return to factory default and reboot automatically. Please don’t cut off the power of device during this time. Factory default IP address is 192.168.0.158, User name: admin, password: 123456. Note: please use 12V power adapter 3 Visit IP Camera from LAN 3.1 Lan connection Figure 3 3.
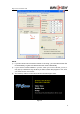
http://www.wansview.com Figure 4 NOTE: 1) If you don’t know how to fill out the content of “IP config”, you could also tick the “Set IP automatically” to get the IP address from the router automatically. 2) If you have the firewall software in your PC, when you run the HSearch_en.exe, it may pop up a window to say “whether you want to block this program or not”, then you should choose not to block. 3) The default ip address is 192.168.0.158 and default http port is 80.
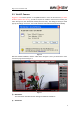
http://www.wansview.com 3.3 Visit IP Camera Suggest to use internet explorer or compatible browser to visit it for the first time (use other browsers, please refer to 6.1), you will be required to install the ActiveX before viewing the video. As Figure 5, click “Download ActiveX (when first use)”. The dialog just as Figure 6 will pop up accordingly. Click “Run”, then it will download and install the ActiveX automatically.
http://www.wansview.com Figure 8 ① connection status display ② Record status display:if click “Record” in figure 7, it will show “REC” which stands for recording; click record button again, it will stop. ③ Zoom out, zoom in and reduction picture buttons ④ File saving location setting:you may set the location for recording and capturing, the default location is d:/record; ⑤ Talk-back button::it can transmit the sound which collected by the computer to the equipment.
http://www.wansview.com 4 Visit IP Camera from WAN 4.1 Wan connection Figure 9 4.2 Port forwarding If visit IP Camera from WAN, you must do port forwarding on the router. Take Netgear router for example.
http://www.wansview.com Choose “Add custom Service” 3) Input IP camera port. 4) Input IP camera IP address,click “Apply”。 (the http port and ip address should be the same as figure 4 which set by you own) 2) Note: Different router has different settings for port-forwarding; please kindly follow your router guide to do the port-forwarding. After the port-forwarding is done, you could view the IP Camera from WAN now. 4.
http://www.wansview.com 5 Other Settings 5.1 Video Setting Page 5.1.1 Video Setting Figure 13 5.1.2 Audio Setting Figure 14 After you change any settings for Audio, you need to power off the item and reboot it. Audio on, click the audio play button as in Figure 7, you can hear the sound from IP Camera. Audio off, you will save Bandwidth and storage space.
http://www.wansview.com 5.1.3 Image Setting Figure 15 5.2 Network Setting Page 5.2.
http://www.wansview.com 5.2.2 WIFI Setting Figure 17 Please use the network cable to connect the device into Internet before doing settings of wireless connection. Please follow the above 1-4 steps to do the settings, then click “apply” to save the settings. You can also check the wireless network is connected successfully or not by clicking “Check” button. When the wireless is connected successfully, power off the device and reboot it, then the wireless network will work perfectly. 5.
http://www.wansview.com 5.3.2 Motion Detection Setting Figure 19 Please click “apply” after settings are done, and motion detection takes effect. The bigger the digital, and the higher sensitivity. 5.3.3 Alarm Mode Setting After it triggers the alarm, the camera will store the capture pictures and videos according to your settings, to store in SD, or upload to FTP, or email you, etc.
http://www.wansview.com 5.3.4 Alarm Time Setting Figure 21 The device will trigger the alarm only during the armed time period. Note: Please make sure your system time is correct before you set the alarm time period. Please refer to 5.5.2 to set system time. 5.4 Advance Setting 5.4.1 User Management Figure 22 There are 3 levels of user authorization. Administrator:”admin” has the highest authority. It can do any settings.
http://www.wansview.com 5.4.2 Auto Capture Setting Figure 23 Tick “Save Picture on the SD card”, the snap pictures will be stored onto SD card. 5.4.3 E-mail Setting Figure 24 SMTP server: fill with email server address, for example: sohu email sever, here you should fill with “smtp.sohu.com” In Figure 24, the blanks which have been filled with info should be filled. If any info is not filled right, the setting will fail.
http://www.wansview.com 5.4.4 FTP Setting Figure 25 In order to use FTP function, user should apply username and password on the FTP server first. And please apply some storage, and the authority to write and create sub-category into it. 5.4.5 Alarm Server Setting Figure 26 Please confirm if you have connected to alarm server. The alarm message format as follow: GET /api/alarm.
http://www.wansview.com 5.5 System Setting Page 5.5.1 Device Information Checking Figure 27 Device ID is set by factory. Every ID is unique Network Connection status will display “LAN” when connected by wired cable and display “Wireless LAN” connected by wireless Router. SD status will remind if SD card inserted and display the free capacity. Click “Browse” to view the contents in SD card and, “Format SD Card as fat32” to format SD Card and, “Unplug SD Card” to stop the work of SD Card.
http://www.wansview.com 5.5.2 Date and Time Setting Figure 28 Please refer to above Figure 28. Select the time zone first. There are three options to set the time and date. One is manually, another is keeping the same as the time and date on the computer, and the third one is getting it from the NTP server. 5.5.
http://www.wansview.com 6 Advanced Application 6.1 Other web browser visit device In the Windows OS, using browser with IE kernel, user must download the Active-x. Please Download “QuickTime” plug-in and install it before you use Safari, Firefox to access the IP camera. (We suggest QuickTime 7.6) After installation, users can start the QuickTime program, and to access the QuickTime Preferences dialog box from Edit Menu. Click Advanced, select “custom.” in the Transport Setup.
http://www.wansview.com Figure 31 6.2 Centralization Control Software IPCMonitor is a free software offered by factory, several devices on LAN and WAN can be browsed at the same time. The software also support snap, video record and so on. The below Figure 32 is the interface. Figure 32 For more information, pls. refer the <> in CD. 6.
http://www.wansview.com Camera video. It is compatible with QuickTime 7.6 and VLC 1.1.11 version or above. Please use below URL to visit: rtsp://ip:port/11 (View the video under first stream) rtsp://ip:port/12 (View video by second stream) The PORT is RTSP port, please refer to the settings of Figure 16.
I Warnings 1) changes or modifications not expressly approved by the party responsible for compliance could void the user’s authority to operate the equipment 2) This equipment has been tested and found to comply with the limits for a Class B digital device, pursuant to Part 15 of the FCC Rules. These limits are designed to provide reasonable protection against harmful interference in a residential installation.