INSTRUCTION MANUAL Before using the TV, please read this manual thoroughly, and retain it for future reference.
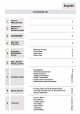
English CONTENTS SAFETY 1 PRECAUTI。N 2 IMPORTANT SAFETY INSTRUCTIONS 2 3 ACCESSO阳ES 3 4 GETTING STARTED 3 5 CONTROL REFERENCE GUIDE 6 Remote Control Front View Side View Back View WALL MOUNT 4 5 5 6 7 INSTALLATI 。N Installation Antenna Connection AV Connection YPbPr Connection HDMI Connection Power Cord Connection Optical audio output Connection 8 9 9 10 10 11 12 7 c。N NECTI 。 NS 8 INITIAL SETUP Putting The Unit On A Proper Place Turning The Unit On For The First Time Source Selec
CONTENTS 10 11 12 13 use MEDIA PLAYER 22 SMART TV 24 。PER.I:π。N DISPLAY ”。DE Video Formats 26 27 SPECIFICATION TROUBLE- 14 SHO。τING TV Symptom 28 GUIDE • The pictures, functions and other information provided in the manual are for reference on伽 If it does not match the actual object, please refer to the actual product.
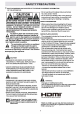
SAFETY PRECAUTION L WHW仙阳咽吨吭∞…山阳巾。 emwum 川明白 川 mdhg 阳川 dJ川m 引 町』 刨曰“ msh 时 Nr1vw mmA肌Meed 叶 HEelAh dvt 阳’旧 m川崎| onEn mluest eteurunteMHHT n 刚MιMdhm ωWM 山川嘟州”川咱 1 刻 町 ’阳 v AU 阳 mum 剧 S 朋vcutaMdmMddω ’ahuu 川 U附 muoatulUH 此d 刨 EbmaotaHMHM 时 um 山 tm n 啊’咱 atHmemosrttrwi Mddm 叮- 陆咐 副幅 酬川阳 MS·阳 且- hu明 e 勘 mmM配 n 副町 MehH odaαEOnC 币,mMhwHVW 血 murw 刷 『《 smHtuned 蛐m附M叫 仙”川阳阳刚响创句 副MWMmMhM Mm V川同∞m eob ufhcpuwrchn pneAfzorfues ErPE 4be 陪阳 MMF 们。- hg 刷阳毗伽 mMW刷M 川剧创 T刷hM忡灿川mu阴 ·阳∞」闹闹剧 hMm 啤
IMPORTANT SAFETY INSTRUCTIONS 1)Read these instructions. 2)Keep these instructions. 3)Heed all warnings. 4)Follow all instructions. 5)Do not use this apparatus near waler. 6)Clean only with a dry cloth. 7)Do not block any ventilation openings. Install in ace。rdance with the manufacturer's instructions. S)Do not Instal I near any heat sources such as radial。阳, heal registers, stoves,。『 other apparatus {Including amplifiers) that produce heat.
ACCESSORIES Please c:hec:k and Identify the supplied ac:c:ess。rles. Remote control .....…..…………… …..…..…..………..…..…..…………… ……… …..………..…...... x E E E 1 Ballery(AAA) ................................................................................................................... x 2 Warranty Card …-……-…-…-…...…-…-…--…-- … -…-……- … -…-…. Instruction Manual Base stand x1 …-……-…-…--…...…-…--…--…--…·-…-……-…·-…..x 1 ........… ………..… ………..………… ………………...… ………..……..………..…....
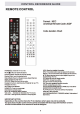
CONTROL REFERENCE GUIDE REM 。TE CONTROL Format: NEC Universal Remote Code: 20DF Code location Chart 叫 z 00 画JOO (ill 型E 宣D @) [1ID IMl [ID 道ll~~IID p。WER(): Tums the TV on or off. INFO: Show the detalled lnformauon. EPG: This control bu址。n does not apply lo this product REC(•): This control button d口es not apply to this product. MTS: Select desired sound output depending on the bro回dcesting channel. CC: Setup the mode of clo四d 四ption. SUBTITLE: Ac回回 the subtitle CHLIST:Ac四” the channel list.
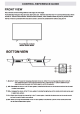
CONTROL REFERENCE GUIDE FRONT VIEW About remote cα'ltrol working dis也nee and angle, see n臼t page. POI崎畸恼1dbylndi饵tor. Blue 田d red dual-color LED. It shows red when the TV is turned off and blue when turned on. Remote Cor'ltrol Sensor: Remote co时刚 IR 缸,,sor, which m划vesin阳陪dray sent by 附note control. N。TE: If there is a protective film around the screen, ,:? rem口ve the protective film before using the TV. 飞 | Power/Standby Indicator Remota Control Sensor B。TT。M 1.
CONTROL REFERENCE GUIDE BACK VIEW _,,.,霄’….,,..,.,.…·明~…-同~……唔世句占百市. 。PTICAL: Digital TV sound output. USB: Connect the USB device such as the flash disk to access the TV media function. HDMI: (High-Definition Multimedia lnte巾ce) Provides an uncompressed digital connection. VGA: Connect the PC to these jacks. MINI YPbPr: Connectthe YPbPr output Jack oflhe DVD or VCR. RF: Connect to receive the signal from your antenna or cable through a coaxial cable.
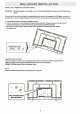
WALL MOUNT INSTALLATION INSTALLING I REM。YING THE BASE STAND WARNING : The LED Display isveryfra日ile. and must be protected al all times when removing the base Stand. Be sure that no hard or sharp object or anything that could scratch or damage the LED display comes into contact with it D。 NOT exert pressure on the front of the unit at anytime because the sc『een c口uld crack. 1 . Disconnect all cables or cords connected to the unit. 2.
|门stallation Your TV is p币,ckaged with the stand and the cabinet separated. Before using the TV, install the stand 踊 d臼cribed below, or if you want t。 mount it t。 a wall, see page 7 币。「 mounting advice; the wall mount itself is not supplied. IMPORTANT! • Makesu用 the TV set is unplugged from the p。wer supply befo帽 installing or remo叫,ing the stand. • The TV panel may be awkward t。 install 。n your 。wn. We recommend y。u 臼k someone t。 help with installation and/or removal of the stand.
CONNECTIONS CONNECTING A TV ANTENNA I CABLE I SATELLπE To view television channels c。rrectly, a signal must be 『eceived from one of the following sources: -An indoor or outdoor aerial antenna -A cable system -A sate II ite system NOTE For receiving over-the-air TV broadcasts, we recommend that you use an external fixed antenna. Should you require the use of a temporary antenna, please ensure that you purchase an antenna with sufficient ability to receive in weak signal areas.
CONNECTIONS CONNECTING AHIGH ·DEFINITION (HD) SOURCE USING COMP。”ENT CONNECT !。N High-Definition (HD) Devices with component video 口utput must be connected to the YPbP「 input. c。『mectthe component video cable and audio cable (not included) as shown. Make sure you connect the comp口nent video cable and aud lo cable from the othe「 equipment ( COMPONENT OUT and AUDIO 。UT) t。 the unit COMP。NENTIN.
CONNECTIONS c。NNECTING THE P。WERCORD Youcenpowe『。n yourTVunitbef,。『eyou 刽 the same time, meke su『elhe powe『 co『d is inserted well. please check that the rated voltage of your unit matches your I。cal Voltage. NOTE • Insert the power plug fully Into the s。cketoutlet. (lflhe power plug is loose ii pould generate heal and cause fire .) • Ensure that the power plug is easily accessible. • Ensure the ea此h pin on the power plug is securely connected to prevent electrical shock.
CONNECTIONS Connectl 。n t。 a H。me Theater Audi 。 System For BEST audl。 pt”、nmanc• c。”nectlng to a Home Theater System Dolby Digital can deliver optimal 2 ch自由nel stereo or surround sound with 自vedl”惜协 副I ran伊 channels plus a aixth chann创 for 串串ubwooter. EnJoy optimal a。und reproduction from your system wtlh a Dolby Dlgl~l ampllller that Inc。rp。rat,制 a dlgltal optical input. Connect an optional digit曲I cable directly to the televlalon's opUcal audio output to llaten through all inputs except VGA.
INITIAL SETUP PUTTING THE UNIT ON A PROPER PLACE When you turn on your television set for the first time, be sure to place it on a solid stable surface To avoid danger, do not expose the TV to water, or a heat source (e.g. lamp, candle, radiator) Do not obstruct the ventilation grid at the rear and be sure to leave sufficient gaps around the unit. TURNING THE UNIT 。 N FOR THE FIRST TIME After you have initially connected your TV antenna or cable, turn the television ON.
TV SETUP Picture Menu P『ess MENU button to display the main menu. butt。n to select PICTURE in the main menu.it will highlight the first 。ption. P『ass ‘, . ,. 匾d Pi伽『e @. @ Pictu『e Mode Soun c。ntrast 50 Function Brightness 50 ⑨ 币me Color 50 λ• Option Sharpness 50 (aj lint 。 Backlight 70 Lock 军 Channel Color Tempe『ature Picture Mode: Choose among Sports, Normal, Mild, Save and User.
TV SETUP Sound Menu Press MENU button to display the main menu. Press
TV SETUP Functi。n P『ess Menu MENU button to display the main menu. butt。n to select FUNCTI。N in the main menu.it will highlightthe first option. P『ass ‘, . ,. 匾d @. @ Picture Soun Noise Reduction M PEG Noise Reduction Aspect Ratio Function CEC link setup ⑨ 币me λ• Option HDMI EDID Netflix Deactivate Netflix ESN (aj Lock 军 Channel Netflix Version E-Manual N。lse Reduction: Eliminate noise in the picture. Choices are 。何, Low, Middle, High and Auto.
TV SETUP Time Menu Press MENU button t。 display the main menu. Press
TV SETUP Opti。n Menu Press MENU button t。 display the main menu. Press ..i I 协 button to select OPTION in the main menu.it will highlight the first option. 匾d @. @ Picture OSD Language Soun OSDlime Closed Caption Function Reset ⑨ 币me Network λ• Option (aj Softwa陪 Update(USB) Lock So阳晒陪 Upda协(NetR,回dy) 军 Channel Network Update Information 。SD Language: Select your desired 。SD 。SD Time: Select the time to keep the OSD display on the screen. language.
TV SETUP Opti。n Menu How to connect to WIFI? P『ess MENU button to display the main menu. Press ..,.. I .,. button to select 。PTION in the main menu, choose the Network. After pre随ing the 。k button, select WIFI. Select to WI Fl setting and tum on the WI Fl, select your WI Fl network and enter the passwo时, then select the Setting to connect the WIFI.
TV SETUP Lock Menu Press MENU butt。n to display the main menu. Press <1111 I .., button to select L。CK in the main menu.it will highlightthe first option. 匾d @. @ Picture Lock System Soun Set Password Function ⑨ 币me λ• Option (aj USA TV Rating USA MPAA Rating Canada English TV Rating Canada French TV Rating Lock RRT Setting 军 Channel RRTReset Input the initial password(OOOO) or your own password to access this feature, then p『ess OK button to enter the following featu 『es.
TV SETUP Channel Menu P『ess MENU button to display the main menu. butt。n to select CHANNEL in the main menu.it will highlight the fi 『st option. P『ass ‘, . ,. 匾d @. @ Picture Antenna/Cable Soun Auto Search Function ⑨ 币me λ• Option (aj Program Edit DTV Manual Search A TV Manual Search Signal Information Lock 里 Channel Antenna/Cable: Select the tuner mode between Antenna and Cable. Auto Search: Search for programs automatically. If you want to stop the auto search, prees EXIT button.
USB Media Player USB Media Menu Before operating Media menu, Plug in USB device, then press INPUT button Press T / .&. button to select USB Media Player in the Source menu, then press Enter button to enter. /” Press "'4 button to select the option you want to adjust in the main Media menu, then press Enter button to enter. Ph。t。 Menu Press "'4 Press "'4 /” button to select PHOTO in the main menu, then press Enter button to enter.
USB Media Player M。vie Menu Press -.,” button to select Movie in the main menu, then press Enter button to enter. Press menu button to return back to the previous menu and exit menu to quit. Press -.,~ bu目on to select drive disk you want to watch, then press Enter button to enter. Press ._,” bu忱。n to select the file you want to watch in the file selecting menu, then press Enter button to add the file to play list, press media button to display and operate file details.
Smart TV Operation Smart TV 。perati。n Press HOME button on the remote control to enter the Main Launcher. Press the arrow buttons ...,..,~ to select the APP, then press “。 K” button to enter. ’ NETFLIX ~ pond叶 twi佳岭 ’ -盟1311 川市凰 Y仙…“NETFL … p陌SSH。M…臼lect After enter the NETFLIX you can see below logi 『li 『1terface ’ i 『IPL』t your account and password.press ”。K” button, then you can enjoy the NETFLIX resources.
Smart TV Operation IEI 1. Use arrow key to Select button, then press “ ENTER” key to enter Youtube. 2. Use arrow button to select one video and press “ ENTER” key to play. Press “ Menu” key to exit playing. 3. 4. Pre臼 V Pre臼 A key to open or close control menu when playing. key to enter search inter阳饵, input the keyword and then press "ENTER” to search videos. . ,,,呗呵 F自盟军目 国E 『 lillll[(I• 1111[ s ,’ . .. 飞 ~ u四 arrow key to Se叫 - Press 阳rrow buttons ..,..
DISPLAY MODE VIDEO FORMATS SUPPORTED COMPONENT I HDMI INPUT MODE Horizon饱| Resolution Scanning Frequency ( KHz) Vertical S臼nning Frequency Format (Hz) 720 X 480 15. 73 59. 94 480i x 31.5 59. 94 480p 1280 X 720 45 60 720p 1920 X 1080 33. 75 60 1080i 24 1080p 67·50 60 1080p 3840 X 2160 53.9 24 2160p 3840 X 2160 67.5 30 2160p 3840 X 2160 134.
SPECIFICATION Model Vi时Anale LED Panel SS inch国 16:9 3840x2160 280cd/m' 1000:1 178(Hl/178M Resoon&e Time Meximum Color Color Svstem Sound S明白m a.oms 16.7M colors NTSC/ATSC M/MTS Resolu四m Pan副 Brightness Con甘est S归”『T商 55"LED TV De帽,ption Panel Twe Diagonal Size Sc用en Fonnat Sound Output υR Sp倒Ice「: 10W+10W RF In口ut HDMI Input 75 ohm external terminal 480i, 480p, 72郎, 1060i, 1060p, 2160p. HDMl1(2.0), HDMl2(2.0), HDMl3(2.0) Composite Video Input 1.
TROUBLESHOOTING GUIDE CAUSE (AND REMEDY) SYMPTOM lV Bad Picture (snow, multiple images distortion.blurry) No sound. Black and White pictu陪. No picture or sound. • • • • • Check the I。但tion of the antenna and 叫 ust it if ne四ssa『y. Make sure the antenna cable is firmly connected. Make sure all input cables are 币rmly connected. Increase the volume. Check whether the mute function has been activated on the Remote Control. • Check the PICTURE setting within the PICTURE menu.
FCC Warning This device complies with Part 15 of the FCC Rules. Operation is subject to the following two conditions: (1) this device may not cause harmful interference, and (2) this device must accept any interference received, including interference that may cause undesired operation. Changes or modifications not expressly approved by the party responsible for compliance could void the user’s authority to operate the equipment.