INSTRUCTION MANUAL Before using the TV, please read this manual thoroughly, and retain it for future reference. cus Model: RWOSQU5526 a. wills This prosciutto fs bean manufactured and sa under the responsibility of CURTIS INTERNATIONAL LTR. RCA, te RGA ins and tha two dogs (Nipper am Chigger) ogo srs trademarks used nude sands by CURTIS INTERNATIONAL LTD. — truer information at woe to-brand.
English CONTENTS 4 SAFETY 1 PRECAUTION IMPORTANT 2 Safety 2 CONSTRUCTIONS 3 ACCESSORIES 3 HEFTING 4 rareness 3 Remote Control 4 CONTROL Front View 5 5 REFEREEING Side View 5 aunt Back View § 5 WALL MOUNT 7 INSTALLATION Installation 8 Antenna Connection a AY Connection 8 HDMI Connection ip CONNECTIONS Power Cord Conn action ig Optical audio output Connection 11 Suiting The Ult On Apropos Place 12 4 legitimatize Turing The Unit On For Tha First Time 12 Ours Selection 13 Quick Settings 14 Using Live Meany 14 P
CONTENTS SMART TY 18 open anon 22 14 Sing Home Dashboard = " Usk MEDIA PLAYER 25 © DISPLAY Hone Video Formats 27 13 SPECIFICATION 28 TROUBLE 14 SHORTING TV Symptom 23 NUDE WARRANTY The pictures, functions and other information provided in the mans! are for reference only. If it does not match the actual object, please refer to the actual product.
SAFETY PR CAUTION # CAUTION MARKING WAS LOCATED AT THE REAR FLAGELLANT INFORMATION OF THE APPARATUS. eA SON Ty 00 ROT EXPOSE THIS UNIT TO RAN OR MOISTURE AVIS BISQUE DE CHG ELECTRIFIER HE PAS DRILL WARNING: TO REDUCE THE RISK OF ELECTRIC SHOCK, BO NOT REMOVE COVER (OR BACK) NO USER SERVICEABLE PARTS INSIDE. REFER SERVICING TO QUALIFIED SERVICE PERSONNEL.
IMPORTANT SAFETY INSTRUCTIONS 1)Read these instructions. Sep these instructions. S)Head all wakings. 4)Fsliow alt instructions. 5)000 not uae this apparatus near swats. Ohioan only with a dry sloth, 7)e not block any visitation openings. install in accordance with tha manufacturer's Instructions. €)0Jo not install near any heat sources such as transistors, heat registers, stoves, of ‘hire apparatus (Including amplifiers) that produces hast.
TELECONFERENCE GUIDE FRONT VIEW About remote control working distance and angle, 556 next gaps. Powerlessness Indicator: Bus snd red dual-dolor LED. t shows red when the TV Is muted off and blue when turned on. Remote Control Sensor: Remote control IR scissor, which receives infrared ray ser by ramparts control. NOTE: f thees ls & protactinium fim around the screen, removes the protective fim before using the TV. Powerlessness indicator Remold Control Sensor SIDE VIEW INPUT: Displays tha Source Select List.
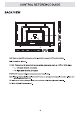
CONTROL REFERENCE GUIDE BACK VIEW USB: Connect ths USE device such as the flash disk to frescoes ths TV media function LAN: Connect the Internet CABS: Connect an AY device they has composite video jacks, such as a VOR or EVD player. © L: Left audio channel connection. + KR: Right audio channel connection. EARPHONE: Connect a 3 Smm headphones for personal audio. HDMI: (Sigh-Definition Multimedia interface) Provides an uncompressed digital connection. Pie ass enter i the setup menu bs tum it on.
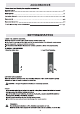
WALL MOUNT INSTALLATION INSTALLING / REMOVING THE BASE STAND WARNING : The LED Display la very fragile, and must ba protected stall tines when removing the bass Stand Bn sure that no hard or sharp object or anything ghat could orator or damages the LED display comes into syntactic It Do NOT extra pressure on the front of the unit at any time because the screen could crack +.
Installation Your TV is packaged with the stand and the cabinet separated. Before using the TV, install the stand as described below, or f you want to mount tie a wall, see page 7 for mounting advice; the wall mount itself is not supplied. IMPORTANT! + Make sure the TV set is unplugged from the power supply before installing or removing the stand. + The TV pane! may be awkward to install on your own. We recommend you ask someone to help with installation and/or removal of the stand.
CONNECTIONS CONNECTING ATV ANTENNA / CABLE / SATELLITE To view divisional channels correctly, a signal must Ba raveled from one of the following sources: ~An Indoor or outdoor aerial antenna A cable system ~ A satellite system HOT Facsimileing over-the-air TV broadcasts, we recommend that you use an external fixed pardon. Should you require tha uss of a temporary antenna, pleases ensure that you purchase an antenna with sufficient ability to receive In weak signal arches.
CONNECTIONS Connection to a Home Theater Audio System For BEST audio performance Connecting to 8 Home Theater System Dolby Digital can deliver optimal 2 channel stereo or surround sound with five discrete full tangs channels plus a sixth channel for 2 sub woofer. Enjoy optimal sound reproduction from your system with a Dolby Digital amplifier that Incorporates a digital optical input Connect an optional digital cabal directly to the television's optical audit outputted fasten through all inputs.
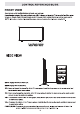
INITIAL SETUP PUTTING THE UNIT ON PROPER PLACE When you fum on your television set for the first time, be sure to pace it ong yuk stabs sleaze. To amok danger, do not expose the TV to water, or a heat suggest (e.g. lamp, candle, rat.
INITIAL SETUP To sangs your saunter sating (i you net located In USA) go fo Main Mon General” {Tha Ranch Symbiosis} then Choose Location Set your Services Country Select your country (in the many) to annals the applicable Wel OS Apps and pastures for your country.
Sequitur Accessibility Menu Select All settings in settings rems, press (Q) button te ante the sub many, Press 4/¥ buttons to select Accessibility In the sub menu, ftw highlight he option, then press bunion to enter menu Press 4/9 button ta strict the option and pees bun fo ard the sub mien Mode Certain renunciations will rot work Ff offers are ted on. Accessibility rr @ TV Power Sour de Craps Audio Guidance Glued menus and operations with calve for visually Impaired viewers ts uss TV.
Sarto TV Operation Home Tutorial Using the home features of the webs TV You cart open tha home screen by pressing halt) bunion on your remote control 1.Enter the search menu. Search for a variate of content 5. Moss to the the APP store. and information using the desired search lemme, Pad to make sure the network connection is nomad 8. Move to the Browser. 7. Moss tithe Plotters and video playback menu 2. Move To The Home Dashboard. #. Move to the Muse playback menu. 3.