English CONTENTS 4 SAFETY i PRECAUTION PORTENT 2 SAFETY 2 INSTRUCTIONS 3 ACCESSORIES 3 BETTING 4 rareness 3 Remote Control 4 CONTROL Front View 5 8 REFERENCE Side View 5 NUDE Back View & 6 WALL MOUNT 7 INSTALLATION Installation 8 Antenna Consecration 9 AY Connection 9 Ypres Connection 10 CONNECTIONS HDMI Connection 10 Power Cord Connection 11 Optical audio output Connection iz Putting The Unit On A Proper Place 13 8 metallurgist Turning The Unit On For The First Time 13 Source Selection 13 Pictures Mani 14
CONTENTS w ish senna PLAYER 41 SMART TY OPERATION 2 DISPLAY MODE Video Formats 18 SPECIFICATION TROUBLE 14 SHOOTING TY Symptom GUIDE The pictures, functions and other information provided in the manual are for reference only. If it does not mach the acts! object, please refer io the actual product.
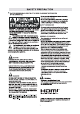
SAFETY PRECAUTION ¥ CAUTION MARKING WAS LOCATED AT THE REAR PLACEMENT INFORMATION OF THE APPARATUS. CAUTION RISKS = De not uss this uniting places they are extramural hat, cold, dusty or humid. + Dn not restrict the sirrah of this unit by placing it Haas EF somewhere with poor airflow, by covering with AL es a cloth, by placing it on bedding or carpeting.
IMPORTANT SAFETY INSTRUCTIONS 1}Raad these instructions. bespoke these Instructions. Send all wakings. “Fellow all Instructions. 6)Do not use this apparatus near water. )Loan only with 2 dry cloth. )0o sot black sy ventilation openings. Install in concordance with the manufacturer's instructions. Do sot install near any heat sources such as radiators, hast registers, stoves, or thee apparatus {Including amplifiers) tht produces heat.
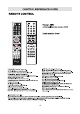
ACCESSORIES Please hessian identify the supplied accessories, Remote control! Battery) Warranty Card Instruction Manual Base stand Bede stand screws .. GETTING STARTED USING THE REMOTE CONTROL Point the ram ate control at the remote sensor located on the unit. When thees is a strong ambient light source, the performance of the infrared remote sensor may bs degrade, causing unmissable operation. Ths recommended effective distances for rematch operation is about 18 feet {5 maters). TO INSTALL THE BATTERIES 1.
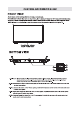
CONTROL REFERENCE GUIDE FRONT VIEW About rat note control working distance and angle, 59 Next page. Understandably indicator: Pius and red dual-color LED, It shows red when the TV is turned off and bis when turned on. Re mots Control Sensor: Remote control IR sensor, which receives infrared ray chant by remote control. NOTE: if theta is & protective fim around the screen, dramas the protective fim before using the TV. Newsstand indicator Foots Control Sensor BOTTOM VIEW 1.
CONTROL REFERENCE GUIDE BACK VIEW OPTICAL: Digital TV sound output. USB: Connect the USB device such as the fish disk to access the TV media function HOM: (High-Def n Mu ti media Interface) Provides an uncompressed digital connection. VGA: Connect ths PC to these jacks MINI Ypres: Connect the Ypres output Jack of the DVD or VOR. RF: Connect to receive the signal from your antenna or cabs through s coaxial cable.
WALL MOUNT INSTALLATION INSTALLING / REMOVING THE BASE STAND WARNING : The LED Display is vary fragile, and must be protected tall limes when removing the base stand. 8a aura that na hard or sharp object or anything that could separator or damage the LED display comes into antithetical it Di NOT taxer premature on the grant of the unit st any ime because tha worsen could rack 1. Disconnect all cables or cords connected to the unit. 2.
Installation Your TV Is packaged with the stand and the cabinet separated. Before using the TV, install the stand as described below, or if you want to mount ft to a wall, see page 7 for mounting advice; the wall mount self is not supplied. IMPORTANT! = Make suns the TV set is unplugged from the power supply before installing or removing the stand. = The TV pans! may be awkward to install on your own. We recommend you ask someone to help with installation and/or removal of the stand.
CONNECTIONS CONNECTING HIGH DEFINITION (HD) SOURCE USING COMPONENT CONNECTION High-Definition (HD) Devices with component video output must ba contact to ths Ypres Input, Conn est tha component video cable and audio sable (not included) ae shown. Wake urs you connect the component dives able and suds cable farm the either engulfment (COMPONENT OUT and AUDIO QUT) fo ths unit COMPONENT IN.
CONNECTIONS Connection to a Home Theater Audio System For BEST audio performance Connecting to @ Home Theater System Hew To Setup Digital Audio Quip Press the MENU button on the remotes control Dolby Digital san deliver opal channel press the right arrow button ta selfie sound full range channels plus a sixth channel for Press the own v farrow butler to highlight & sub woofer.
INITIAL SETUP PUTTING THE UNIT ON A PROPER PLACE When you turn on your television set for the first time, be sure to place it on a solid stable surface. To avoid danger, do not expos the TV to water, or 8 heat source (e.g. lamp, candle, radiator). Do not obstruct the ventilation grid at the rear and be sure to leave sufficient gaps around tha unit. TURNING THE UNIT ON FOR THE FIRST TIME After you have initially connected your TV antenna or cable, turn the television ON.
SETUP Picture Menu Press MENU button to display the main menu. Press « / » button to select PICTURE in the main menu, it will highlight the first option. Bill el Brightness hg Blt Tint : Fightback a [seller Picture Mode: Choose among Sports, Norma, Mild, Save and User. The following five toms (Contrast, Brightness, Color, Sharpness and Tint) can be adjust only when tha picture mods is setts “User” mode.
SETUP Sound Menu Press MENU button to display the main menu. Press 4 / button to select SOUND In the main menu, it will highlight the first opulent. Sel hl. AVL ST reel BLL eh Tao] Digital Audio output Dep Sound Mods: Choose among Standard, Music, Movie, Sports and User. The value of 120Hz2, 500Hz, 1.5KHz, kHz or 10KH2 can bs adjusted only when the sound mods is set to "User'mode. Balance: Control the sound balance between the right and |aft speaker.
SETUP Function Menu Press EMU button to display the main menu. Press «4 / & button fo select FUNCTION in the main menu,it will highlight the first option. Noise Reduction MPEG Noise Reduction eet lei ce y0 gla THT Netflix Deactivate Ls Lin ape] E-Manual Noise Reduction: Eliminate noise in the picture. Choices are Off, Low, Middle, High and Auto. MPEG Nola Reduction: Eliminate noise generated while converting of compressing MPEG signals. Choices ars OF, Low, Middle and High.
SETUP Time Menu Press MENU button to display the main menu. Press «4 / » button to select TIME in the main many, it will highlight ths first option. Off Time el Sl Way LE ale asc) | Lock we a 4 Channel Off Time: Setup the repeat mode and timer to turn off the TV set. On Time: Setup the repeat mode and timer to turn on the TV set Si esp Timer: Set to turn off the TV set automatically.
SETUP Option Menu Press BEAU bullpen to display the main menu, Press 4 | b button fo dissect OPTION In the main menu, it will highlight the first option. 8 ela (ssl Closed Caption RE Network Software Update(USB) Language: Select your desired OSD language. OSD Time: Select the time to esp the OSD display on the screen Diciest Caption: Setup the function of Closed Caption 1. CC Mods Select the CC mess. Ths following three items can't be adjusted when the CC Mods is turned off 2.
SETUP Option Menu How to connect to WIFI? Press MENU button fo display ths main menu, Crass <€ / & bunion to select OPTION in the main menu, choose the Network After pressing the OK bunion, select WiFi Select to WIF! smelting and tum on the WF, select your WiFi network and enter the password, hen satiety the Sailing to connect the WIFE.