
User's Manual


Quick Setup
1. Remove all the components from packaging and saving packaging to store laser light when not
in use. Please make sure that there are 1x Laser Light, 1 x Screw, 1 x Bracket, 1 x Stake, 1 x stand,
1x Adapter, 1x Remote Control and 1 x User Manual in the packaging.
2. Install the laser light:
1 )Find a location where is no obstructions between light and its projecting surface for the laser
light.
2). Fix the bracket into the laser with screw, and then insert the stake or stand to the bracket in the
right way.
Attention: Please be sure the laser is unplugged before installation.
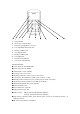
3) Installation
a, Insert the pointer on top of the stake vertically into the earth by holding the top of stake.
Use hammer or a wooden mallet to gently pound spike deeper into the ground if it is too hard.
b, Screw the bracket into the stake.
c, Fix the laser projector on the bracket with screw and adjust to the appropriate angle. Connect the
two round-pins of input wire to the waterproof adapter in a right way, and tighten the coupler
securely.
e, Connect the adapter to a working GFCI power socket when ready to use.
a. b. c. d.
4). Unplug when not in use.
Note:
The darker the area the light being used in, the brighter the projection. Try to stay away
from areas with bright illuminating lights.
Operate the Remote:
1, Press any button on the remote, the laser light will work on the mode.(See the remote control
parts)
2, Function memory, from Off to On by pressing RF remote, the light will return to the mode
before closing.
3, Please operate the RF remote control within distance: 25m(82ft.)
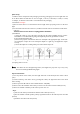
4, Please remove the insulation sheet when you start to use the remote at the first time.(Icon A)
5, Please use CR2032 cell battery if the remote’s power runs out.
Steps:
1), Pull out cell cabin by hand from the bottom of the remote.(Icon B, C)
2),Put one CR2032 cell with positive polarity up(read the marks on the remote) in the cell cabin.
(Icon D)
3), Push the cell cabin in the slot.(Icon E)