Dog Training Collar Model p-collar 210A User Manual 0.3.0.02.
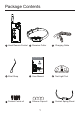
Package Contents 1 Hand Remote Control 2 Receiver Collar 3 Charging Cable Dog Training Collar Model p-collar 210A User Manual 0.3.0.02.
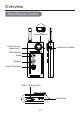
Overview Hand Remote Control Channel Select Static Intensity Adjustment Lock/Unlock Switch LED Indicator Beep Vibration Static Stimulation USB C Charging Port Wrist Strap 2
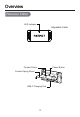
Overview Receiver Collar LED Indicator Adjustable Collar Contact Points Power Button Contact Spring Sheet USB C Charging Port 3
Important Safety Information This is the safety alert symbol. It is used to alert you to potential injury hazards.Obey all safety messages that follow this symbol to avoid possible injury. WARNING Not for use with aggressive dogs. Do not use this product if your dog is prone to aggressive behavior. Aggressive dogs can cause severe injury to their owners and others. If you are not sure if this product is right for your dog, please check with your veterinarian or a certified trainer.
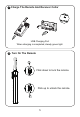
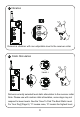
01 Charge The Remote And Receiver Collar USB Charging Port When charging is completed, steady green light. 02 Turn On The Remote Flick down to lock the remote. Flick up to unlock the remote.
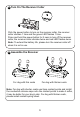
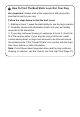
03 Turn On The Receiver Collar Click the power button to turn on the receiver collar, the receiver collar vibrates 1 time and the green LED flashes 1 time. Press and hold the power button for 2 secs to turn off the receiver collar, the receiver collar vibrates twice and red LED flashes twice. Note: To extend the battery life, please turn the receiver collar off when it is not in use.
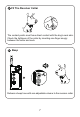
05 Fit The Receiver Collar The contact points must have direct contact with the dog’s neck skin. Check the tightness of the collar by inserting one finger snugly between the collar and neck. 06 Beep Delivers a beep tone with non-adjustable volume to the receiver collar.
07 Vibration Delivers a vibration with non-adjustable level to the receiver collar. 08 Static Stimulation Level + Level Delivers currently selected level static stimulation to the receiver collar. Note: Please use with caution static stimulation, some dogs may not respond to lower levels. See the “How To Find The Best Static Level For Your Dog”(Page 8). “0” means none, “8” means the highest level.
09 How To Find The Best Static Level For Your Dog Very Important: Always start at the lowest level and choose the level that is best for your dog. Follow the steps below to find the best Level: 1. Starting at Level 1, press the static button to see the dog’s reaction. 2. Gradually increase the stimulation levels until your pet reliably responds to the stimulation. 3. If your dog continues showing no response at Level 3, check the fit of the receiver collar.
Main Features Seep, Vibration and Static training mode 0-8 adjustable static level Receiver collar is IP67 waterproof (Caution: Remote non-waterproof) Remote range is 300-1000 feet Long-life rechargeable lithium polymer battery Support maximum 2 receiver collars with 1 remote USB C charging port 10
How to Use Test Light Tool 1. Make sure the Remote and Receiver Collar are on paired. 2. Put the test light tool vertically on the 2 contact points, making sure the metal wire has direct contact with the top of the 2 points. 3. Press the static button on the remote. The test light will be lighted. The higher the static level is the redder the light will be.
Training Tips If you want to correct the dog's bad behavior, for example, barking, please follow these training steps. 1.Put a separate non-metallic collar on your dog’s neck above the receiver collar, and attach an 8-10 feet leash. Caution: Be sure the extra collar does not put pressure on the contact points. 2. Hold the leash and the remote. 3. Choose your pet’s recognition static level. 4. As soon as your pet is barking, press the stimulation button and give the command “No” or “No barking.” 5.
Pairing Note: You may skip this step because the set is already paired by factory setting. 1. Make sure the receiver collar is turned off, make sure the channel switch of remote is on "Dog 1". 2. Press and hold the power button of receiver collar for 3 secs until the red and green lights flash alternately. 3. Press and hold the Beep and Vibration buttons of remote at the same time to pair the receiver collar. 4. Pairing successful, the receiver collar beeps 3 times and the green light flashes 3 times.
Two Receiver Collars System Part I : Pairing 2nd Receiver Collar. Note: You need own an additional receiver collar. 1. Make sure the receiver collar is turned off, make sure the channel switch of remote is on "Dog 2". 2. Press and hold the power button of receiver collar for 3 secs until the red and green lights flash alternately. 3. Press and hold the Beep and Vibration buttons of remote at the same time to pair the receiver collar. 4.
Question & Answer Q: Is the static safe for my pet? A: Static electricity may hurt your pet, please select the appropriate static electricity level. Electronic training equipment requires the interaction and training of the owner. Q: How old does my pet have to be before using the electronic training collar? A: Your pet should be able to recognize basic obedience commands such as “Sit” or “Stay”. Pets should be at least 6 months old before using the training collar.
Troubleshooting My pet does not respond when i press a button. 1. Make sure the receiver collar has been turned on. 2. Make sure the remote channel 1 or 2 is correct with the receiver collar. If not, please pairing the remote and the receiver collar again. Refer to "Paring" (Page 12) for more information. 3. Check the battery may be low in either the remote or the receiver collar. 4. Make sure the receiver collar's contact points are placed snugly against your pet's skin.
Warranty 1-Year Warranty The original purchaser for this unit is provided with a 1-YEAR Warranty. The warranty begins on the date of purchase. For the first year, coverage is provided for both parts and labor on warranty repair services. After the first year, the Limited Lifetime Warranty covers parts only, and does not cover labor fees and Accessories. Accessories such as straps and batteries are covered for the first year only.
Compliance FCC - USA This device complies with part 15 of the FCC rules. Operation is subject to the following two conditions: 1. This device may not cause harmful interference. 2. This device must accept any interference received, including interference that may cause undesired operation. CAUTION: Modification or changes to this equipment not expressly approved by the manufacturer may void the user’s authority to operate the equipment.
Designed By PATPET https://patpet.us service@patpet.com @PATPET 1-855-888-9922 (Mon-Fri, EST 9:00-17:00) Shenzhen Patpet Technology Co., Ltd Add: No.