Introduction Thank you for purchasing the product ORDOR EP8. By recording from the first perspective, you can make 4K UHD videos and photos through buttons and controller. Besides, you can download a special App to preview synchronous camcorder pictures and operate it by using the App to record videos and photos after connecting to Wi-Fi. You can edit the videos and photos on the App and share them to your social platforms.
Table of Contents ● Camcorder and Accessories ......................................................... 1 ● Components Guide. ..................................................................... 2 Camcorder components................................................................. 2 Operating indicators....................................................................... 3 Wireless controller (Optional). ........................................................ 4 ● Assembly/Disassembly of Camcorder....
Download and install the App ..................................................... 16 Using Wi-Fi ................................................................................ 17 Using the App............................................................................. 19 ● FAQ ........................................................................................... 28 ● Faults and Solutions ................................................................... 29 ● Technical Specifications .............
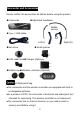
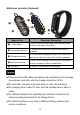
Camcorder and Accessories Please confirm the accessories as follows before using the product: ◆Camcorder ◆Adjustable headband Middle section ◆Type-C USB cable Left (L) ◆Set screw Right (R) ◆Small spanner ◆USB cable hook◆Charger (Optional) ◆Rubber cap◆Wireless controller (Optional) ◆ Manual/ Waterproof bag ●The camcorder and the wireless controller are equipped with built-in rechargeable batteries. ●As a product of IPX5, the camcorder is dustproof and waterproof (not intended for swimming).
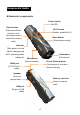
Components Guide ●Camcorder components Power button (On/Off) Photo button Wi-Fi button (Take photos/hold (Enable, disable Wi-Fi) and press it as per prompt tone to Video button format the memory (Start,stoprecording) card) Indicator (Take photos, record videos, charging and Wi-Fi operating status indication) Cameralens (Find views) Microphone R hole (Reset button) (Record sounds) HDMI port (Gently press it to restore (D-TYPE HD default settings) cable) Speaker (Give out Memory card slot pr
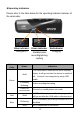
●Operating indicators Please refer to the table below for the operating indicator statuses of the camcorder. Blue indicator Green indicator Redindicator Using Wi-Fi StandbyVideo Charging recording/photog raphing Indicator Color Status Indication The camcorder is switched on and in standby Solid Green Flicker for one second Blue off;Connect it toa computer by using USB cable. Constantly flickering Red status.
●Wireless controller (Optional) ❶ ❷ ❸ ❶ ➍ ❸ ❸ ❶ Name of Part ➍ ❶ Video ❸ button ❶ ❷ Operating indicator ❸ Charging indicator ➍Photo/Candid shot ❺ USB port ❺ ❸ ➍ Functional Description Press it when the camcorder is in standby status ❸ to start, stop video recording. ❶ It flickers once when the Video/Photo button is pressed. It is solid while charging through USB cable and it will go out after the camcorder is fully recharged.
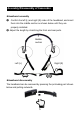
Assembly/Disassembly of Camcorder ●Headband assembly ❶ Confirm the left (L) and right (R) sides of the headband, and insert them into the middle section as shown below until they are properly installed. ❷ Adjust the length by stretching the front and rear parts. Middle section Right (R) Left (L) ●Headband disassembly The headband can be removed by pressing the protruding part shown below and pulling outwards.
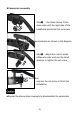
●Camcorder assembly Step❶ : As shown below, fit the camcorder with the right side of the headband and install the set screw. Step❷ : Screw up the set screw clockwise as shown in the diagram. Step❸ : Adjust the correct angle ofthecamcorder and use the small spanner to tighten the set screw. Step➍:Correctly insert the rubber cap into the set screw to finish the installation. ●Repeat the above steps inversely to disassemble the camcorder.
Charging the Camcorder In case of low battery, the camcorder will give out a prompt tone 『Low battery , please charge in time』. The responses of the controller buttons may slow down in case of low battery. After the battery is used up, the indicators will be off after the buttons are pressed. Charging the camcorder and the controller ❶ Take out the Type-C USB cable from the package.
●In case the red indicator is off and charging cannot be performed, the possible causes are as follows: ❶ The USB cable is not properly connected or the charger fails to reach required standards. You may reconnect the cable or replace the charger. ❷ Thebattery is old or abnormal. Using a Memory Card ●Memory card standard ❶ The product is compatible with micro SDXC and micro SDHC memory cards. ❷ The maximum capacity is 256GB(U3). ●Inserting/removing a memory card ❶ Confirm the camcorder is switched off.
●All the files stored in the memory card will be deleted after it is formatted to match the usage structure of the camcorder. ●Do not remove the memory card while formatting and operation. ●When a memory card used by any other device is used for the camcorder for the first time, it must be formatted on the camcorder. ●A U3 256GB memory card is recommended, and any memory card below U3 may not function properly. Power Operation ●Switch on Press the hold the power button for 3 seconds.
❶ The camcorder will shut down automatically if it is idle for 3 minutes in standby status. ❷ The camcorder will shut down automatically after being disconnected with Wi-Fi for 1 minute. ★ In case of system halt, the Reset button can be pressed to perform forced shutdown. ●Reset ❶ Open the memory card slot cover and confirm the Reset button (a small hole marked with「R」beside the card slot). ❷ Usea needle to accurately and gently press it.
Video Recording and Taking Photos ● Operate by using the camcorder Press and hold the Power button for 3 seconds. The green indicator is on and the camcorder gives out the startup sound and goes to the standby status. ◆ Horizontal screen / vertical screen mode switch Camera supports horizontal screen / vertical screen shooting mode switching, the default horizontal screen mode, the screen ratio is 16: 9.
◆Taking photos Shortly press the Photo button once; the camcorder gives out a prompt tone『Taking picture』. The green indicator flickers for one second, meaning a photo is taken. ◆Taking candid photos Shortly press the Photo button when recording a video; the camcorder gives out a prompt tone “crack”, meaning a candid photo is taken.
●The controller cannot be used when Wi-Fi is enabled. ●After the camcorder is used for recording videos for a certain period, the video files will be stored automatically in various segments. When 4K60fps/4K30fps/2.7K30fps is used, they will be automatically stored in form of 5-minute videos; when 1080P60fps/1080P30fps/720P120fps/720P60fps is used, they will be automatically stored in form of 20-minute videos. ●Candid photos cannot be made when 4K resolution is used for recording videos.
❷ Use the USB cable provided by the manufacturer to connect the camcorder to a computer. The camcorder gives out a prompt tone 『Please select the USB function and press the video button to enter the removable disk mode and press the photo button to enter the PC cam mode』. Shortly press the Video button, and the device gives out a prompt tone『Enter the removable disk mode』” and a mobile HDD is displayed on the program “Computer” in the computer.
Connecting to TV (Optional) Use an optional HDMI cable to connect it to a TV set to preview photos or videos. ❶ Press and hold the Power button to switch it on. ❷ Use an optional HDMI cable to connect the camcorder to a TV set, and match the TV channel with that for the HDMI port. The preview image of the camcorder is displayed on the TV set for taking photos or recording videos. ●The TV preview image proportion may vary according to the current resolution ratio changes for the photo/video mode.
APP ●About the App Android and iOS users may search「OD Cam」on various App stores to download and install the App. The operations as follows can be performed by using the App: ❶ Preview any photos or videos in the camcorder and download them to your phone. ❷ Use the camcorder to take photos or record videos by using your phone instead of the controller. ❸ Edit the photos or videos you download and share them to various social platforms.
●For Android users, please select「Yes」for all possible questions like 「Allow the App to obtain the permission?」. ●Using Wi-Fi ◆Enabling and Disabling Wi-Fi Enable Wi-Fi: Press and hold the power button to switch it on. Shortly press the power button. The blue indicator is on and gives out the sound『Wi-Fi on』to connect Wi-Fi. Disable Wi-Fi: Shortly press the power button when Wi-Fi is connected. The blue indicator is on and gives out the sound『Wi-Fi off』to disconnect Wi-Fi.
◆ Connecting Wi-Fi to a phone ❶ Go to the「Settings」in your phone and enable Wi-Fi. ❷ Enter the Wi-Fi name for the camcorder (Default name: EP8 xxxxxx). ❸ Enter the Wi-Fi password (Default password: 12345678) for a successful connection. ➍ Open the App「OD Cam」and click the「Connecting device」to enter the main interface of the APP. ●Because of various phone brands or configurations, the process to enter the main interface may be slow or the connection may fail. Please try the connection process again.
●Using the APP ◆ Main interface Please confirm the contents as follows for the icons on the main interface and their functions.
●The App display images of iOS and Android phones may vary because of different systems. ◆ App settings Please confirm the following contents for the names in the setting menu and their functions. 【Example of iOS System Display Interface】 Function PhotoSettings Video Settings Description Photo resolution Select the pixels for photos at will. Time-lapse shooting i.e. timed photographing, by selecting: Off/2S/10S for selfies. Video resolution Select the resolution for videos at will.
Function Loop recording Recording while shooting Slow motion Video Settings Time-lapse video interval Time-lapse video duration Distortion correction Time display Memoryspace Other settings Formatting memory card Wi-Fi Name Wi-Fi Password Factory settings Wi-Fi Switch About Firmware version Description Select: Off/On for loop recording, i.e. the first video file will be overwritten when the memory card is full to reach loop recording effects.
●The setting menu cannot be entered when the APP is recording a video. ●The App setting menu display images of iOS and Android phones may vary slightly because of system configurations. ●The function「automatic segmentation」will be used if the function 「loop recording」is used. Refer to「Page 13」for segment lengths. ●All the data of a memory card will be deleted by formatting, and the operation is irreversible. ●The default Wi-Fi password is「12345678」.
◆App video recording ❶ Click the iconto switch to the video recording mode and make required settings and functions in the setting menu. ❷Click the middle icon; it changes to, and REC time is displayed at the top; the camcorder gives out a prompt tone “Start video recording”, and the green indicator flickers to record a video. ❸Click the iconagain; it changes to; the camcorder gives out a prompt tone “Stop video recording”, and the green indicator stops flickering to stop video recording.
●Candid photos cannot be taken if the App is used for recording a video. ●Other functions cannot be performed when the App is used for recording a video. ◆ Taking photos by using the App ❶ Click the iconto switch to the photo mode and make required settings and functions in the setting menu. ❷Click the icon, the camcorder gives out a prompt tone “Take a photo, crack”; the green indicator flickers once, meaning a photo is taken.
◆ Online playback ❶ ❸ ❷ ❺ ❹ ❹ ❻ ❽ ❼ 【Example of My Device Display Interface】 S/N Functional Description S/N Functional Description ❶ Return to the preview interface ❺ Check box ❷ List of video files ❻ File size ❸ List of photo files ❼ Delete any file selected ❹ Thumbnail image ❽ Download any file selected ❶ Click「My device」on the main interface to enter the online playback interface. ❷After selecting「Video」or「Photo」, click any「Thumbnail image」 for playback.
◆Video clipping 【Example of Video clipping Display Interface】 ❶ Click「My Files」on the main interface to enter the list of files. ❷ After clicking the「Video」, click the「Check box」to select a file and click the「Video crop」to enter the clipping interface. ❸ Slide the icons「」and「」at both sides of the time shaft to adjust the length of the proposed video. ➍ Click the icon「 」to finish clipping and store it in an album or share it to various social platforms.
◆Photo editing 【Example of Photo Editing Display Interface】 ❶ ❷ Click「My Files」on the main interface to enter the list of files. After clicking the「Photo」, click the「Check box」to select a file and click the「Picture edit」to enter the editing interface. ❸ Click to add special filter effects like「Twilight」,「LOMO」, and 「Fleeting time」. ➍ Click to add all types of stickers. ❺ Click to add「Words」of various「Color」,「Fonts」.
●Because of phone configurations, iOS users may directly share any files to social platforms via mobile network, while Android users need to disconnect with the camcorder and connect to any network available before sharing any files to social platforms. FQA Q1: Can I use it as a wireless network camera? A1: No, you can’t. It is used only by connecting to a computer via a USB cable. Q2: A video may be automatically divided into several files.
Faults and Solution Fault Possible Cause and Solution ●The camcorder has low battery. Please recharge it Failure to switch on immediately. ●Check whether the operating environment temperature is within 0~40°C. ●If the ambient temperature is high or the camcorder Failure to switch off is used for an extended period, it may have excessively high temperature. Please wait a moment or use a clip/toothpick to gently press the [RST] beside the slot.
Failure to take photos/record videos ●The memory card capacity is inadequate. Please check it immediately. ●The memory card format is incorrect. Please use it after it is formatted. ●The sound equipment is poor or the volume is not Video voice is too low properly adjusted. Please use other equipment or adjust the volume. ●The distance to the sound source is too long. Please record your videos within 5m (effective distance). ●The ambient brightness is too low.
(recommended) Video 1520P QHD 2704*1520 30fps 1920*1080 60fps 1080P FHD 1920*1080 30fps 1280*720 120fps 720P HD 1280*720 60fps 20M(5200*3900) /14M(4320*3240) 10M(3648*2736)/8M(3264*2448) Photo 5M(2592*1944)/ 3M(2048*1536) 2M(1920*1080)/1M(1280*960) Memory micro SDHC memory card/micro SDXC memory card medium UHS-III, 256GB (maximum) 4K 256GB:560m /128GB:280m /64GB:140m video length 2.
Computer OS Windows 7/8/10/Mac OSX10.5 and above Mobile OS Android 5.0 and above; iOS 9.0 and above Power input DC5V/2A Type-C USB Charging time About 0.5 hours Battery life 150 ~ 170 minutes Dimensions 98.4 x 27.9 x 28.5mm (LxWxH) Weight (including 85g±5 headband) Ingress protection IPX5 Operating temperature 0~40℃ The pictures in the manual are for your reference only. The actual product may vary. We reserve the ultimate power of interpretation.
FCC Statement This equipment has been tested and found to comply with the limits for a Class B digital device, pursuant to Part 15 of the FCC Rules. These limits are designed to provide reasonable protection against harmful interference in a residential installation. This equipment generate, uses and can radiate radio frequency energy and, if not installed and used in accordance with the instructions, may cause harmful interference to radio communications.