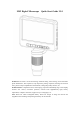
MS2 Digital Microscope Quick Start Guide V0.1 Product use: electronic circuit board testing, industrial testing, textile testing, clock and mobile phone maintenance, skin inspection, scalp inspection, printing inspection, teaching and research tools, precision object amplification measurement, reading help, hobby research, etc.
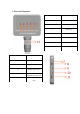
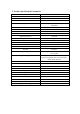
1. Parts and Functions Part No. Function 8 Wire jack 9 TF card socket 10 MICRO USB interface 11 Adjust knob for supplementary light lamp 12 Focal length adjusting roller Part No.
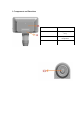
1. Components and Functions Part No.
1. Components and Functions Micro USB charging interface: When the power of the equipment is low, connect a charger to charge the equipment. It is not recommended to use the equipment during charging (it will reduce the service life of the battery of the equipment). When USB with signal cable is used to connect the computer terminal, the screen will pop up three options of "Memory Mode/PC Camera Mode/Recording Mode" for users to choose from.
1. Components and Functions Power key: long press to switch on and off, short press to switch WiFi function. Focal length adjusting roller: rotate this roller to adjust the focal length and focus the shooting object. LED supplementary light lamp: turn the brightness level knob (identification 13) to adjust its brightness. Movable arm: the angle of the display screen can be adjusted back and forth. Indicator description: indicator includes charging indicator (red) and working indicator (blue).
2.
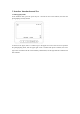
3. Interface Introduction and Use 3.1 Photography Mode In the shutdown state, press the power key for 3 seconds to turn on the machine, and enter the photographing mode by default: As shown in the figure, there is a camera logo in the upper left corner of the screen to represent the photographing mode, and the upper right corner is marked with photo resolution, the lower right corner is marked with TF card and battery identification, and the right bottom is marked with time and date.
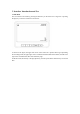
3. Interface Introduction and Use 3.2 Video Mode You can switch to recording mode by pressing the menu key on the device for a long time or pressing the recording key on the wire control for a short time: As shown in the figure, the video recorder logo in the upper left corner of the screen represents the recording mode, the video resolution is marked in the upper right corner, the TF card and battery logo are marked in the lower right corner, and the time and date are directly below.
3. Interface Introduction and Use 3.3 File Mode You can switch to file mode by pressing the menu key on the device for a long time or pressing the play key on the wire control for a short time: As shown in the figure, the upper left corner of the screen has a picture/video logo representing the recording mode, the upper right corner is marked with file format and resolution, and the lower right corner is marked with TFC card and battery logo.
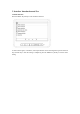
3. Interface Introduction and Use 3.4 Menu Interface Press the MENU key briefly to enter the menu interface: As shown in the figure, in the menu, relevant parameters can be set through the up, down direction keys and OK keys. After the setting is completed, press the MENU key briefly to exit the menu setting.
3. Interface Introduction and Use 3.5 Function Description Video resolution: there are three resolutions to choose from: 1080FHD, 720P and VGA. Photography resolution: there are 3M, 2M and 1M3 resolutions to choose from. Screen saver: there are 4 options: off, 30 seconds, 1 minute and 2 minutes. After the set time, the device will automatically turn off the screen. Automatic shutdown: select the appropriate time to automatically shut down the equipment when no one is operating.
4. USB Function Description 4.1 USB Functions When the device is connected to the computer through the USB cable, the device will pop up three options of memory mode/PC camera mode/video mode for the user to select. Press the up and down selection keys to select any mode and press OK to confirm. 4.1 USB Function Mode ① Memory mode: Enter the device memory on the PC side to view and process the photos and video files inside.
5. Function Description of External Wire Control Key Part No.
5. Function Description of External Wire Control Key When entering the menu or storing information, this key can switch between different options. When entering the menu or storing information, this key can switch between different options. Short press is the menu key, and long press can switch the three modes of photographing/video recording/file cyclically.
6. Use WiFi Digital Microscope on IOS/Android Device 6.1 APP Download IOS: Search iWeiCamera in App Store to download and install, or scan the following QR code to select IOS version to install. Android: Scan the following QR code and select Android (Google Play) version (international users) or Android (China) version (Chinese users) to download and install, or enter the address from the browser to download and install.
7.WiFi Connection and APP Function Introduction 7.1 WiFi Connection Steps Step 1: When the device is turned on, press the power key briefly to turn on the WIFI switch. At this time, a yellow WIFI logo will flash at the top of the screen. Step 2: Turn on the WiFi settings of your mobile phone, find the WiFi hotspot named "wifi_camera_MS2_ ..." and connect. After the connection is successful, the WiFi logo on the screen will no longer flash.
7.WiFi Connection and APP Function Introduction 7.2 APP Function Introduction 7.2.1 APP Main Interface Open the app and enter the main interface: My Photo: click to view photos and video files that have been taken. Camera: click to watch the real-time picture of the equipment and operate the equipment. Help Center: introduction to functions and operation pages.
7.WiFi Connection and APP Function Introduction 7.2 APP Function Introduction 7.2.2 Preview Interface Zoom out: click to zoom out the screen (the default is minimum every time you open it). Zoom in: click to zoom in the screen (used when the picture is too small). Reference line: click to mark the center point of the picture with a cross. Photo: click to take photos and save files automatically. Video record: click to record video/end video recording and automatically save the file.
7.WiFi Connection and APP Function Introduction 7.2 APP Function Introduction 7.2.3 My Photo Click on the My Photo, and you can view photos or videos after entering, or you can choose to delete photos or videos. If you have any questions, please contact our company. The final interpretation right belongs to our company.
FCC Caution: This device complies with part 15 of the FCC Rules. Operation is subject to the following two conditions: (1) This device may not cause harmful interference, and (2) this device must accept any interference received, including interference that may cause undesired operation. Any Changes or modifications not expressly approved by the party responsible for compliance could void the user's authority to operate the equipment.