
User's Manual
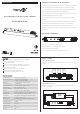

Detection area, hold time and daylight sensor can be set by using DIP switches
on the sensor. Note that reducing the detection area will also reduce the sensitivity.
SETTINGS
DETECTION PATTERN
1, Detection area
I: up to 100%
II: up to 75%
III: up to 50%
IV: up to 25%
2, Hold time
Refers to the time period the lamp remains at 100% illumination
after no motion is detected.
I: 5s
II: 5min
III: 90s
IV: 10min
V: 30min
1,Stand-by dimming level
This is the pre-setting dimming level you
would like to have after the hold time in
the long absence of people.
I: 50%
II: 35%
III: 25%
3,Daylight sensor
The sensor can be set to only allow the lamp to illuminate below a defined ambient
brightness threshold. The settings are as follows:
I: 5lux, darkness operation only
II: 25lux, darkness operation only
III: 50lux, twilight operation
IV: 25lux, twilight operation
V: 100lux, twilight operation
VI: Disable
Question
The load will
not illuminate
Incorrect daylight
sensor setting selected.
Load has failed.
Power is switched off.
Switch on.
Adjust setting.
Replace load.
Continuous movement in the
detection area.
The lamp (containing sensor) is
installed in an area too close to
reflective surfaces, i.e. metal,
glass or concrete walls.
Check detection area setting.
1, Make sure installation area
suitable with at least 30cm space
between lamp and surrounding
reflective surfaces.
2, Reduce sensitivity (detection area).
The load is
permanently
illuminated.
The load will
not illuminate
despite
movement.
Speed of moving object is not in
the range of 0.5-3m/s or the
detection radius is too small.
Check detection area setting.
Cause
Remedy
FAQ
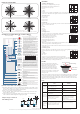
Fast walk Slow walk
Mounting height:13.1ft/4M
(Note: Please do not set the detection sensitivity to 25%/50% when mounting at the height of 13.1ft/4m)
Fast walk Slow walk
Mounting height:9.8ft/3M
13.1ft
4m
6. 6ft
2m
13.1ft
4m
6. 6ft
2m
50%
25%
75%
100%
25%
50%
75%
100%
6.6ft
2m
13.1ft
4m
19.7ft
6m
26.2ft
8m
32.8ft
10m
39.4ft
12m
6.6ft
2m
13.1ft
4m
19.7ft
6m
26.2ft
8m
32.8ft
10m
39.4ft
12m
6. 6ft
2m
13.1ft
4m
6. 6ft
2m
13.1ft
4m
75%
100%
6. 6ft
2m
75%
100%
6. 6ft
2m
13.1ft
4m
13.1ft
4m
ON
ON
ON
35%
21
ON
50%
25%
ON
ON
43
ON
ON
30min
5S
5min
10min
ON
ON
ON
100%
75%
50%
25%
21
ON
ON
ON
5 6 7
ON ON ON
ON
100Lux
Disable
50Lux
25Lux
5Lux
ON
ON
ON
ONON
ON
3, Stand-by period
Refers to the time period the lamp remains at a pre-setting dimming level before it
completely switches off in the long absence of people.
I: 0s
II: 5min
IV: 15minn
VII: +∞
ON
ON
0S
5min
15min
98
ON
ON
+∞
ON
NOTE1
Microwave detection includes two
parts called main wave and side wave.
Main wave normally detects the
motion signal. Side wave does not
effect motion detection but might
disturb main wave if the microwave
motion sensor is built-in a sealed metal
luminaire as microwave can not pass
through metal.
Sensor module
Side wave
Metal fitting
Main wave
*When set to Disable, the daylight sensor will switch on the lamp when motion is
detected regardless of ambient light levels.
*It should be set to Disable mode if the motion sensor is connected to stand-alone
daylight sensors.
* when set to 0s, the lamp will work as on/off function
* When set both daylight sensor and stand-by period to Disable.
the lamp will work as 2-step dimming control (Motion detected, 100%lm,no
motion, remains at pre-setting level lumens)
SETTINGS (OPTIONALREMOTE CONTROL MH10)
Button
Remote Control Setting
Press the “ON/OFF” button, the light goes to constant
on/off mode, sensor is disabled. Press any button to
quit from this mode and the sensor starts to work.
Remarks
Press “Reset” button, all parameters are same as
setting of DIP switch or factory settings.
Press “Sensor motion” button, the light quits from the
constant on/ off mode,and the sensor starts to work (
The latest setting stays in validity )
Press“DIM Test” button, the 1-10 V dimming works to
test whether the 1-10Vdc dimming ports are
connected properly. After 2s, it returns to the
latest setting automatically.
Short press“DIM+/DIM-” button to transmit dimming
signal. The brightness of the lamp adjusts at 5% per
unit. (not applicable for MC077V RC)
Long press>3s,sensor will take current light level as
target lux level, to dim up/down load automatically
according to the change of ambient light level.
( not applicable for MC077V RC)
Note: Detection area / Hold time /Stand-by period /
Daylight sensor can be adjusted by pressing the
corresponding button.The latest setting will stay valid.
ON/OFF
Reset
Sensor
motion
DIM
Test
DIM -
DIM +
DH
Mode
Q1 Q2 Q3
TEST
2S
Press the "TEST 2S" bottom can enter the test mode
anytime.At the mode, the sensor parameters as
below:Detection Area is 100%, Hold Time is 2s, Stand-
by Dim Level is 10%, Stand-by Period is 0s, daylight
sensor disable.This function only for testing. Quit the
mode by pressing "RESET" or any other function
buttons.
HS LS
5m
1
0
m
1
5
m
Remote Distance
Toggle bottom can set the remote distance of remote
control and sensor.
Detection Area
Set up detection area: 25%/ 50%/75%/ 100%
10%
50%
Hold time
Set up hold time:
5S/30S/1min/3min/5min/ 10min/20min/30min
Stand-by period
Set up stand-by time:
0S/10S/1min/3min/5min/ 10min/30min/+∞
Daylight Sensor
Set up daylight threshold:
5Lux/ 15Lux/ 30Lux/50Lux/100Lux/150Lux/ Disable
4m Max .
5m Max .
3m Max .
5m
10m
15m
5m Level 10m Level 15m Level
1
5
m
5m
1
0
m
1.DIP switch setting convert to remote control Press any bottom except “RESET” on the
remote control, and the sensor settings convert to the function currently selected by t
he remote control. (No function button settings invalid)
Remote control and code setting conversion
Unique design of infrared
transmitting device
When the microwave module is built into a metal lighting luminaire or installed in
a sensor near a wall, the side wave will be reflected by the metal base or the wall.
It can disturb the main wave. As the result of this, the microwave motion senor
might not perform optimally. Reducing the detection sensitivity or the side wave
will help to solve such problems.
Long press 3s,daylight harvesting mode will be
switched to daylight threshold mode,lux value will go
back to previous one.
Override
DH
Scene
Optio ns
QS1
QS2
QS3
100%
100%
100%
5min
10min
20min
10min
30min
30min
30Lux
Disab le
Disab le
Detec tion
Area
Hold
Time
Stand -by
perio d
Dayli ght
Senso r
N/A
N/A
Shenzhen Merrytek Technology Co..Ltd
2nd and 3rd Floor,No.3 building,380 Xiangshan Avenue,Luotian,Yanluo,Baoan,Shenzhen,518127,China www.merrytek.com • Email:sales@merrytek.com
2 remote control convert to DIP switch setting
a. Press the "RESET" button on the remote control, and all settings return to the DIP
switch settings of the sensor.
b. Turn off the power, toggle any DIP switch,connect to the power, and all settings
return to the DIP switch settings when supply power again.