
User's Manual

;YKX-[OJK
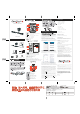
9/*+6'4+2
,854:6'4+2
9;(=55,+8
(')16'4+2
9IXK]Y
'JGVZKX
8KSUZK)UTZXUR
)GHRK
)GHRK
/TZNKHU^
=OXKRKYY9U[TJ(GX
3.[ ] button媥decrease volume / skip to previous track
4.[ ] button媥Play / pause track
5.[ ] button媥increase volume / skip to next track
30] _"dwvvqp媥Rqygt"QP1QHH
6.[
LINE IN 1 ] Input媥Input LINE IN 1
7.[
LINE IN 2 ] Input媥Input LINE IN 2
8.[ ]媥Input OPTICAL
12.[ ]媥OPTICAL LED indicator light
(Red lights )/
ARC LED indicator light
(Blue lights)
13.[ ]媥BT LED indicator light
(The flashing blue lights)
9VKIOLOIGZOUT
40]"""""""""_"dwvvqp媥Uykvej"oqfgu
30
40
Fq"pqv"wug"vjg"dnwgvqqvj"urgcmgt"pgct"ycvgt"qt"
jwokfkv{="fq"pqv"wug"vjg"fgxkeg"pgct"vjg"dcvjvwd."ycvgt"
vcpm."uykokpi"rqqn"cpf"uq"qp0
Fq"pqv"kpuvcnn"vjg"dnwgvqqvj"urgcmgt"kp"c"gzvtgog"jqv"qt"
eqnf"gpxktqpogpvu0
50 Fq"pqv"gzrqug"vjg"fgxkeg"kp"vjg"uwpujkpg"fktgevn{0
60 Fq"pqv"wug"vjg"fgxkeg"pgct"hktg."uwej"cu."uvqxg."ecpfng"qt
""""hktgrnceg"cpf"uq"qp0
70 Fq"pqv"wug"cdtcukxg"engcpkpi"uqnxgpvu"vq"engcp"vjg
""""dnwgvqqvj"urgcmgt0
This device complies with part 15 of the FCC Rules.
Operation is subject to the following two conditions:
(1) this device may not cause harmful interference, and
(2) this device must accept any interference received,
including interference that may cause undesired operation.
)G[ZOUTYGTJ]GXTOTMY
3GRL[TIZOUTGTGR_YOY
Eqpuwnv"vjg"chvgt/ucng"ugtxkeg"hqt"jgnr0
2KMGROTLUXSGZOUT
Cp{"eqr{."ejcpigu"qt"oqfkhkecvkqpu"qh"vjg"wugt"ocpwcn"
pqv"gzrtguun{"crrtqxgf"wpnguu"fgcngtɛu"rgtokuukqp0
)G[ZOUT
30 Fq"pqv"vcmg"vjku"crrctcvwu"crctv"qt"tgrckt"kv0
40 Fq"pqv"wug"vjku"crrctcvwu"pgct"ycvgt"cpf"
jwokfkv{0
50 Engcp"qpn{"ykvj"c"ft{"enqvj0
2OSOZKJ=GXXGTZ_
[qw"oc{"ykvjkp"3"{gct"htqo"{qwt"qtkikpcn"fcvg"qh"rwtejcug
tgvwtp"kv"vq"vjg"cwvjqtk|gf"ugtxkeg"hqt"tgrckt0
14.[ ]媥Infrared remote control receiver
15.[ ON/OFF]Rqygt"QP1QHH
16.Connection indicator light(
Blue lights
)
17.[DC 14]DC 14V IN jack
۲
۲
30"Iq"vq"UGVVKPIU@"DNWGVQQVJ*ocmg"uwtg"dnwgvqqvj"ku"vwtpgf"QP+
40"Yjgp"{qwt"dnwgvqqvj"gpcdngf"fgxkeg"hkpfu"vjg"urgcmgt."ugngev"ɞDGSB100BLKɟ"
htqo"vjg"nkuv"qh"hqwpf"fgxkegu0"Yjgp"uweeggfkpi"rcktkpi."{qw"yknn"jgct"ɞdggr"dggrɟ0"
35]"DV"_"dnwgvqqvj"kpfkecvqt"nkijv"crrgctu"pqtocnn{"qp0"Yjgp"rnc{"vjg"owuke."vjg"
dnwg"ngf"nkijv"yknn"hncuj"unqyn{0"
30 "Iq"vq"UGVVKPIU@"DNWGVQQVJ*ocmg"uwtg"dnwgvqqvj"ku"vwtpgf"QP+
40 "Yjgp"{qwt"dnwgvqqvj"gpcdngf"fgxkeg"hkpfu"vjg"urgcmgt."ugngev"ɞDGSB100BLKɟ"
htqo"vjg"nkuv"qh"hqwpf"fgxkegu0"Yjgp"rcktgf"uweeguuhwnn{ ."{qw"yknn"jgct"ɞdggr"
dggrɟ0"35]"DV"_"dnwgvqqvj"kpfkecvqt"nkijv"crrgctu"qp0"Yjgp"rnc{kpi "owuke."vjg"dnwg"
ngf"nkijv"yknn"hncuj"unqyn{0"
(R[KZUUZN)UTTKIZOUT3KZNUJLUXOVNUTK/59Y_YZKS
31.49
31.49
Chian Unicom 4G
Common settings Ail settings
Wireless & networks
Device
Dual card management
WLAN off
Bluetooth
Data usage
More
Home screen style
Display
Sound & notification
Storage
on
!
!
!
!
!
!
!
!
!
General
Display & Brightness
Airplane Mode
Wi-Fi
BIuetooth
Cellular
Personal Hotspot
Notifications
Control Center
Do Not Distrb
Carrier CHINA MOBILE
Off
On
!
!
!
!
!
!
!
!
!
!
Settings
The connection
On
Visible to all nearby Bluetooth devices(0:58)
Paired devices
Available devices
Bluetooth
Menu
Chian Unicom 4G
CUN-AL00
806
Settings Bluetooth
Bluetooth
The connection
My device
Other equipment
Please go to Watch Application of matching Apple
Watch & iPhone.
Now it can be found “iphone qiaoyan”.
F/58RY
Ρ Uqwpfdct"uk|g媥;62,92,96oo
Dcuu"uk|g媥382,4:4,4:2ooΡ
Ρ DV"yqtmkpi"fkuvcpeg媥32o
Ρ Rqygt"FE""<"FE"36X14C,4
Ρ
Htgswgpe{"Tgurqpug
"<":2J|3:MJ|
Ρ
DV"KE
"<"EY88;5
Ρ
Qwvrwv"rqygt"
<"72Y
Ρ
U1P"<"˙87fd
Ρ
Fkuvqtvkqp"
<"˘3'
Ρ
Ftkxgt"Uk|g"
<"407$,4""-"7047ɟ
ࣜዩ䃧⎨媥327i䱂⦮㘞媗嘷ⷣঝ
书ᩯ䃧⎨᧾媗᧾୴ధᎠ፞媥:7,332oo
࣫ጟًᕋㅱ᧥䌊ᾝధ֠
;0]""CTE""_媥ARC jack
320]"""""""""""_媥DC 14V IN jack
11.[ ]媥Input LINE IN 1LED indicator light(Red lights )/
Input LINE IN 2 LED indicator light(Blue lights)
USER MANUAL
MODEL:DGSB100BLK
SOUNDBAR
;
Y
=OXKRK
YY9U[
TJ(GX
DGSB100BLK
DGSB100BLK
1K_ "Uvcpfd{"Rqygt"QP1QHH
1K_ Uykvej"oqfgu"
1K_ Umkr"vq"rtgxkqwu"vtcem
1K_ "Rnc{1rcwug"owuke
1K_ Umkr"vq"pgzv"vtcem"
1K_ "Fgetgcug"vtgdng"xqnwog"
1K_ Fgetgcug"dcuu"xqnwog"
1K_ Kpetgcug"vtgdng"xqnwog
1K_ Fgetgcug"xqnwog
1K_ "Kpetgcug"dcuu"xqnwog
1K_ "Kpetgcug"xqnwog
10
11
638/F58RY2;3/22T
423;/25/36/224
5VKXGZOUTVXUIKYY
3.1 Bluetooth mode operation
3.1.1 Press the [MODE] button on the speaker or the [INPUT] button on the remote
control. When 13[BT] bluetooth indicator lights flash blue and a "drip" sound is
heard, then go into bluetooth pairing mode.
3.1.2 During the pairing process, keep the speaker and bluetooth device within 10
meters of each other.
3.1.3 Set your phone or other bluetooth device to bluetooth status.
(R[KZUUZN)UTTKIZOUT3KZNUJLUX'TJXUOJY_YZKS
3.2 Optical/ARC mode operation
3.2.1 Please insert one connection port of OPTICAL fiber into the 8 [OPTICAL] fiber
input jack or one connection port of ARC fiber into the 9[ARC] fiber input jack first,
and then insert another connection port into the socket of media playback device.
3.2.2 Press the (MODE) button on the speaker or the (INPUT) button on the remote
control. When 12 [ OPT/ARC ] indicator lights up red light, then enter the Optical mode
state.When 12 [ OPT/ARC ] indicator lights up blue light,then enter the ARC mode state.
3.3 LINE IN mode operation
3.3.1 Insert one of the connection ports of the audio cable into the 6[LINE IN 1] jack,
and then insert another connection port into the socket of the media playback device.
3.3.2 Press the (MODE) button on the speaker or the (INPUT) button on the remote
control. When 11[LINE IN 1/2] indicator lights up red light,enter LINE IN 1 state.
3.3.3 Insert one of the connection ports of the audio cable into the 7[LINE IN 2] jack ,
and then insert another connection port into the socket of the media playback device.
3.3.4 Press the (MODE) button on the speaker or the (INPUT) button on the remote
control. When 11[LINE IN 1/2] indicator lights up blue light,enter LINE IN 2 state.
3.4 Volume control operation
3.4.1 Short press the [ ] button on the speaker or press the [VOL-] button on the
remote control to reduce the volume.
3.4.2 Short press the [ ] button on the speaker or press the [VOL+] button on the
remote control to increase the volume.
3.4.3 Press the [TREBLE-] button on the remote control to reduce the treble volume.
3.4.4 Press the [TREBLE+] button on the remote control to increase the treble volume.
3.4.5 Press the [BASS-] button on the remote control to reduce the bass volume.
3.4.6 Press the [BASS+] button on the remote control to increase the bass volume.
3.5 Skipping and play/pause Songs operation
3.5.1 Long press the [ ] button on the speaker or press the [ ] button on the
remote control to skip to the previous song.
3.5.2 Long press the [ ] button on the speaker or press the [ ] button on the
remote control to skip to the next song.
3.5.3 Press the [ ] button on the speaker or the remote control to play or
pause music.
USER MANUAL
MODEL:DGSB100BLK
SOUNDBAR
TM
Wireless Subwoofer Connection
When the soundbar and the subwoofer are plugged in
and powered on,
the wireless subwoofer will automatically connect to the soundbar.
Manufacturer’s 1-Year Limited Warranty
The manufacturer warrants that all parts and components are defect free in materials and
workmanship for 1 year. This warranty is valid only in accordance with the conditions set
forth below:
1. The warranty extends only to the original consumer purchaser and is not transferable. In
addition, proof of purchase must be demonstrated.
2. This limited warranty is the only written or express warranty given by the manufacturer.
Any implied warranty of merchantability or fitness for a particular purpose on this product
is limited in duration to the duration of this warranty. Some states do not allow limitations
on how long an implied warranty lasts, so the above limitation may not apply to you.
3. This warranty gives you specific legal rights. You may also have other rights which vary
by state
Procedure for Replacementor Return within the l Year:
To return the product for replacement or refund within the 1 year, the original purchaser
must pack the product securely and send it postage paid with a description of the reason
for replacement ar refund, proof of purchase, and include your order number on the
package, to the following address:
Deco Gear
80 Carter Drive
Edison, NJ 08817
First plug in the DC power supply, then press the switch.