Baby Monitor INSTRUCTION MANUAL Thank you for purchasing our baby series products. We kindly recommend you to read the following instructions before using this product.
FCC WARNING This equipment has been tested and found to comply with the limits for a Class B digital device, pursuant to part 15 of the FCC Rules. These limits are designed to provide reasonable protection against harmful interference in a residential installation. This equipment generates, uses and can radiate radio frequency energy and, if not installed and used in accordance with the instructions, may cause harmful interference to radio communications.
WARNING 1. Please keep the product away from the baby more than 3feet (1meter). 2. Please place the product in a dry place to prevent short circuit caused by damp. 3. Please use Ac adapter(s) provided by us only. We do not recommend to use Ac adapters and charging cables from other brands. 4. This product is not medical equipment. Check your baby's activities regularly as this product is not designed for supervision but for assisting your supervising.
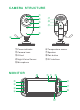
CAMERA STRUCTURE ① ② ③ ④ ⑦ ⑧ ⑨ ⑤ ⑥ ① Power indicator ② Camera Lens ③ IR Led ④ Night Vision Sensor ⑤ Microphone MONITOR 12 ⑥ Temperature sensor ⑦ Speaker ⑧ Pair button ⑨ DC interface ⑨ ① ⑩ ② ③ ④ ⑤ ⑥ OK ⑦ ⑧ + 11
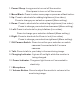
1. Power /Sleep: Long press to turn on/off the monitor. Short press to turn on /off the screen. 2. Menu/Black: Press to enter menu page or press as a Back button. 3. Up: Press to shortcuts for adding brightness (Live video). Press to change your selection upward (Menu setting). 4. Down: Press to shortcuts for subtracting brightness (Live video ). Press to change your selection downward (Menu setting). 5. Left: Press to shortcuts for play lullabies (Live video).
16 14 13 15 17 13 2.
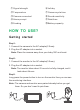
① Signal strength ⑥ Lullaby ② Temperature ⑦ Camera cycle time ③ Camera connected ⑧ Sound sensitivity ④ Alarm prompt ⑨ Date/time ⑤ Feeding ⑩ Battery capacity HOW TO USE? Getting started Step1: 1. Connect the camera to the AC adapter(2.5mm). 2. Plug the AC adapter into a socket. Note: Place the camera away from your baby 3ft/1m at least. Step2: 1. Connect the monitor to the AC adapter(3.5mm). 2. Plug the AC adapter into a socket.
CAMERA SETTING 1 . Ad d ca mer a This function is to add a new camera to the monitor. a. Press button enter to the menu page. Select and press OK to enter camera settings. b. Select Add Camera and press OK button. CAMERAS Add Camera Delete Camera Cycle Cameras c. Pop up pairing interface . Countdown 60sec. d. Press the Pair button on the back of the camera.Then see the camera added successfully. Add Camera Add Camera Note: Four cameras at most can be connected to one monitor.
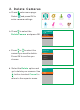
2 . Del ete Ca mer a s a. Press enter menu page. Select and press OK to enter camera settings. b. Press to select the Delete Camera and press OK. CAMERAS Add Camera Delete Camera Cycle Cameras c. Press or to select the camera you need to delete. Press OK to confirm you choose. d. Select the Delete option and go to delete your camera. Use button to select Cancel to return to the superior menu.
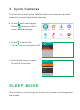
3 . Cy cl e Ca mer a s This function is setting the time for switch one camera to another camera if connecting multiple cameras. a. Press enter menu page. Select and press OK to enter camera settings. b. Press to select the Cycle Cameras and press OK. CAMERAS Add Camera Delete Camera Cycle Cameras c. Choose the time you want. Press OK to confirm. Cycle Camera OFF 5 Sec 10 Sec 15 Sec 30 Sec S L E E P MO D E This function is to prolong your monitor’s run time by shutting down the screen.
a. Press to enter menu page. Select . Press OK to enter the setting. b. Select OFF to turn off Sleep Mode. Press or button to select the time you want. Press OK to confirm. CAMERAS SLEEP MODE SLEEP MODE Sleep Mode: off Sleep Mode: 1 min Sleep Mode: 3 min Sleep Mode: 5 min c. Press to back to menu interface. T E MP/ S O U N D AL E R T 1 . Temp A cti v a ted A l er t This function is to send alarms if the temperature exceeds your settings. a . Press to enter menu page. Choose and press OK. CAMERAS b .
c. High temperature setting. Select the option you want. Press OK to confirm. Temp Activated Alert High Temp off Low Temp 75°F Alert Duration 80°F 85°F 90°F d. Low temperature setting. Select the option you want. Press OK to confirm. Temp Activated Alert High Temp off Low Temp 70°F Alert Duration 65°F 60°F 55°F e. Alert Duration setting. Select the time you want.Press OK to confirm. Temp Activated Alert High Temp 5 Sec Low Temp 10 Sec Alert Duration 20 Sec 30 Sec 2 .
b. Sound level setting.1-5 levels of sensitivity you can choose. Press OK to confirm you want select one. VOX Senstivity Sound Level Off Alert Duration 1 2 3 4 5 Alert Duration a. Press to enter menu page. Choose the Alert Duration option and press OK. b. There are four options of alarm time you can choose. Press or to choose the right time and press OK to confirm.
a. Press to enter menu page. Choose enter the settings. CAMERAS SLEEP MODE TEMP/SOUND ALERT TIME SET b. Select Set Time and press OK to enter the next interface. c. Press or to choose the ON or OFF. ON stands for starting the setting. + d. Use , , , button to change the Date/time settings. Press OK to finish setting. 2 . Feed Ti mer This function is to remind you of feeding your baby. Off means you shut down the function.2.5H hour means remind you every 2.5 hour and so on for other options.
a. Press to enter menu page. Choose Feed Timer enter the setting. b. Choose the time you want. Select Off to turn off the feeding reminder. Note: Feeding alarm lasts 5 second. BRIGHTNESS This function is to set the brightness of monitor screen. a. Press to enter menu page. Choose enter the interface. CAMERAS SLEEP MODE TEMP/SOUND ALERT TIME SET BRIGHTNESS b. Use , button to adjust the brightness. BRIGHTNESS Note: The higher the brightness, the higher the power consumption.
LULLABIES This function is to comfort your baby when needed. a. Press to enter menu page. Choose enter the interface. b. Use , button to select the lullaby you want. Choose Play All to play the lullabies in a loop. CAMERAS SLEEP MODE BRIGHTNESS LULLABIES TEMP/SOUND ALERT TIME SET LULLABIES Lullaby 1 Lullaby 2 Lullaby 3 Lullaby 4 Lullaby 5 Lullaby 6 Play All Note: Lullaby function has a quick open mode. When in Live video you can turn the lullaby on or off using the shortcut button.
b. Select 1.5x or 2x you want. Press OK to confirm. ZOOM off 1.5x 2.0x Note: The Zoom function also has a quick open mode. When in Live video, you can Zoom in/out image using the shortcut button. + SETTING This function is to set Night Vision Mode, Anti-Screen Flicker, Default Settings and provide service support information. 1 . Ni g ht Vi s i on Mod e a. Press to enter menu page. Choose enter the interface. CAMERAS BRIGHTNESS b. Select the camera you want to turn on/off the Night Vision function .
2 . Anti - S cr een Fl i ck er a. Select and confirm Anti-Screen Flicker . Press OK to enter the interface. b. Power supply frequency of 50Hz or 60Hz can be selected. Note: Generally 60Hz is selected in the United States, Japan and other countries. In this way, the picture will not flicker because of the interference of the power frequency. It's usually 50Hz in Europe. 3 . Def a ul t Setti ng s a. Select and confirm Default Settings . Press OK to enter the interface.
b. Confirm YES to reset. Press or confirm NO to exit. 4 . Temper a tur e Uni t a. Select and confirm Temperature Unit . Press OK to enter the interface. b. Choose °F or °C you want and press OK. 5 . About Select About to enter the interface.
6 . Connect Wi th Us Select Connect With Us to enter the interface. FAQ Q1. The monitor will alarm when the network is disconnected a. The monitor will alarm 1 minute when the network is disconnected. It will alarm again after every 5 minutes, and so on lasts for 30minutes will automatically turn off. b. You can press Menu button to turn off the alarm directly. Q2.
Yes.Please turn on the function of sound monitoring on the monitor. It will wake up the screen and have a beep alarm prompt If the camera detects that the baby's voice exceeds the set value. Q6. Why is there always the temperature alarm sound and icon prompt? Please check the temperature of the baby's room in time. If the temperature is abnormal, please timely adjust the temperature of the baby's room to avoid interfering with your baby's normal rest. Q7.
SPECIFICATION No. 1 2 3 4 5 6 7 8 9 10 11 12 13 14 15 16 17 18 19 20 21 Item Camera Image Sensor Resolution FOV Angle IR Distance Night Vision Video Resolution Video Bitrate Audio Encode Audio Transmission Alarm Mode Voice Senstivity Wireless Transmission Transmission Distance Connector Adaptor Working Power Temperature Sensor Dimension Weight Working Temperature Working Humidity Spec 1/4-inch cmos H62 1280*720P 70° 5M > 5LUX(IR OFF) 1280x720P/25fps 32kbps-8Mbps PCM 2 way audio Voice Detection 49dbm 2.
No. 1 2 3 4 5 6 7 8 9 10 Monitor Screen Dimension Screen Resolution Video Input Audio Input Power Adaptor Built-in polymer lithium battery Dimension Weight Working Temperature Working Humidity 5inch 1280*720P Single Channel Mic DC 1.5A/5V 2100mah/3.7V 164x90x18.85mm 176g(Adaptor not included) 0°C~50°C 20%~80% If you have any questions or problems. Please contact us by email:babymonitor@wohomeshop.