Wireless Backup Camera and Touch Button Screen System Product Manual / Installation Instructions Please read this manual thoroughly before operating the device. Keep it for future reference. Customer Service Team Email: amtifo@rearcamera.
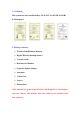
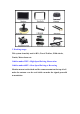
1. Certificate: The system has been certificated by CE & FCC & & EMC & RoHs & Waterproof. 2. Package contents: Wireless Touch Button Monitor Digital Wireless backup camera 2*power cords Brackets for Monitor Cigarette lighter adapter Antennas 1*Sun visor Screws Instructions (This manual is a general specification which applies to one monitor with one camera, one monitor with two cameras, one monitor with four cameras.
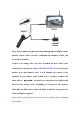
. Working range: This system is mainly used to RVs, Travel Trailers, Fifth wheels, Trucks, Motor-home etc. Vehicles under 55FT---High-Speed Driving Observation Vehicles under 60FT---Slow-Speed Driving or Reversing Monitor mount on the dash and the camera mount on the top of tail make the antenna over the roof which can make the signals powerful transmission.
.Installation Video : Please watch below video on YouTube to help you install the system. (Or please contact us get the video link directly ) https://youtu.be/wi7DXZwbPsE If you can not open this link, it may be caused by the wrong type of software. So you can search the video ID: wi7DXZwbPsE on www.youtube.com Below five video for installing on RVs (only for reference) https://youtu.be/42jvZUzh8sQ https://www.youtube.com/watch?v=CBCII-J9wM8 https://www.youtube.com/watch?v=5Z9KXXzXrqQ 5.
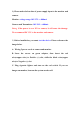
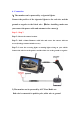
1) Please notice below data of power supply input to the monitor and camera. Monitor: voltage range 10V-35V >= 800mA Camera and Transmitter: 10V-36V >=800mA Note:If the power is over 36V to camera, it will cause the damage. We recommend DC 12V to the monitor and camera. 2) Before installation, you must test the device. Please reference the image below. A. Wiring 2 power cords to camera and monitor. B.
Tips:Test to make sure that your surroundings appear/display on the monitor screen! Once you have confirmed the monitor works, you are ready to install it. If there is no image after you have installed the unit, check your connections to the power source. PLEASE NOTE: if you reverse the positive wire and negative wire, it will damage the camera so be cautious.
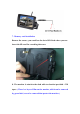
6. Connection 1)The monitor can be powered by a cigarette lighter. Connect the positive of the cigarette lighter to the red wire and the ground or negative to the black wire.( Before installing, make sure you connect the power cable and antenna to the camera) Step 1 - Step 3 Step 1: Choose the camera location. Step 2: Drill a 12mm Diameter cable hole and secure the camera with two screws.(Package contents include screws) Step 3: Locate the reversing lights or running lights wiring on your vehicle.
7. Memory card installation Remove the screws, you would see the slot of SD Card where you can insert the SD card for recording data save. 8. The monitor is attach to the dash with two bracket provided + 3M tapes. ( There is a layer of film on the monitor, which can be removed by green label, or not be removed that protect the monitor.
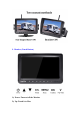
. Monitor (Touch Button) 1): Power: Turn on/off the Monitor 2): Up: Touch it to Plus
3): Down: Touch it to Minus 4): CH-: Touch to switch Channels 5): Menu: Touch this to enter the menu mode 6): OK: Touch to confirm/Select/Open and close the Recording 7): V: Touch it turn on/off guide lines Note: when entering the "Menu" mode, the Up and down key only plus and minus the data in the menu. 10. Product function introduction (1) PAIRING(First icon) (The system does not need to pair signals when you have received, because it has already been paired.
Touch + and - to switch different features Step 2: Touch the below image Red Mark button (OK key) to confirm and enter this mode. The monitor starts pairing. Step 3: When you see PAIRING START on screen, you need to disconnect the power for camera and reset the power, then wait few seconds. The image will be appear. (2) PICTURE SETTING(second icon) Step 1:Touch the below image Red Mark button (Menu) to enter menu mode (touch it once).
Step 2:Touch the below image Red Mark button (OK) to confirm and enter this mode. In this mode, you can adjust some data for brightness/contrast/volume etc.
Tips: The Screen Rotation Settings can be switched only when the screen is displayed separately full screen, which cannot be split screen. (4)Split Screen Mode (Fourth icon) Touch the menu button to enter the menu mode. Use + button to switch to this mode. Touch the below image Red Mark button (OK) to confirm and enter this mode.
(In this mode, you can choose one of eight split screen modes. The last one is Turn off the quad screen to display a single screen) For example: Select a split screen of CAM1 and CAM2. Touch the OK button to confirm. Then touch the menu button to exit the menu interface. First came the single picture. You need to touch the CHbutton to switch the screen until the split screen appear.
(The adjustment steps of the other seven split screen are the same as this mode) (5)Camera ON/OFF (Fifth icon) This function can be used to turn off or on the selected camera in the system. (Please confirm that all cameras are on before use) For example: Close Camera 1. First select the CAM1 icon (the CAM1 icon turns yellow). Touch the OK button to enter this CAM1 for adjustment (the icon color is red now).
(The adjustment steps of the other camera are the same as this CAM1) Notice: the last row of icons indicate the function is an automatic jump setting between 4 camera screens and jump time setting. When the last icon is on, it will automatically jump from the CAM1 screen to the CAM4 in the single screen. 6)SYSTEM (Six icon ) In this mode, you can adjust some data for time/language/NTSC and PAL switching/Reversing auxiliary line etc.
7)Start or Stop the Recording In this mode, you can view the previously saved video. But Touch and hold the OK button to start recording under signal screen or split screen normal conditions. Touch SEL button again to stop recording.
8)RECORD In this mode, you can recording/Formatting Data.
14. Two years quality warranty and lifetime tech support. Please contact us if you meet any issues. Troubleshoot : 1) If there is no image after installed the system, please check whether the monitor is powered on first. If the monitor button lights up, it means that has power. Then please reference below video that check the camera's LED light is turn on. If not lit on, It may be the camera was burn out or not power.
https://youtu.be/TBVcxXpY_7M 2) Please check the Positive and Negative poles of the power supply before installation. If the Positive and Negative poles are connected in opposite directions, the camera will be damaged. 3) Sometimes due to the length of the vehicle is too long or the material of the vehicle is thick, plus the driving speed is too fast, the signal becomes weak or the image is delayed. Please contact us get the 7db antenna with 13.5ft extension cable that improve signal.
FCC WARNING This device complies with part 15 of the FCC Rules. Operation is subject to the following two conditions: (1) this device may not cause harmful interference, and (2) this device must accept any interference received, including interference that may cause undesired operation. Any changes or modifications not expressly approved by the party responsible for compliance could void the user's authority to operate the equipment.