Quick Operating Manual for SkyCube 3D Printer Patented product, and counterfeiting is not allowed
Unpacking First of all, check all the parts; please contact with the seller in time once any deficiency is detected. Installation Ⅰ.
Ⅱ. Install the Conveying Pipe 1. Screw the joint of the conveying pipe into the hole of the heat dissipation block. 2. Insert the other end of the conveying pipe into the socket of the remote extruder. Ⅲ.
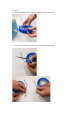
Ⅳ. Feed 1. Unpack the package of the consumable, and find out the head material; 2.
3. Press the spring of the extruder with hands, to insert the head material into the hole on lower end of the extruder, and insert to the bottom, and hang the material disk on the hook on side of the printer (notice the arrangement of the stock level, and do not tie a knot). Ⅴ. Inserting the Card Ⅵ.
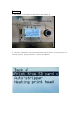
Printing 1. The display screen displays the main interface after starting up; 2.
3. Rotate the knob, and move the choice box to “printing document”, and press the knob to enter into the submenu; 4. Rotate the knob, to move the choice box to the document to be printed, and press the knob to begin printing.
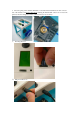
Taking down the finished printing product Take down the bottom plate after the finishing of printing, and take down the finished printing product by a slight bending. After that, clean the surface of the bottom plate (washable), in order to use for the next time. Suspending printing 1. During the printing process, press the control button, and the control menu pops up on the display screen; 2.
Continuing printing ☆ This function is only applicable to the continuing of printing after suspending printing in condition of continuous power on. 1. Press the control knob, and the operation menu pops up on the display screen; 2. Rotate the knob, and move the choice box to “continuing printing”, and press the knob to continue printing; Stopping printing ☆ It is not available to continue printing after stopping printing, and please be cautious when using this function. 1.
the knob to enter into the operation; 3. “In processing, and please wait” shows on the interface, and please wait patiently; 4.
and the temperature on the extrusion head falls, and the operation is finished. End cap dredging High quality printing consumables are selected for this printer, and this function is not needed in normal conditions. If you select other consumables, the sprayer nozzle may be blocked due to impurities in the material or other reasons, in which condition this function can be utilized. 1.
4.
5. Please poke the consumable into the sprayer nozzle for dredging, until the feeding is in normal condition. 6. Turn off the power for cooling down after the finishing of material dredging.
Tips 1. Avoid edge warping of the material: In order to make the printing material attached to the bottom plate in a preferable way, apply a thin layer of glue on the bottom plate before the commencement of the printing. 2. The TF card attached with the printer contains some printing models, and you can choose for printing; please go to internet to download more models. 3. If you need the support of medium software, please contact with the sales person, and we will provide you with related services. 4.