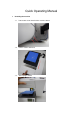
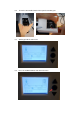
Quick Operating Manual 1 Unfolding the machine 1.1 Loosen two screws that fixed the machine column 1.2 Pull the column with hand 1.
1.4 Move the column, aligning screws to the fixed hole 1.5 Tighten the screws to secure the column Install the feeding tube 2.
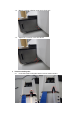
Placing the build plate 3.1 Put the build plate on the platform rack, align the magnet screw of the platform to the hole, and make the wide side towards up. 3.
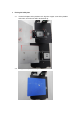
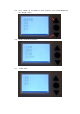
Inserting the SD card 5 Turning on the power 5.1 Plug in and power on 6 Feeding the consumables 6.
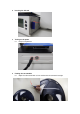
6.2 Insert the consumable into the inlet up to the extruder gear. 6.3 Starting up into the main menu 6.
.5 Press "arrow" up and down to select "Prepare", press middle Button into the " Ready " menu 6.6 Choose "feed/return filaments" 6.
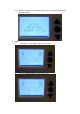
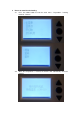
6.8 7 After the temperature reached 220 degrees, the machine will automatically load consumables Print 7.1 7.1 After power on, the display shows the main screen .
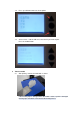
7.2 Press up and down arrows to select options 7.3 Select "menu" Into the SD card, select the file you want to print. Press the middle button. Take the model 8.1 After printing, remove the model with a shovel. If the masking tape is damaged when the model is taken, repair the damaged masking tape and attach a new cover to the damaged area.
Return of material and reloading 9.1 Press the middle button to enter the main menu - Preparation - Loading filaments - Returns 9.
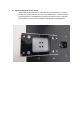
Adjust the height of sprayer nozzle Much too high or too low sprayer nozzle will affect the normal print ( if nozzle is too high, the printing material can’t stick on the bottom plate; if nozzle is too low, the nozzle will press the bottom plate and the print material can’t be extruded), please adjust 4 screws under the platform according to the following figure: