
Instruction Manual

3
2
1
4 6
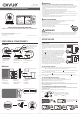
Press and hold the
Zoom/Talk Back “ ”
buon on the monitor to acvate
two-way communicaon mode.
6X DIGITAL ZOOM IN & OUT
The zoom opon enables you to get a closer and clear view on the screen. Press the Zoom/Talk Back “ ”
buon for mes to 6x zoom in the video on the screen or return to the normal size.
NIGHT VISION
The infrared LEDs and the lens are used for night vision which will light up automacally aer you turn off
the light. The image on the monitor will turn to black and white when the camera is in a low-light or dark
room.
VOLUME CONTROL
Turn up the volume to hear every lile sound from your baby (like cooing), turn down the volume to
monitor louder sounds and crying from the baby. Easily adjust to the volume level you want by
pressing VOLUME “ ” buon, and then choose LEFT “ ” or RIGHT “ ” o adjust.
BRIGHTNESS ADJUSTMENT
Screen brightness can be adjusted according to the light intensity of your room. Adjust lighter or
darker video image by using the brightness control funcon. Press the BRIGHTNESS “ ” buon at
the right of monitor, and then choose LEFT “ ” or RIGHT “ ” to adjust to the brightness you want.
SOUND LIGHT
The LED sound light bar on the top of the monitor will light up in red based on the level of the baby’s
sounds. Louder sounds will acvate more LEDs to light up.
Red LED stop flashing
SETUP & USE ( connued )
FCC INFORMATION
This device complies with part 15 of FCC Rules. Operaon is subject to
the following two condions: (1) The device may not cause harmful
interference, and (2) This device must accept any interference received,
including interference that may cause undesired operaon.
CAUTION
Changes and modificaons not expressly approved by AXVUE may void
the users authority to operate this equipment.
NOTE
This equipment has been tested and found to comply with the limits for a
Class B digital device,
Pursuant to Part 15 of the FCC Rules. These limits are designed to provide
reasonable protecon against harmful interference in a residenal
installaon. This equipment generates, uses and can radiate radio
frequency energy and, if not installed and used in accordance with the
instrucons, may cause harmful interference to radio communicaons.
However, there is no guarantee that interference will not occur in a
parcular installaon. If this equipment does cause harmful interference
to radio or television recepon, which can be determined by turning the
equipment off and on, the user is encouraged to try to correct the
interference by one or more of the following measures:
- Reorient or relocate the receiving antenna.
- Increase the separaon between the equipment and receiver.
- Connect the equipment into an outlet on a circuit different from that to
which the receiver is connected.
CAUTION
1. To comply with the FCC RF exposure compliance requirement, a
separaon distance of 20 cm must be maintained between the antenna
of this device and all persons.
2. This transmier most not be co-located or operang in conjuncon
with any other antenna or transmier.
DO NOT EXPOSE TO RAIN OR MOISTURE
CAUTION
RISK OF ELECTRIC SHOCK
DO NOT OPEN
• Make sure you read this instrucon carefully before using the product.
• Store this instrucon safely for your future reference.
• Ensure that you read the “Warning” secon of the product package and this instrucon carefully.
• Use the product properly by following this instrucon.
• Wipe the product by wet towel aer you take it down from the wall.
• Avoid possible danger by following manufacturer’s instrucon.
• Do not using the product in humid place or contact with liquid, like bathtub, hand washing sink, kitchen sink, laundry tub, humid
basement, swimming pool, etc.
• Ensure the product is installed in a flat place. Otherwise, it will cause serious personal injury and product damage when dropped.
• Only follow this instrucon and use installaon tools provided by the manufacturer to set up the product.
• The slots and holes on the product are used for venlaon, please ensure that it is not covered or blocked by other objects.
• Do not place the product on bed, sofa, rug or other similar places, it will block or cover the slots and holes on the product. Do not
place the product in a closed bookcase or shelf unless it has parcular part for venlaon.
• This product should be connected with certain power supply unit, if you are not sure about the power supply system in your home,
please contact with your product dealer and local power supply company. Please refer to the operang instrucon if you want to
operate the product in portable/baery mode or by connecng with other power supply sources.
• Power supply cords should be routed so that they are not likely to be walked on or pinched by items placed upon or against them,
paying parcular aenon to cords at plugs, convenience receptacles, and the point where they exit from the product.
• An outside antenna system should not be located in the vicinity of overhead power lines or other electrical lines or power circuits, it will
cause interference for the signal transmission. When installing an outside antenna system, extremely aenon should be paid to avoid
touching such power lines or circuits, otherwise, you will have possible danger of electrical shock.
• Do not overload wall outlet, extension cords or convenience receptacles, this can be cause a risk of fire or electrical shock.
• Do not insert any ny objects into the product’s inside, it may touch dangerous voltage point or cause short-circuit, this can be cause
a risk of fire or electrical shock. Any kind of liquid spillage happens on the product should be avoid.
• Do not maintain the product by yourself as opening and removing the covering, this may expose you to dangerous voltage or other
hazards. Please contact with qualified service personnel for maintaining.
• Unplug the product from wall outlet and contact with qualified service personnel if you have problems as below:
- When the power-supply cord or plug has been damaged.
- If liquid has been spilled, or objects have fallen into the product.
- If the product has been exposed to rain or water.
- If the product didn’t operate normally by following the operang instrucons, please only adjust those controls which are covered by
the operang instrucons. An improper adjustment of other controls may result in product damage, it will also require extensive
work from qualified service personnel to restore the product to its normal operaon mode.
- If the products has been dropped or damaged in any way, or when the product shows a disnct change in performance
- this indicated that the product need to be maintained.
• Replacement parts - When replacement parts are required, be sure the service technician has used replacement parts specified by
the manufacturer or its have the same characteriscs as the original part. Unauthorized substuons may result in fire, electrical
shock or other hazards.
• Safety Check - Upon compleon of any service or repairs to this product, ask the service technician to run safety checks on the
product to confirm that it is in a proper operang condion.
• The product only can be mounted on the wall or ceiling as recommended by the manufacturer.
• The product should be kept away from heat sources, such as radiator, heat registers, stoves or other products (including amplifier)
which can produce heat.
TO CONTROL THE CAMERA
TO DELETE A CAMERA
AXVUE INC.
Revised at 04/2021
*Any updated or revised version please refer to axvue official website.
AXVUE stands behind all of its products.
If you are not completely sasfied or have any quesons,
please contact us at hps://www.axvue.com
Red LED flashs
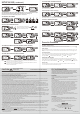
Step 5:
The SCAN, SELECT, ADD, DELETE, VIEW CAMERA opons are only available when mulple
cameras connected with the monitor. Order extra cameras by vising us at
www.axvue.com or search “Axvue Baby monitor” on Amazon.
Favorite Features
TO USE MOTION TRACKING FUNCTION
Under moon detecon mode, screen turns off automacally, it will light up and sound alarms if your baby
has any movement to be detected.
TO SET UP VOX—Video on Crying
Under VOX mode, screen turns off automacally and turns on only when a certain level of sound is
detected by camera: “3” for High Volume, “2” for Medium, “1” for Low.
TO SELECT TEMPERATURE UNIT
TO ADJUST TIME
TO VIEW ONE CAMERA WITH FULL SCREEN ( SELECT CAMERA )
Note*
:Under this mode, any changes of camera seng (eg. Talk back, Moon detecon, VOX level
seng, etc.) will only be available for Camera 1.
:Under this mode, any changes of camera seng (eg. Talk back, Moon detecon, VOX level
seng, etc.) will only be available for Camera 2.
:Visit us to order extra camera.
TO USE 2-WAY COMMUNICATION
IMPORTANT SAFETY INSTRUCTIONS
Connect with us:
732-00A2HD-0704
Press &
hold
10:24PM
10:24PM
2
1 3
4
3
2
1
4
5
6
9
7
3
7
8
UNSYNC CAM?
NO YES
3
2
1
4
5
TO VIEW TWO CAMERAS WITH SPLIT SCREEN
3
2
1
3
2
1
ON
2
1
3
VOX OFF
VOX 3
°F°C
3
2
1
4 6
5
80°F
27°C
27°C
2410: PM 12
5
8
2422: 24
7
10:24PM
7
22:24