
User's Manual


37
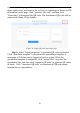
STEP 4: Select “USB”];
STEP 5: Select “File Transfer”;
STEP 6: After completion, the icon of the helmet is shown in “My
Computer” and click to view files.
Figure 33. Flow of helmet access
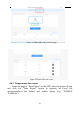
4.6.2. Generation of QR code
Connect the helmet through a wired projection and generate the QR
code following the steps below:
Step 1: Unzip the installation package KC_QRcode_V1.0.2.rar
(available at https://www.kcwearable.com ) in the root directory;
Step 2: Open the folder KC_QRcode_V1.0.2, and right-click file
“index.html" to open with Google Chrome browser;
Step 3: After opening the web page as shown in the figure below, you