7'' Netbook Contents Table of Contents................................................................................................ 2 1 Description of Parts.......................................................................................... 3 2 Power Button Usage......................................................................................... 4 3 Using a Flash Drive.......................................................................................... 5 4 Using an SD Card................
21 VIDEO PLAYER........................................................................................................21 Play Video..............................................................................................................21 22 QuickPics.................................................................................................................22 23 Contacts...................................................................................................................
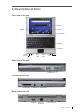
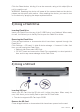
1) Description of Parts Front view of the unit: Display Speaker Speaker Power Button Keyboard Touchpad Battery charging Power On Left Click Right Click Number lock Caps lock Right view of the unit: USB Ports Left view of the unit: SD card slot Headset Port Microphone Back view of the unit: USB port Ethernet (RJ45)port Power interface USER MANUAL 3
Bottom view of the unit: reset 2) Power Button Usage Turning On : To turn on the Netbook, press and hold the power button for 2 seconds until an image appears on the screen. Release the power button and let the software load on the Netbook. Please allow at least 45 seconds for the Netbook to fully start-up. Turning Off : To turn off the Netbook, press and hold the power button for 2 seconds until a “Device options” menu pops up on the screen. The menu will prompt a couple of options.
Click the Reset button, holding it for a few seconds, using a thin object (like a pin) to reset the unit. WARNING: Resetting the device will erase all the unsaved data on the device, please use this option with caution. After resetting the device, you need to turn on the device by applying the steps explained above. 3) Using a Flash Drive Inserting Flash Drive Insert your Flash Drive into any of the 3 USB Ports of your Netbook.
Click Settings → SD card, U-disk & device storage → Unmount SD card. Press the card lightly; this will partially eject the card allowing you to pull the card out. ☆ Don’t insert and remove the SD card repeatedly in a short period of time, as this may cause damage to the SD card. ☆ We recommend using branded name memory cards to avoid incompatibility. 5) Keyboard Netbook uses 80 keys of standard keyboard template.
6) Touchpad Touchpad is a mouse device. It can be used as a regular mouse. Click buttons are located on both sides of the Touchpad. These buttons function similar to the right and left click of a regular mouse, respectively. ☆ Do not place heavy objects on the Touchpad as it may damage the Touchpad. 7) Getting Started Charge the device ☆ You cannot charge the battery using the USB cable.
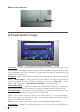
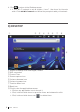
4.. Click to return to the Desktop screen. ☆ If your Wi-Fi network is set as hidden, it won’t be found by the auto scan. Click Add Wi-Fi network and follow the prompts to add your network. 8) DESKTOP ① ② ③ ④ ⑤ ⑥ ⑦ ⑧ ⑨ ① Return to Desktop from other apps / folders ② WiFi connected ③ Current Time ④ Screen capture icon ⑤ Volume decrease icon ⑥ Volume increase icon ⑦ Function Menu icon ⑧ Back icon ⑨ Click to view the applications screen ☆ Click on any application icon to launch it.
9) Screen Lock Your Netbook can be set up for automatic screen lock. You can also lock your screen by quickly pressing the power button to manually lock screen. Locked screen displays like following: Turn on or turn off silent mode Unlock the screen Drag the icon to turn on or turn off silent mode. Drag the icon up, to unlock the screen. 10) Pre-loaded Applications News& Weather Clock SlideME Market Displays weather related information and read news from website Alarm clock with scheduled alarms.
Calendar Calendar with ability to set events. Browser Access internet and surf the web. Calculator 10 USER MANUAL Perform calculation. Email Access/Send/Receive emails using your existing email accounts. My Pad File manager application for viewing and managing files and apps. Install Android apps, and to backup files to your SD card / Flash Drive. Music Player Play and manage audio files. Video Player Play and manage video files. QickPic View and manage photo files.
Wi-Fi Settings Network Settings Set-up Wi-Fi network. To enable/disable the 3G network. Facebook Access your Facebook account. You Tube Access videos from You Tube. Document To Go MSN Twitter Talk View/Edit/Save office documents. *This is a paid app Access MSN Access your Twitter account. Instant message service. Sound Recorder It can not only record sounds but also play back the saved audio contents.
IReader Electronic reader, it supports formats like txt,pdb,chm,umd. In addition, you can also use it to view pictures, whose formats can be bmp,jpg,jpeg,tif,png. Downloads You can find the downloaded application in it Ethernet setting To Set-up the network with Ethernet Gallery View and Manage photo files ☆ To move an icon to the Desktop screen, click & hold the icon, and then release it when it appears on the Desktop screen.
Desktop screen displays only 16 icons at a time. In order to add more items, long-click the left-click, and finger slide the touchpad (or use the USB keyboard to slide the screen) horizontally to expose available space, and then click Add icon. If the screen is full, the Add icon option won’t respond. Add quick launch shortcuts on the Desktop to applications, bookmarks or settings.
12) Application Management Your Netbook gives you access to exciting world of Android apps. While, some of these apps are pre-installed on your Netbook, you can download host of additional apps through built in libraries, SlideME Market or other online sources. 1 Pre-installed Apps: Your Netbook has pre-installed apps like Facebook, YouTube, Twitter etc. Just click the app you like to access, and follow onscreen directions (as applicable). 2. Install Apps: ● Access applicable apps library.
14) CLOCK Clock application icon. You can see the time and date. Click the Alarm You can use your Netbook as an alarm clock by setting multiple alarms. ☆ This clock icon displayed at the top of screens indicates that one or more alarms have been set and are active. Add Alarm 1. Click the Clock application icon. → Add alarm. 2. Click 3. Set up your alarm as desired. 4. Click Turn alarm on. 5. Click Done.
15) BROWSER Users can access the Internet through a browser. Click the browser icon on the Desktop , which will open the Web browser. Clicking the browser will take you to the Home page (www.Google.com). Type in the desired website in the address bar to view the respective website. 16) CALENDAR Click the Calendar application icon. While accessing Calendar for the first time, you need to create an Exchange account. Enter account email address and password.
17) CALCULATOR 1. Click the Calculator application icon. 2. Click the numbers and symbols (+, /, - etc) to perform calculation. 3. Click CLEAR to clear the result one by one, click and hold CLEAR to clear all. 18) EMAIL ☆ POP3 and SMTP accounts are supported. Add Email accounts You can enter one or more email addresses that you would like to access through your Netbook. 1. Click the Email application icon. 2. On the Your Accounts screen, click Next. 3.
Open Email Message 1. On the Inbox screen, click on an email to open it. 2. For attachments, click Open to launch appropriate application, or click Save to save attachment to a SD card / Flash Drive. 3. To reply, click Reply or Reply all. a. Click the Compose Mail entry field to compose an email. b. Click Send to send. c. Save as draft to save without sending or Discard to discard without saving or sending. 4. To delete the email, click Delete. Compose New Email Message 1.
Set Default Email Account You must always have one account designated as the default account, so if you have multiple email accounts, you can select any one of them as the default account. 1. Click the Email application icon. 2. On the Inbox screen, click → Account Settings. 3. Click Default Account to select it. ☆ If you delete the account that was designated as the default account, the next email listed will automatically designated as the default.
2. Click and hold the folder/file you want to copy, → click Copy. Internal Memory, → click the folder which you want 3. Click on the to paste the file in, → click Paste. ☆ You can reverse the process to copy files from internal memory and paste to external devices like (SD Card / Flash Drive). Delete files Click and hold the folder/file you want to delete, → click Delete → OK to confirm the deletion. 20) MUSIC PLAYER ☆ Audio file formats supported: MP2, MP3, WAV, AAC, WMA. Play Music 1.
21) VIDEO PLAYER ☆ Video file formats supported: MPEG1/2/4、MJPG、H263、H264. In addition to H264 which is supported by (720× 480) resolution, the other video formats are supported (1280×720) resolution. Play Video 1. Click the VIDEO PLAYER icon. 2. Select a video file from Defined Playlists to play it. 3. Click on the screen using the Touchpad or keyboard to display video controls (adjust volume, pause/play, previous/next). 4. Click Back button or to return to the VIDEO PLAYER screen.
22) QuickPic ☆ Photo file formats support: JPG, JPEG, BMP, and PNG. 1. Click the QuickPic application icon, → click on a group of photos. 2. To view individual photos, click on the desired photo. 3. Click Back button to return to the photo gallery screen. After entering a group of photos, click and hold on a picture to enter multiple selections mode. In the multiple selection mode you can delete photos.
click to share this picture by Gmail or Picasa etc. click to copy this picture to local storage or external storage click to move this picture to local storage or external storage click to delete this picture click to rotate this picture click to slect all pictures 23) CONTACTS You can create an address book of your personal contacts, including personal notes. Add New Contacts 1. Click the 2. Click Contacts icon. → New Contact. 3.
In the Contacts screen, click on the contact you want to delete, click Delete Contact. 2. Click OK to confirm the deletion. → 24) APK MANAGER Use APK MANAGER to manager applications and widgets. Stopping Applications Android does not automatically stop applications after they are loaded, so you can manually stop the applications as desired. 1. Click the APK MANAGER application icon. The list of running applications is displayed. 2. Click on an application you want to stop, → click Force stop.
5. If the Network is encrypted (password protected), enter the password in the pop-up window, and click "Connect" to start connection; 6. When internet connections are successful, the wireless connection icon in the status bar appears.
SETTINGS Wireless & networks Wi-Fi Turns on Wi-Fi. Wi-Fi Settings Set up & manage wireless access points. VPN settings Set up & manage Virtual Private Networks(VPNs) Mobile networks Set options for roaming,networks,APNs Ethernet Ethernet Corfiguration Ethernet configuration Silent mode Turn off Ethernet Configure Ethernet devices Silence all sounds except media & alarms. To adjust the Media volume, Alarm volume and Volume Notification volume. Click & slide and then click OK.
Applications Accounts & sync Unknown sources Allow installation of non-Market applications. Quick launch Set keyboard shortcuts to launch applications Manage applications Manage and remove installed applications. Running services View and control currently running services. Background data Applications can sync,send,and receive data at any Auto-sync Application sync data automatically time Click to reset the device to its factory settings, erasing all data and downloaded applications.
Date & time Set date Set the date. Select time zone Select the time zone. Set time Set the time. Use 24-hour format You can choose to use 24-hour format or 12-hour Select date format About device format. You can select the date format. View Status (Battery, Wi-Fi, etc), Battery use, Model number, Android version, Kernel version Frequently Asked Questions Android Q: What Android OS version is on my Device? A: 2.
Media Cards Q: Which media cards are compatible with my Device? A: SD cards. Music Q: What type of music files can I play on my device? A: MP2, MP3, WAV, AAC, WMA Q: How do I add music files to my device? A: Copy the music files from your computer onto a SD card or Flash Drive, and then use the My Pad application to copy the files onto the device. Or, you can download files from the web. Photos Q: What type of photo files can I view on my device? A: JPG, JPEG, BMP and PNG.
Battery Management The battery is not fully charged out of the box, so it is recommended that you charge the battery (fully) for at least 4 hours before you start to use the device. The rechargeable battery is designed and manufactured to be used and recharged frequently. As with all batteries, the capacity of the battery reduces each time it is charged/depleted. However, you can still try to prolong the battery's lifetime by following the suggestions below: ● Use your netbook at least once a week.
Appendix I : The Optional parts and models Parts name TD-SCDMA 3G Wireless Network Card WCDMA Parts type TU930,HUAWEI ET188 HUAWEI E220 HUAWEI E230 HUAWEI E160G HUAWEI E156G HUAWEI E1750 ZTE MF190 ZTE MF628 ZTE MF626 ZTE MF636 Appendix II : The list of the main key function Keys F1 F3 F5 F7 F9 F11 Fn+← (Home) Delete & Num Lock Esc Direction key (↑↓←→) Function Browser VIDEO PLAYER Calculator MyRecorder Volumn + APK Manager Back Home Delete back or front words Num Lock Esc Direction key (↑↓←→) Short cli
LIMITED WARRANTY This manufacturer's product warranty extends to the original consumer purchaser of the product. Neither the retailer nor any other company involved in the sale or promotion of this product is a co-warrantor of this manufacturer warranty. WARRANTY DURATION: All materials and workmanship are warranted to the original consumer purchaser for a period of ninety (90) days from the original purchase date. WARRANTY COVERAGE: This product is warranted against defective materials or workmanship.
FCC Warning: This device complies with Part 15 of the FCC Rules. Operation is subject to the following two conditions: (1) this device may not cause harmful interference, and (2) this device must accept any interference received, including interference that may cause undesired operation. NOTE: changes or modifications not expressly approved by the party responsible for compliance could void the user's authority to operate the equipment.