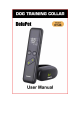
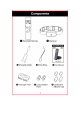
Components User Manual © Charging Cable O wrist Strap © User Manual 44 @ Test Light Tool @ Long Contact © Conductive Point Silicone Cap
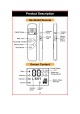
Product Description Handheld Emote Aes digital Di 2 2d Channel a Digital Display: LMH Vibration arms & Select & Level 0 Keypad A Electric. Beep Tone—4——— Lack H shock. Adjustable Vibration buttons Electric Shock Shock Boost —— \ JNA fe Nome NT a’ Screen Content Channel Display (1-4) Static Static Level Warning —] Vibration — Battery Status Sound — (Remote) Vibration Keypad Grade Lock 2
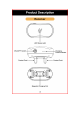
Product Description Receiver LED Status Light ON&OFF an @ ooo Charging * Power Indicator © a bi Contact Point ——s/ + Contact Point Magnetic Charging Port
Important Safety Information Not for aggressive dogs. Do not use this Product if your dog is aggressive, or if your dog is prone to aggressive behavior. Aggressive dogs can cause severe injury and even death to their owner and others. If you are unsure whether this product is appropriate for your dog, please consult your veterinarian or certified trainer. 4\ CAUTION Please read users manual carefully before using to avoid injury caused by improper use. Proper fit of the collar is important.
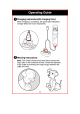
Operating Guide @ charging instructional charging time): When charging is completed, the green light will appear. Charger takes two hours respectively. 0 Wearing Instructions: Note: The Contact Points must have direct contact with Dog's skin on the underside of neck. Check the tightness of the Collar by inserting one finger snugly between the collar and neck.
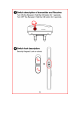
Switch description of transmitter and Receiver: Turn ON the Receiver: Hold the ON button for 1 seconds. Turn OFF the Receiver: Hold the ON button for 3 seconds. 0 Switch lock description: Security Keypad: Lock or unlock.
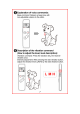
6 Explanation of voice commands: Beep command: Delivers a beep tone with non-adjustable volume to the collar. N Sm (6) Description of the vibration command (How to adjust the level, level description}: Vibration command: Press the vibration key, the receiver vibrates once. Intensity adjustment: After pressing the side vibration button, adjust the vibration level by the side vibration bunion.
Instructions for the electric shock order {How to adjust the level, level instructions): Static button: Delivers currently selected level Static stimulation to the collar. Static + button: That is 10% higher than the currently selected level. Static Intensity adjustment: After press the static button, adjust the static level level by Electric Shock G2 Shock Boost 0 Channel switching instructions: Channel switching: It is possible to train 4 dogs at the same time.
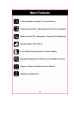
Main Features 3 Training Modes (Vibration, Tone and Shock ). Three-speed vibration adjustable and 0-99 shock adjustable, Receiver Collar IP Waterproof, Remote IP Waterproof. Remote Range 1000-1600 Ft. Bl 2-Hour Rapid Charging Lithium Polymer Battery. ¢) Big Digital Display Shows Intensity Level, Battery and Dog. pe £2 Support 4 Receiver Collars with One Remote. | 5 Magnetic Charging Port.
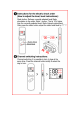
Use of the Test Light Tool A : Electric shock test 1. Make sure the Remote and Receiver Collar on. 2. Hold the Test Light tool contacts to the Contact Points. 3. Press a Static button on the Remote Transmitter. The Test Light will be lighted. B: As a tool to tighten or loosen the contact points For dog with shorter coats, use PCs shorter contact points. For dog with thicker coats, use PCs longer contact points. Install the conductive Silicone onto the contact point to make it softer.
Pairing Instructions {Note: You can skip this step as the device is factory-paired.) Match the remote to the receiver: 1. Make sure the receiver is turned off. 2. Press and hold the receiver switch for 5 seconds until the green light flashes quickly. 3. Press the remote control pairing button to pair the receiver. 4. Pairing is successful: The receiver will beep and the green light will flash. FRY Press and hold 5 Secs Press any key to pair Nome {Note: If you are only using one receiver, skip this step.
Training Tips 1. Reward your dog with food / treats will usually help to achieve the best training result. 2. Do not use the device on dogs aged below 6-month, old, pregnant, easily frightened, aggressive, in heat, and in inferior health conditions. 3. Use verbal commands first, and supplement with a corrective stimulus only as needed. Be consistent with your verbal commands, use the same words every time. Work with your pet on one behavior at a time to avoid confusion and frustration. 4.
Question & Answer How to change the longer prongs for this collar? 1 don’t think they are getting through my Labs thick hair. Answer: Just part the hair or trim it a bit. | have a dog with very thick neck of hair. | parted it with my hands . Just be sure remote is off then start on low setting and work your way up. If no response repeat steps of working prongs thru hair remember to turn off or lock remote.
» Please check if the battery is low in either the Remote Transmitter or Receiver Collar. ZN 80s LMH ME « Test the Receiver with the Test Light to confirm if shock functions normally. « Increase the correction level. Refer to “Find the Best Stimulation Level For Your dog”.
» Make sure the Receiver Collar's Contact Points are placed snugly against your pet's skin. 2. Fail to match receiver with remote Ensure the receiver is connected to a power source (charging mode can only be activated while charging). Must hold the channel switch for more than 5 seconds, if not, matching will fail. If the problem persists after attempting as above, please contact us to confirm whether the receiver and the remote are of the same version.
Operating Environment & Maintenance Do not use the product in the circumstances as follow: 1. Do not operate the devices under temperature of 104°F and above, doing so in such high temperature will decrease the performance of the batteries. 2. Do not use the set in places with strong electromagnetic interference. This will greatly compromise the performance of the product. 3. Avoid dropping the devices on hard surface or inflict excessive force on them. 4.
Regarding you and the product 1. It is strictly prohibited to open the receiver in any situation. Doing so will likely compromise the waterproof function and thus voiding the product warranty, 2. Please use the remote control and the receiver from the complete set. Do not use other product to match with the receiver. 3. If you want to test the product, please use professional testing apparatus. Do not test with hands, so as to avoid accidental injury. 4.
Terms of Use & Limitation of Liability 1. Use of this product means you accept all the terms and conditions. 2. This product is a professional dog training device. You are not recommended to use this product if your dog is clever and less than 15 Ibs in weight. If you're not sure whether the product is suitable for your pet dog, please consult a professional handler ar contact us. 3. This product is a professional dog training device and should not be used for other purposes.
FCC Statement This device complies with part 15 of the FCC Rules. Operation is subject to the following two conditions: (1) This device may not cause harmful interference (2) This device must accept any interference received, including interference that may cause undesired operation. Warning: Changes or modifications not expressly approved, by the party responsible for compliance could void the user's authority to operate the equipment.
Product Specification Model ST-66 Receivers Casing IP waterproof Remote’s Casing IP waterproof Rg Battery 300mAh dbeiiteied Full Charger 2hr Remote/Receiver Remote 45 days Standby Time Receiver 35 days Signal Range Distance | 1600FT Maximum supported 4 receivers quantity 21
Warranty and repair information 1-Year Warranty The original purchaser for this unit is provided with 1-YEAR WARRANTY. The warranty begins from the date of purchase. For the first year, coverage is for both Parts and Labor on warranty repair services, but the return postage is for the buyer's account. Accessories such as chargers, straps, and batteries are covered for the first year only. When the warranty expires, customers will need parts and repairs at their own expense.