
User's Manual


Title:
AJ102 Data Concentrator Unit User Manual
Ver.
1.4
Page:
20 of 23
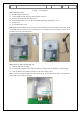
Step 7: Power on inspection
After right connection of power wires, turn on the power. Inspect LED status according to chapter 4.10.
1) “PWR” LED should be on.
2) “WCSQ” LED should be on, or at least blink.
3) “Res.” LED should not be always on.
4) “RF” LED should not be always on.
5) “ALARM” LED should not be on.
If “WCSQ” LED is off, it means 3G signal quality is very low, please try to adjust the position the 3G
external antenna. If “WCSQ” is still off, there will be no connection the 3G.
If “ALARM” LED is on, it means there is some failures on DCU. Please contact the expert or replace to
install a new DCU.
If the 3G parameter (APN, user, and password etc.) and HES parameter (server IP, port no etc.) is
configured before the installation, the DCU will try to dial 3G and connect to the HES. After successfully
connect to HES, the “WLNK” LED will be on or blink.
Note: before power on DCU, please make sure 3G module is tightly connected to the DCU box.
Step 8: Configure the communication parameters (This step is needed only if DCU is not rightly configured
before installation)
Use configuration software to configure the right 3G communication parameters (APN, user name,
password etc.), and HES communication parameters (server IP, port no etc.). Use configuration software to
send a reboot command to reboot DCU. After reboot is finished, DCU tries to connect to HES. After
successfully connect to HES, the “WLNK” LED will be on or blink.
Note: It is strongly proposed to configure the DCU communication parameters before installation of DCU.
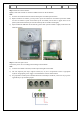
Step 9: Install the terminal cover
1) Install the terminal cover tightly
2) Fix the terminal screws
3) Seal the terminal cover screws.
The installation of DCU is finished.
Note : The detail installation guide in the box refers to “Meter and Meter Box Installation
Specification.pdf”.