
User's Manual


6
OPERATION
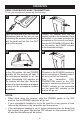
Insert the large end of the cord into the
Microphone jack on the unit you are
connecting this wireless microphone to
and the small end into the Line OUT
jack on the receiver.
1
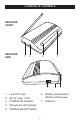
Connect the headset plug into the
Headset jack
1 on the transmitter. Place
the headset on your head and adjust the
microphone so it is in front of your mouth.
Slide the OFF/STANDBY/ON switch
2 to
the ON position; the POWER indicator
on the transmitter will light.
1
2
2
Slide the Receiver’s POWER switch
to the ON position; the red POWER
indicator on the receiver will light. If
the microphone headset is on, the
green Microphone ON indicator on
the receiver will also light. Raise the
antenna for best reception and speak
or sing into the microphone headset
as desired.
3
Slide the transmitter OFF/STANDBY/
ON switch to the STANDBY position to
put the microphone in Standby mode (it
will be on, but will not transmit).
Slide the transmitter OFF/
STANDBY/ON switch to the OFF
position to turn the microphone off; the
POWER indicator on the transmitter
and the green MIC indicator on the
receiver will go out.
4
USING YOUR MICROPHONE (TRANSMITTING)
To use your microphone, please see the following:
NOTES:
• When done using the receiver, slide the POWER switch to the OFF
position; the red POWER indicator will go out.
•
If your microphone headset is not to be used for a long period of time,
remove the batteries in the transmitter and the receiver
.
•
If the microphone headset is out of range (microphone too far away from
the receiver) the green Microphone ON indicator on the receiver will turn
of
f and the microphone will be muted.