
User's Manual


5
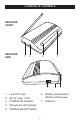
INSTALLATION
REPLACING THE BATTERIES
If the sound quality starts to become poor or the receiving distance has shortened,
replace the batteries in the transmitter and the receiver as follows:
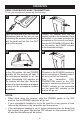
INSTALLING THE BATTERY INTO THE TRANSMITTER
Remove the battery cover at the bottom of the transmitter by sliding it
downward and slightly remove the battery cover. Insert one 9V battery,
making sure to observe the correct polarity (+/–). Replace battery cover.
1
INSTALLING THE BATTERIES INTO THE RECEIVER
Remove the battery cover by sliding
it off. To prevent the possibility of
1 2
+
-
BATTERY PRECAUTIONS
Follow these precautions when using batteries in this device:
1. Use only the size and type of batteries specified.
2. Be sure to follow the correct polarity when installing the batteries as indicated in the battery
compartment(s). Reversed batteries may cause damage to the device.
3. If the device is not to be used for a long period of time, remove the batteries to prevent damage
or injury from possible battery leakage.
4. Do not try to recharge batteries not intended to be recharged; they can overheat and rupture.
(Follow battery manufacturer’s directions.)
losing the cover, it cannot be
removed.
Insert a 9V size battery (not
included) to the connector inside the
battery compartment. Slide the
To use the receiver with AC power, connect the AC adapter (included)
battery cover back into place.
DC JACK
to an AC outlet having AC 120V, 60Hz only. Plug the small end into the DC 9V jack
on the side of the unit and connect the other end into the AC outlet.
The batteries will be disconnected when the AC adapter is connected.