Lt lm ee Parts of the design of this product may be protected by worldwide patents Information in the manual is subject to change without notice and does not represent g commitment on the part of the vendor. GS-Technologies shall not be liable for any loss or damage whatsoever arising from the use of Information or any strop contained In this manual.
PLEASE SEAL BEFORE GEEING APPLIANCE HAR CRETAN WARNING AND SAFETY INSTRUCTIONS! AA ® ES coo it RTE Sosa aio SCE Bede vertiginous mii esd SCS RSE RRR Bi ET ATH BASE 0d A a LIMN INS, Rnd BARE RH RR BARING 05s ROE SAE HONE HR SHEW, SER SH SA SRA AEC EBT 0 BR ENS BAR ves FORESEES SLR Doh RAGA PR SAE HE KANA FSS D0 AY EON A IEE NRA HS FSA SAO EHF eli SER SER RE Se SAO HI BUR BS FREY BSR AROSE DARE i CR ER RIE SEA dra AAR PAE HERE 5 0 he Sen Nad ro NR ARR LR TI ERO BR Han Are tho WS Re Re BAO HOURI REE A RO 0 BET
PART RUDE GHA BEL PARA, BERG DE FORENOON COINAGE Di HET RUG TIGER VOR HERTZSPRUNG DES GREATS LESSEN.
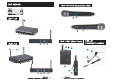
Base receiver antennas Power ON & LED indicator Channel ON LED indicator Volume Rotary Dial Control AF OUT DC INPUT Channel Selector Microphone MUTE & ON/OFF switch Battery cavity Power on / Battery Low dual mode LED Belt Pack MUTE & ON/OFF switch Screw in 1/8" 3.5mm) TRS (Jack) Belt clip Padded head rest Snap-off Cavalier Microphone PRERCROOECEOOHLED Congratulations on your purchasing a Gemini wireless system. This system includes the latest features and is backed by a one year limited warranty.
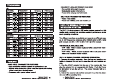
Frequencies us: CHANNEL FREQUENCY CH {cont)| FREQ (cont) cH1 WHEN 68235 MHz (chs AEEE| ESE MHz CHz if |683.25 MHz chino MASHER] 690.75 MHz cH3 WHEW e385 MHz {chit MEAN] e915 MHz cHa HPA |e84.85 MHz schizo AWAY 6925 MHz cis HEME |e85.75 MHz {chis AACHEN 8936 MHz ce WAM (eee mHz |cHi4a AHEM] 694.85 MHz CHr WARE e875 MHz [cries MARE] 8957 mhz cHe WARM |ees7s MHz (chs MARA sor MHz EUROPE: CHANNEL FREQUENCY CH {cont)| FREQ {cont) ci WHEN 8541 MHz cH BURN 8802 MHz CHz HEEL (88575 Me (chic AREA 861.
4. Insert the 1/4” cable into the jack labeled AF QUT (8) on the rear of the receiver and connect the other end of the cable to your amp, effects or mixer jack. 5. Set the channel selector pins (7) on both the transmitter and receiver to the desired frequency as indicated on the included Frequency Chart. 8. Adjust the volume using the level control (4) on the front panel. Note: Effective range between the transmitter and receiver is up fo 250 feet.
ies into the battery cavity {8} according to the polarity indication marked on the battery housing. Close the battery cavity. 2. Set the channel selector pins (7) on both the transmitter and receiver to the desired frequency as indicated on the included Frequency Chart. 3. Push the power switch {11} to the ON position. The BAT indicator should flash once briefly as you turn on the mic indicating that the mic has sufficient power.