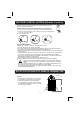
,03257$17 6$)(7< ,16758&7,216 Before using the unit, be sure to read all operating instructions carefully. Please note that these are general precautions and may not pertain to your unit For example, this unit may not have the capability to be connected to an outdoor antenna. 1. Read these instructions All the safety and operating instructions should be read before the product is operated. 2. Keep these instructions The sately and operating instructions should be retained for future reference.
32:(5 6285&( Connect the small plug from the supplied AC/DC Adaptor to DC IN Jack on the rear of unit. Connect the AC/DC Adaptor to a wall outlet having AC 100-240V~, 50/60Hz. NOTE: This AC/DC Adaptor is intended to be correctly orientated in a vertical or floor mount position.
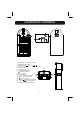
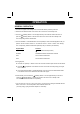
/2&$7,21 2) &21752/6 6 ANT AUX IN 2 POWER ON OFF DC DC IN 12V,2A R L AUX IN 1 1 ANT AUX IN 2 2 POWER ON OFF DC DC IN 12V,2A R L AUX IN 1 3 1. Remote SensorIJOn the front of unitij 2. POWER ON/OFF Switch 3. DC IN Jack (DC 12V, 2A, ) 4. AUX IN 2 Jacks 5. AUX IN 1 Jack 6. FM Wire Antenna 7. STANDBY / FM Indicator 8. (Bluetooth) Indicator 7 9. AUX 1 Indicator 16 10. AUX 2 Indicator 13 11. VOL - (Volume Down) Button 11 12. VOL + (Volume Up) Button 13. (Standby) Button 14.
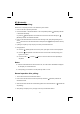
/2&$7,21 2) &21752/6 5HPRWH &RQWURO LED ON/OFF 1 2 3 4 FM AUX 1 6 AUX 2 5 7 11 8 RESET TUNE- TUNE+ 9 VOL - VOL + 12 10 1. 2. 3. 4. 5. 6. 7. 8. 9. 10. 11. 12.
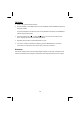
%$77(5< ,167$//$7,21 5HPRWH &RQWURO During first time use, slide the insulation film out from the battery tray and discard it as illustrated to the right: When the battery is consumed, replace the battery as shown below: 1. Push the tap on the battery tray and slide it out as the illustrated below: 2. Install a new CR 2025 button cell to the battery tray as the polarity makings on the rear of remote cabinet. 3. Close the battery tray. Fig.1 Fig.3 Fig.
23(5$7,21 *(1(5$/ 23(5$7,21 &RQQHFW WKH VXSSOLHG $& '& $GDSWRU WR WKH XQLW DQG ZDOO RXWOHW DV SUHYLRXVO\ LQVWUXFWHG 6OLGH WKH 3RZHU 21 2)) 6ZLWFK RQ WKH UHDU RI XQLW WR WXUQ WKH XQLW RQ WR VWDQGE\ PRGH 3UHVV WKH SUHVV WKH 6WDQGE\ %XWWRQ RQ WKH XQLW DSSUR[LPDWHO\ VHFRQGV WKHQ UHOHDVH WKH EXWWRQ RU 6WDQGE\ %XWWRQ RQ WKH 5HPRWH &RQWURO WR WXUQ WKH XQLW 21 IURP VWDQGE\ PRGH 7KH FRUUHVSRQGLQJ LQGLFDWRU ZLOO LOOXPLQDWH 3UHVV WKH 6285&( /(' 21 2)) %XWWRQ RQ WKH UHSHDWHGO\ WR VZLWFK WR GHVLU
%7 %OXHWRRWK %7 %OXHWRRWK SDLULQJ )LUVW WLPH XVH RU UH SDLULQJ WKH XQLW WR D QHZ %7 'HYLFH SDLU DV IROORZV 3RZHU RQ WKH XQLW DV SUHYLRXVO\ LQVWUXFWHG 3UHVV WKH 6285&( ± /(' 21 2)) %XWWRQ RQ WKH XQLW UHSHDWHGO\ XQWLO WKH %OXHWRRWK ,QGLFDWRU is illuminated and blinking. 2U SUHVV WKH %OXHWRRWK %XWWRQ RQ WKH 5HPRWH &RQWURO WR HQWHU %7 PRGH GLUHFWO\ WKH %OXHWRRWK ,QGLFDWRU ZLOO LOOXPLQDWH DQG EOLQN 3RZHU RQ WKH H[WHUQDO %7 'HYLFH DQG HQWHU WR %7 VHDUFKLQJ PRGH 6WDUW SDLULQJ IROORZLQJ WKH R
)0 5DGLR 3RZHU RQ WKH XQLW DV SUHYLRXVO\ LQVWUXFWHG 3UHVV WKH 6285&( ± /(' 21 2)) %XWWRQ RQ WKH XQLW UHSHDWHGO\ XQWLO WKH 67$1'%< )0 ,QGLFDWRU LV illuminated and blink. 2U SUHVV WKH )0 %XWWRQ RQ WKH 5HPRWH &RQWURO WR HQWHU )0 5DGLR PRGH GLUHFWO\ WKH 67$1'%< )0 ,QGLFDWRU ZLOO LOOXPLQDWH DQG EOLQN 3UHVV DQG KROG WKH 781( RU 781( %XWWRQV RQ WKH XQLW RU 5HPRWH &RQWURO WR DXWR VHDUFK DQG SOD\V WKH SUHYLRXV QH[W DYDLODEOH UDGLR VWDWLRQV 5HSHDW WKH VDPH SURFHGXUH XQWLO WKH GHVLUHG
$8; 1. Insert one of the plugs from supplied Audio connection cable (with 3.5mm stereo mini plugs) to the Phones Jack; Line Out Jack or AUX Out Jack on external audio device such as iPhones; iPad; iPod; MP3 Player; Discman … etc as shown below. 2. Power on the unit as previously instructed. 3. Press the SOURCE – LED ON/OFF Button on the unit repeatedly until the AUX 1 Indicator is illuminated and blinking.
7528%/(6+227,1* *8,'( Check the follows before requesting service: SYMPTOM POSSIBLE CAUSE No power AC/DC Adaptor had not POSSIBLE SOULTION Connect the AC/DC Adaptor to connect to wall outlet and unit the wall outlet and unit POWER Switch is in OFF position Slide the POWER ON/OFF Switch on the rear of unit to ON position The unit in standby mode Press and hold the (Standby) Button on the unit approximately 2 seconds then release the button or Press (Standby) Button on the the Remote Control to turn
*(1(5$/ 63(&,),&$7,216 Power Source: ………………………………DC 12V, 2A, Centre Positive Power Source of Remote Control: ….DC 3V, 1 x CR 2025 Button Cell (Included) Power Consumption: ………………………………………………………….. Max. 24 W Radio FM Band Coverage: …………………………………………….…. 87.5-108MHz BT Effective Range: ...................................…………......... Up to 32 Feet in open area Remote Control Effective Range: ……………………………Up to 12 Feet in open area Audio Power: ……………………………………………………………..
LIMITED WARRANTY