SAFETY INSTRUCTIONS 1.Read these instructions. 2.Keep these instructions. 3.Heed all warnings. 4.Follow all instructions. 5.Do not use this apparatus near water. 6.Clean only with a slightly damp cloth. 7.Do not block any ventilation openings. 8.Install in accordance with the manufacturer’s instructions. 9.Do not install or operate near any heat sources such heat. 10.Unplug this apparatus during lightning storms or when unused for long periods of time. 11.
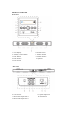
PRODUCT OVERVIEW Front View 1. LCD Display 2. Standby / Source Button 3. Tune- Button 4. Tune+ Button 5. AUX IN Jack 6. Remote Sensor 7. Volume+ Button 8. Volume- Button 9. Speakers Rear View 10. DC IN Jack 11. RCA Audio Input Jacks 2 12. RCA Audio Input Jacks 1 13. Optical Input Jack 14.
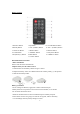
Remote Control 1.SOURCE Button 2.Standby Button 3. FM SCAN Button 4. TUNE-Button 5.M+(Memory+) Button 6.EQ Button 7. VOL-(Volume-) Button 8. BASS- Button 9. TREBLE- Button 10.Mute Button 11. TUNE+ Button 12. CLOCK/MO/ST Button 13. VOL+ (Volume+) Button 14. BASS+ Button 15. Play/Pause Button 16. TREBLE+ Button BATTERY INSTALLATION - Before installation Remove and discard the insulation tab. -Replace battery for the remote control 1. Push and slide out the battery holder as Figure 1 below. 2.
POWER CONTROL - To turn the unit on · Connect the supplied AC/DC adapter. · Press STANDBY button to turn on the unit. - To turn the unit off · Press STANDBY button on the remote control or hold STANDBY button in the front of the unit. NOTE: If the unit is not used for a long period of time, disconnect the power adapter. TIME SETTING 1. Place the unit to standby mode. 2. Hold CLOCK/MO/ST button on the remote control until the hour digit flashes. 3.
AUX IN - AUX IN source may include: ·Personal audio players ·Personal computers or laptops - AUX IN connection: 1. Connect a stereo 3.5mm jack cable (supplied) between the headphone or LINE/Audio output of the personal audio player and the AUX IN jack on the front of the unit. 2. Power on the unit and press SOURCE button repeatedly until "AUX 1" appears on the display. Set your personal audio player/computer to play.
RCA AUX IN - RCA AUX IN sources may include ·TV/DVD/VCR - RCA AUX IN connection 1. Connect the RCA audio cable (supplied) to the audio output jack on DVD player and AUX IN 1 or AUX IN 2 jack on the rear of the unit. 2. Press SOURCE button repeatedly until "AUX 1" or "AUX 2" appears on the display. NOTE: Before RCA AUX IN 1 connection, make sure the AUX IN cable is not inserted into the AUX IN jack on the front of the unit. - During playback ·Press MUTE button to turn off the sound.
BLUETOOTH - Paring: 1.Press SOURCE button repeatedly until "BT" appears on the display. 2. Turn off the Bluetooth functionality of other devices that are paired with your unit. 3. Turn on Bluetooth functionality on your Bluetooth device. Typically, Bluetooth controls are found on the device’s tools or settings menu (see your user manual).Turn on Bluetooth connectivity and make your device “discoverable”. 4. Clean out the paring list on your Bluetooth device. 5.
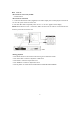
OPTICAL IN - Connecting 1. Press SOURCE button repeatedly until "OPTI" appears on the display. 2. Follow the figure below to make the connections. - During playback ·Press MUTE button to turn off the sound. Press again to resume the sound. ·Press VOLUME+/- buttons to adjust the volume level. ·Press BASS+/- buttons to adjust bass level. ·Press TREBLE+/-buttons to adjust treble level. ·Press EQ button to switch between POP/JAZZ/CLASSIC/ROCK/NORMAL.
SPECIFICATIONS Power source of the remote control................................................ DC 3V, 1x CR 2025 button cell Output of the power adapter....................................................................................... .DC 16V 1.8A Audio output........................................................................................................................ 10W x 2 Power consumption..................................................................................................
FCC Statement: This equipment has been tested and found to comply with the limits for a Class B digital device, pursuant to Part 15 of the FCC Rules. These limits are designed to provide reasonable protection against harmful interference in a residential installation. This equipment generates, uses and can radiate radio frequency energy and, if not installed and used in accordance with the instructions, may cause harmful interference to radio communications.