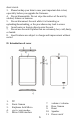
MODEL: RT-1708 USER MANUAL Preface Thank you for buying this MID. Please read and retain all the operating instructions before operating the unit. I. Note 1. Avoid the unit being dropped. Avoid the display been shaken seriously, or the display will be damaged unusually. 2.
short circuit. 3. Please backup your data in case your important data is lost, especially before you upgrade the firmware. 4. Do not disassemble. Do not wipe the surface of the unit by alcohol, thinner or benzene. 5. Do not disconnect the unit while it is formatting or uploading/downloading, or the procedures may lead to errors. 6. Avoid water or foreign objects enter the unit. 7. Do not use the unit in places that are extremely hot, cold, dusty, or humid. 8.
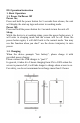
III. Operation Instruction 1. Basic Operation 1.1. Power On/Power Off Power On; Press and hold the power button for 5 seconds then release; the unit will display the start-up logo and enters in working mode. Power Off; Press and hold the power button for 3 seconds to turn the unit off. Sleep; While the device is at working status, press the power button once, it will enter in sleeping mode and the screen will be off. Press the power button again; it will shift back to the normal mode.
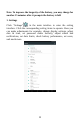
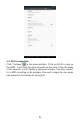
Note: To improve the longevity of the battery, you may charge for another 15 minutes after it prompts the battery is full. 1. Settings Click “Settings” in the main interface to enter the setting interface. Click the corresponding setting items to operate. Here you can make adjustments for example; change display settings, adjust date & time, set password under Security, adjust sound and notifications, set data limits, check battery performance, set users, and much more.
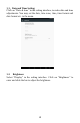
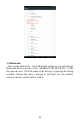
1.1.Date and Time Setting Click on “Date & time” in the setting interface, to make date and time adjustments. You may set the date, time zone, time, time format and date format etc. in the menu. 1.2. Brightness Select “Display” in the setting interface. Click on “Brightness” to enter and slide the bar to adjust the brightness.
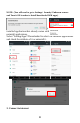
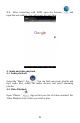
1.3. Wi-Fi connection Click “Settings” in the main interface. Click on Wi-Fi to turn on the WIFI, it will lists the open networks in that area. Click the name of the network; it will display a password window. You may connect it to WIFI according to the prompts. You need to input the user name and password if networks are encrypted.
1.4 Bluetooth: Turn on the Bluetooth,Click Bluetooth setting to set and manage Bluetooth Devices access. Click “SEARCH FOR DEVICES”, it lists the open devices. Click the name of the devices; it pops up the setting window. Choose the device, pairing it, and then you can transfer pictures, movies, music and etc with it.
2. Install & Uninstall and Run applications; 2.1 Install There are many ways to download and install applications under Android. You can download APK apps from other alternate App Market places other than Google Play Store. In order to install your downloaded apps you will need to open the file and install it. Select the APK file you want Install then Click “Install” application will install automatically. After installation is complete, it prompts “Open” and “Finish”. Click “Open” to open the application.
NOTE: (You will need to go to Settings> Security>Unknown sources and Turn it ON in order to Install downloaded APK apps). 2.2 Uninstall You may use a third party Uninstall app management tool or the installed application that already comes with your device, to install or uninstall applications. Select “Setting/Apps”/Downloaded to select the installed applications and check the attribute of it or uninstall it. 3.
3.1. After connecting with WIFI, open the browser input the web address, you can browse the web then. and 4. Audio and video playback 4.1. Audio playback Select the “Music” App . You can find your music playlist and mp3 audio files, search for media devices, and select streaming playlist. 4.2. Video Playback Open “Photos ” App to find your list of videos recorded. For Video Playback select video you want to play.
5. Picture viewing Select “Gallery” App . You will find a list of all your picture files stored in your internal storage drive, also your picture files from your external drive (SD). Select the picture file name and it will display. 6. Camera Open “Camera App” in the App’s menu. 6.1 Camera Click to take picture. 6.2 Video Click to record video.
7. Connect with external device 7.1. Connect Micro USB to Computer PC Connect your Android tablet to a PC computer with a micro USB cable. It will automatically recognize it as an MTP (Media Transfer Protocol) device. Auto play windows come up. Your PC will show two disk drives after connected successfully. One is the (SD) card, and the other is the built-in flash. 8. Explorer App Connect a Micro SD card chip to android tablet SD card slot. It will auto detect.
9. Applications For convenient usage, we installed some third party App software. For detailed App operation methods, please check with the Developer’s website for details or app instruction. Some of the Apps software may require Wi-Fi access. 10.
11. Add Google Account Select “Accounts” in the setting interface, then add your accounts according to the steps.
IV. Troubleshooting 1. What if the device is abnormal during operation? Answer: 1) Reboot the device to see if it works OK. 2) Charge the device by the charger to activate the battery. Make sure it has power before you operate it. 3) It is suggested to upgrade the OS of the device by professional. 2. Why the standby time is so short sometimes? Answer: the use time of the battery is all depending on the temperature and use distance.
E-book Wireless network Language OTG Temperature Power supply Battery Support Support WIFI Multi-language Support -20°C to 60°C AC 100~240V 50/60 Hz; DC 5V/1.5A poly-lithium battery 3500MAH MEANING OF THE DUSTBIN SYMBOL Protect our environment: do not dispose of electrical equipment in your domestic waste. Please return any electrical equipment that you will no longer use to the collection points provided for their disposal.
FCC Statement This equipment has been tested and found to comply with the limits for a Class B digital device, pursuant to Part 15 of the FCC Rules. These limits are designed to provide reasonable protection against harmful interference in a residential installation. This equipment generates uses and can radiate radio frequency energy and, if not installed and used in accordance with the instructions, may cause harmful interference to radio communications.