
User's Manual

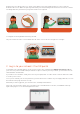

Scan QRKeys with each headset
On each of your ClassVR headsets, open the Scanner app by looking at the icon of a QR code and making the
‘pinch’ gesture with your hand in front of the device.
Once the Scanner app launches, simply look at the Wi-Fi QRkey until you hear a beep. This will add the Wi-Fi
connection to your headset.
If your school uses a proxy server that is not transparent, you will also need to generate a proxy QRKey; in this case,
please get in touch with our support team.
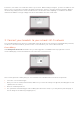
Scan your school’s enrolment QRKey
Your headsets may already be enrolled when you receive them. You can check this by going to http://portal.classvr.
com, clicking the Deliver tab at the top of the page, and looking at the Devices pane; the headsets should be listed
here. If you do not see all the devices you would expect, you may need to enrol them in your school’s organisation.
You can find the enrolment QRKey in the Admin section of the ClassVR portal, under the name of your school:
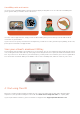
4: Start using ClassVR
Now you’re ready to begin using the headsets in your classroom. Simply visit the Plan tab to drag and drop
experiences, then get started using the Deliver tab. Visit www.classvr.com/portal-video for a quick guide.
If you require further assistance, get in touch with our support team: support@avantiseducation.com