USER MANUAL Upgraded 7”Standard Car Stereo Important ! Test before Installation
Customer service: We have done our best to deliver a high-quality product and we’ll continue doing so, doing so, recommend does not to install the product yourself. We recommend having it professionally installed by a certified professional. If you decide to install the unit by yourself please do read the user manual carefully and follow the installation steps.
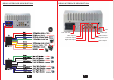
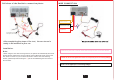
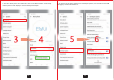
REAR INTERFACE DESCRIPTION REAR INTERFACE DESCRIPTION USB CVBS input Fuse 10A~15A Video output 1 Radio antenna Left audio output Reversing video input Right audio output Video output 2 3
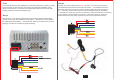
Test Step2 A quick simple test before the installation is to confirm that the device is working normally and as expected. In case there is a wrong step in the subsequent installation, which causes it to fail to work. If you perform a successful test but the unit did not work after installing it please recheck the installation steps. Test rear view camera: Holding the Step 1 connection.
Full show of the Realistic connection photo: WIRE CONNECTION ① Yellow wire connect to the positive of car power ② Black wire connect to the GND (Ground wire B-) of the car power. ③ Connect together ed r ① ② Connect together and connected to the negative pole of the battery - ④ Black Red wire connect to the ④ d re ⑤ + Connect together and connected to the positive pole of the battery - ⑥ ⑤ + d Re d Re ③ ACC(lgnition Switch) black ( Installation: Note: 1.
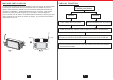
MACHINE INSTALLATION CARPLAY FUNCTION The size of this car stereo is universal, suitable for most cars, and can be easily installed by following the steps below. But if you find that the unit is not suitable for your car, please consider these four methods. You may need three aftermarket accessories to complete your installation: · Double DIN dash kit for (your car model). · Wire harness (Connects car wiring to stereo wiring) for (your car model). · Antenna adapter for (your car model).
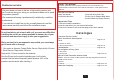
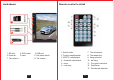
+BDL TIPXT 3FNPUF DPOUSPM JO EFUBJM 1. SD card. 2. AUX socket. 4. Power on. 5. reset. 7. The volume +. 10 3. USB port. 6. The power switch. 8. The volume -. 1. Switch button 2. Function transformation 3.
— 4.Mirror Link for IPhone — 4.Mirror Link for Android Note: Note: If your phone is Iphone X or above the phone link function won't work. 1.Only when the display mode of the phone is on” landscape”, then the display of the car stereo can be displayed in full screen. 2. Bluetooth must be connected, then the audio on the mobile phone can be synchronized to the car stereo. 3. When the phone screen is turned off, the display of the car stereo will also be turned off at the same time.
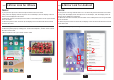
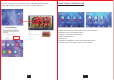
2. Find the "About phone" and click Enter. Click on the "Build number" continuously until the phone screen displays "You are already a developer". 14 3. Go back to the "System" interface, find "Developer options", and click Go to find "USB debugging" and turn this feature on.
4.Connect the phone and the car stereo with the USB cable, and the dialog box "Allow USB debugging" will pop up on the phone. Click the "OK" button. FUNCTIONAL DESCRIPTION 2 3 4 5 6 1.RADIO: Touch to enter the radio mode to listen to the radio station. 2.Bluetooth: Touch to enter Bluetooth mode. 3.Settings: Touch to enter system settings. 4.USB is a USB flash drive 5.SD card slot 6.Phonelink: Compatible for the IOS system and Android system 7.AUX IN: Plug in the AUX hole on the front of the machine.
#VJMU JO $BSQMBZ Other features: 1. Double screen interactive 2. USB connection 3.
This device complies with part 15 of the FCC Rules. Operation is subject to the following two conditions: (1) this device may not cause harmful interference, and (2) this device must accept any interference received, including interference that may cause undesired operation. Any changes or modifications not expressly approved by the party responsible for compliance could void the user's authority to operate the equipment.