
User's Manual

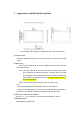


2.5 HDMI
Mini HDMI video output interface;
2.6 TF-CARD
TF-CARD slot: external expansion via the T-FLASH(Micro SD) memory card;
2.7 Micro USB
Micro USB interface: to connect to the computer for data transfer or external link to
the USB flash disk;
3 First usage
3.1 Battery management and charge
Before the first use of the device, please set the battery is fully charged:
Charging by plug the charger into the DC port of device;
It is recommended to keep 6 hours at least in the first two charging, and keep 4
hours after it.
Note: This device adopts built-in polymer battery, and it is must to use original
charger for charging. The product provides DC charging . it is recommended to use the
formal charger with high quality to do it, or it will cause the irreparable damage to the
device.
The battery icon will scroll on the screen during charging.
The battery will turn green and stop to scroll on the screen when the charging is
completed.
In order to extend the life of this device, it is recommended to run out all of the
power in the first two usages and then charging.
Note:
In order to avoid damage caused by the excessive consumption of the battery in a
long time without using, be sure to charge and discharge completely to prevent the
battery run out within a month.
The device will show the battery is low and charged when start charging after
low-power shutdown, and then it will enter the main interface automatically when
charging enough before waiting some time.
In order to achieve the normal charging time, the charging need to be in the
standby state that the screen is full dark. As to the consumption of the device and the
screen themselves, it will take a long time than usual under normal using.
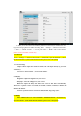
3.2 Connect to PC