T Series Tablet PC User’s Guide Dear User: Thanks for purchasing this T series Tablet PC. This product bases on Android platform, Support WiFi network accessing. Built-in HD camera. Support 1080P video playing and perfect 3D display capacity. It will bring you brand new user experience. This Manual introduces the functions, operation tips and precautions. Please read this guide carefully before using.
Contents T Series Tablet PC User’s Guide................................................................................................1 1 Precautions .......................................................................................................................3 2 Appearance and Button Descriptions ...............................................................................5 3 First usage ......................................................................................................
1 Precautions This Manual contains important security measures and the correct use of the product information. To avoid the accidents, please be sure to read this manual carefully before using it. ●Avoid using this device in the environment with extreme temperature, high humidity, dust, and avoid putting it in the car when the windows are closed in hot summer. ●Avoid knocking at or impacting this device, especially the violent shaking of the display screen, or it will be damaged and can not work as usual.
changes or modifications not expressly approved by the party responsible for compliance could void the user's authority to operate the equipment. NOTE: This equipment has been tested and found to comply with the limits for a Class B digital device, pursuant to Part 15 of the FCC Rules. These limits are designed to provide reasonable protection against harmful interference in a residential installation.
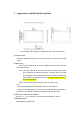
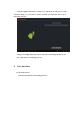
2 Appearance and Button Descriptions Note:Graphics and real if there are differences, refer to the actual product 2.1 Touch screen Capacitive multi point touch screen: click, drag and other operations in the touch region; 2.2 Power key Power on: Press and hold the Power key to display the boot screen to enter the main menu interface.
2.5 HDMI Mini HDMI video output interface; 2.6 TF-CARD TF-CARD slot: external expansion via the T-FLASH(Micro SD) memory card; 2.7 Micro USB Micro USB interface: to connect to the computer for data transfer or external link to the USB flash disk; 3 First usage 3.
Using the supplied USB cable to connect a PC and the device will pop us a USB connection dialog, you can choose to load to transmit your important data or let it charged by select not. Going to the loading model, then you can copy, delete and manage the files on your device and memory card through your PC. 4 User interface 4.
The operation in the main interface: Manage the software icon: it will be changed larger by pressing and hold the icon for about 3 seconds, and you can drag it to any location. Delete the software icon: Press and hold the icon for about 3 seconds, and drag it to the Recycle bin till it is changed to red color, then release touch on the screen. 4.2 Status bar Return key, click on it to go back in any interface.
Home key: click on it to go to the main interface. Daemon key: click on it to see the running programs in the background. Note: It has the same features and functions by click the Return key, Home key, Daemon key in the right of the Tablet PC as clicking the status bar. Volume key: click on it to adjust the volume.
2. When you use the external 3G module by USB to access Internet, it will show the "3G" logo after setting right the 3G module to surfing. Enter “Settings” -> “Wireless and network” -> “more” -> “Mobile network” -> “Access point name” -> Build a name on the Internet. (Please use the 3G module available list) 5.2 Bluetooth Enter “Settings” -> “Wireless and network” -> “Bluetooth”, Open the Bluetooth , connect the Bluetooth devices. (If the model has this function, please refer to the option) 5.
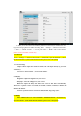
5.6 Screenshot setting Check “Show the screenshot button in the statusbar”, There may be a screenshot below the status bar icon, you can easily. (If the model has this function, please refer to the option) 5.7 Storage You can find the usage space and capacity of the internal storage, internal space and the external SD card. 5. 8Applications Applications management How to remove the unwanted software: 1.
third-party applications downloaded are fit in this device to install. 5.9 Language&input Setting the region (include the language and region), text input and auto-correction options. Select area: 54 languages are provided to select. Keyboard& input methods setting. 5.10 Backup and Reset You can restore the factory settings 5.
Setting date: go to the date settings to set the right date Setting region: go to the region settings to set the right region Setting time: go to the time settings to set the right time Setting Format: select the different formats to show the date and time 5.12 Accessibility You can set to“Auto-rotate screen” (If the model has this function, please refer to the option) 5.13 Developer options Can set to “USB debugging” and “Allow mock locations” 5.
To understand the product “Model number” “Android version” “Kernel version” “Build number” Click “System updates” 6 You can upgrade the system firmware. Internet 6.1 Internet surfing After connecting to the network, open the web browser and enter the web address to browse the web directly; or enter the web address in the search bar on the desktop to open the web. 6.
8 Video playing Click “Video” in the main menu to enter the interface, in which all the video files and picture files are listed. Select a video file to enter the video playing interface, as shown below. You can select “Play”, “Stop”, “Vol+”, “Vol-”, “FF”, “FR”, and “Progress bar” to control the playing. 9 Picture browsing Click “Gallery” in the main menu to enter the interface, in which all the video files and picture files are listed.
most applications can be obtained from the network and copied to the flash or SD card. Click on the .apk file in the files manager, then pops up the .apk installation interface to install the APK. Installation: Click on the .apk file in the files manager, then pops up the .apk installation interface to install . After the operation completed, you can go back to the main menu to find the corresponding software. 12 FAQ ◆ Why the PC can’t be started? 1. Check whether the battery has been used up 2.