
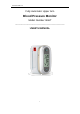
User's Manual


Version Number: 1.0
9
5. Measurement Procedure
Note: You should always be seated and calm before and during measurement.
5.1. Before measurement:
• Avoid eating and smoking as well as all forms of exertion directly before measurement.
These factors influence the measurement result. Find time to relax by sitting in an armchair in
a quiet atmosphere for about ten minutes before taking a measurement.
• Remove any garment that fits closely to your upper arm.
• Always measure on the same arm (normally left).
• Always compare measurements taken at the same time of day, since blood pressure
changes during the course of the day, as much as 20-40 mmHg.
5.2. Common sources of error:
Note: Comparable blood pressure measurements always require the same conditions!
•Conditions should always be quiet.
•All efforts by the user to support the arm can increase blood pressure. Make sure you are in a
comfortable, relaxed position and do not flex any of the muscles in the measurement arm
during the measurement. Use a cushion for support if necessary.
• If the arm artery lies considerably lower or higher than the heart, an erroneously high or low
blood pressure will be measured! Each 25-30cm difference in height between your heart and
the cuff results in a measurement error of 10 mmHg!
Note: Only use approved cuffs!
• A loose cuff or a sideways protruding air pocket causes false measurement values.
• With repeated measurements, blood accumulates in the arm, which can lead to false results.
Consecutive blood pressure measurements should be repeated after a 1 minute pause or after
your arm has been held up in order to allow the accumulated blood to flow away. If you decide
to take your Averaging Mode measurement again, be sure to wait at least one minute
beforehand.
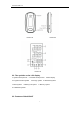
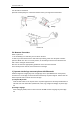
5.3. Fitting the Cuff
Please refer to picture-06
a) The cuff is pre-formed for easier use. Remove tight or bulky clothing from your upper arm.
b) Wrap the cuff around your upper left arm. The rubber tube should be on the inside of your
arm extending downward to your hand. Make certain the cuff lies approximately 1/2” to 3/4” (1
to 2 cm) above the elbow. Important! The red mark
on the edge of the cuff (Artery Mark) must
lie over the artery which runs down the inner side of the arm.
c) To secure the cuff, wrap it around your arm and press the hook and loop closure together.
d) There should be little free space between your arm and the cuff. You should be able to fit 2
fingers between your arm and the cuff. Cuffs that don’t fit properly result in false measurement
values. Measure your arm circumference if you are not sure of proper fit.
e) Lay your arm on a table (palm upward) so the cuff is at the same height as your heart. Make