
Readme Guide

Using the camcorder
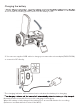
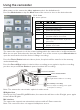
After power on the camcorder, video capture mode is the default mode.
Press the Mode button or tap the Mode icon of the screen to choose the desired mode.
Slide down
for more options
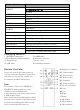
M
ODE DESCRIPTION
Video Normal recording mode
Slowly Slow motion shooting
Loop Recording infinite loop
Lapse Fast action shooting
Photo Take a single photo normally
Auto Automatically cycle take photos after a
specified number of seconds
Burst Take a specified number of photos in
succession
Timer Take a single photo after a specified
number of seconds
PlayBack Play the video or photo
The camcorder supports to do the related settings while the camcorder is in diferent models.
After choose your desired mode, then tap “Menu” icon of the screen or press Menu button to
open the menu and select the desired settings according.
Press the Photo Shutter button to take a photo, the photo will be saved in to the memory
card automatically.
Press the Record/Stop button to start a video recording, press again to stop the recording;
you also can press Photo Shutter to pause/continue the recording.
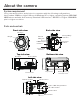
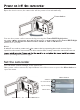
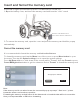
Zoom in/out button
Busy indicator
The light flashes while in recording.
Record/Stop recording
Press to start recording, press again
to stop the recording.
Photo shutter button
Note: The camcorder can not take a photo in video mode.
IR Night vision
Short press the Power/IR light/OK button, the camcorder will turn on the IR night, press again
to turn o the IR lights.
Mic interface
The camcorder supports an external microphone with a 3.5mm connector.
Note: This connector does not support headphone access.